Do you recognize the tablet-woven band? Yes, it’s done!
Yesterday I took the Singer for a first spin. Had already spent some time making sure it was pristine-clean and oiled well. While it wasn’t dusty a bit, it sure was thirsty, and a little more oil went on to help get the bobbin winder humming.
Knowing by experience that antique and early vintage Singers are good at handling thick or dense fabrics, I expected no less from this machine, and wasn’t disappointed. The tablet-woven band wasn’t the issue, as you can poke a needle through the twisted and woven threads easily. It was the manufactured guitar strap, which is two thickish layers. As I hoped, the machine didn’t blink or hesitate as I cranked it. Oh, it makes a pretty seam. Just as precise as the Wilcox and Gibbs, which by the way you can see on video below, too, and many times in blog posts.
I’ve demonstrated the foray into sewing on the Singer 28. You can hear its version of purring - relative to a motor, anyhow, it’s pretty quiet, but not as quiet as the Wilcox and Gibbs, which is nearly silent.
Listen to the Wilcox and Gibbs here, for a comparison.
Where were we? It's been a little while since I worked on this project. Oh yes, we're cutting the pattern to petticoat length and finally constructing the thing. The project has turned into yet another test of period materials and methods to see how they work. Nonetheless, if the petticoat works, it will give my cotton skirt the regulation -- to use the popular term of the time -- flare.
This time we're cutting and seaming, but the seams are not normal ones...
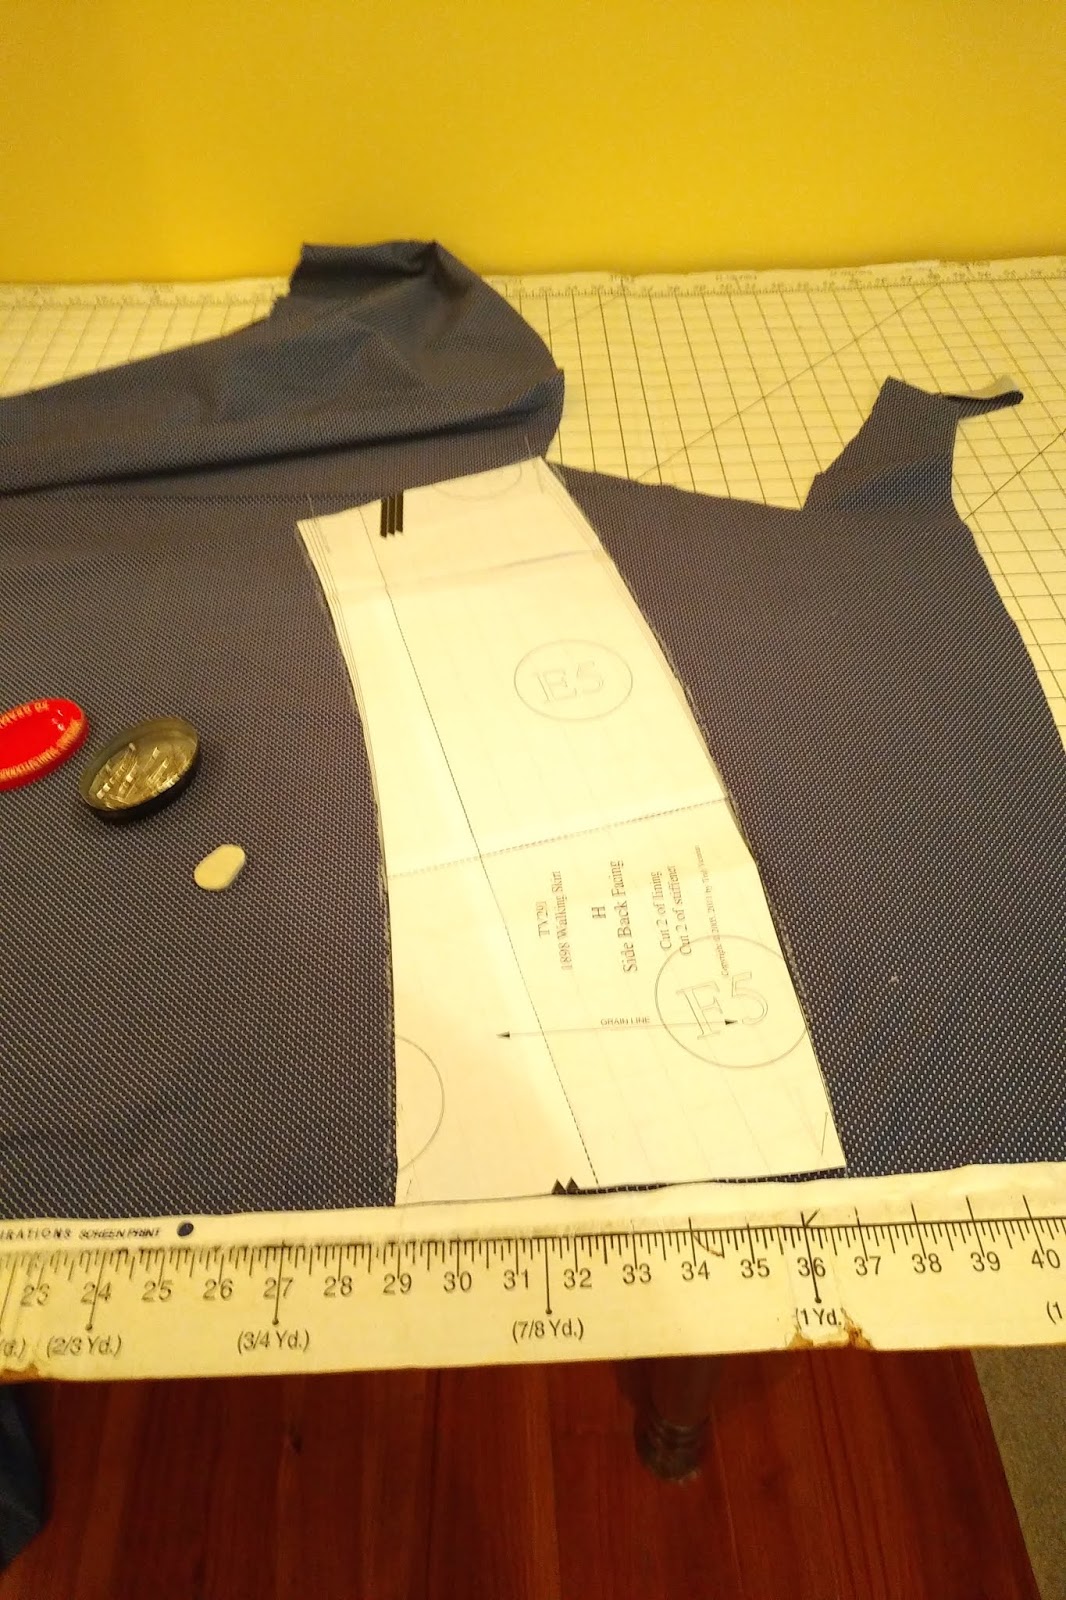
Cutting the Pattern to Petticoat Length
Petticoats are usually a little shorter than outer skirts. Therefore, I subtracted 1 1/2" inches (6.35cm) off the pattern, which is 40 inches/100cm in front. That works out to 38" long when finished, but leaving a 1/2" seam allowance in place. That allowance will be needed to seam the bottom facing and a hem binding to. Hem binding on a petticoat that doesn't touch the ground? What an oddity, but that's what's suggested.
So I copied the pattern pieces onto fresh paper (oh joy), and cut off the bottoms. This way, I have the original skirt pattern plus the petticoat pattern to go with it.
The next, rather obvious step was to cut out the fabric pieces.
I used silk shantung from some old silk curtains I made years ago.
The old curtains were rolled up. I used an entire panel, about 4.5 yards. First I had to deconstruct the entire panel, removing the lining (bonus fabric!) and the plastic curtain facing stuff at the top. Forget what it's called. Fortunately, only bits of the silk were weak or shattered, so I could use most of the fabric. Oh, and yes, our hallway library doubles as a free-weight lifting station. Pandemic creative space use :}
The silk fabric has body and resistance to wrinkles, although probably not to the degree that moreen has. The latter fabric was a favorite among dressmaking writers for silk petticoats (Davis, Mallon), as we have read. As it happened, the two larger pieces were cut on the bias, but not on the perfect bias and another was pieced, because I placed them puzzle-wise to conserve fabric.The bottom of the petticoat is to be faced, hence the 1/2 inch (1.27cm) seam allowance.
The side seams were cut with a 1/4 inch (.635cm) seam allowance. Note: I would have used all metric measures and forgone inches and feet, but the presser foot and markings on the treadle sewing machine are in inches, and they are wonderfully natural sewing guides.
The top of the petticoat has a 1/2-inch seam allowance, but the plan is to cut a yoke for the petticoat, so the extra is just in case I change my mind :}
Stayed...and Bound...Seams
Next, all the skirt pieces were seamed together, but watch out! The seams are emphatically not normal ones. Because just about every seam is on the bias and thus at the fabric's weakest position, we have to sew in a fabric stay on each one so that the fabric doesn't stretch at the seam and cause ripples and puckers and a poor skirt hang. Sophie Klug writes in the 1895 book The Art of Dressmaking, "Where two bias edges are to be joined in one seam, a stay tape or strip of lining must be basted at one side and sewed in with the seam to prevent stretching." (p. 35)
I was going to use bias tape for the job, but big thanks to Quinn of The Quintessential Clothes Pen for pointing out that using bias tape would have been bias over bias and therefore not much of a help. I looked back at documentation on an 1890s skirt in my collection, and sure enough, there's a straight-grain stay there. Why I'd forgotten such an interesting detail, haven't a clue.
Not only would the strip be a seam stay, but it would also bind the seam allowance for a neat, durable finish. Petticoats normally have nicely finished seams because they get so much wear. Twofer!
Making the Stay/Binding
So, I cut 1" strips of thin cotton (from the old muslin curtain lining fabric -- why waste it?) on the straight as long as each skirt seam.
Then I ran the strips through a 1" bias tape maker widget (the Clover brand version; there are others).
It's pretty easy to use. First, you start feeding the fabric strip into the channel.
Help the fabric through the channel by sticking a pin into the fabric and pulling...
...and pull at the tip to pull the fabric right out the end.
Voila! You have bias tape, or straight tape, in my case.
You will want to make sure the fabric strip is out of the way of the little wire handle.
After you start pulling the fabric through, go to your ironing board, pin a bit of the finished tape to the board, and heat your iron to steam heat level. Then slowly pull the gadget, feeding the fabric into it, and pressing the resulting tape immediately.
I found that the fabric wanted to go in wonky sometimes, so the pulling process was slow. Other times the steam from the iron was so hot that I just pushed the bias tape maker along in front of it, like so:
Sewing the Seams
To create a seam, the two skirt pieces that were to be seamed were laid, right sides together, ready to sew. On top, I laid the prepared cotton binding with its pressed edge at the fashion fabric edge and and the rest of it open and ready to fold over the top of the completed seam to bind it. All three layers were carefully pinned together, trying to lift, handle, and tug the fabric as little as possible. Every tug can stretch the bias-cut fabric.
Each seam was sewn from skirt top to bottom in case the ends should get a bit out of alignment.
Immediately after sewing a seam, I folded over the prepared binding to wrap the seam allowance in it, turned in the already prepared fold so no raw edges would be showing, and sewed it down on the covered seam allowance to finish the seam.
Readers, I started sewing the seams with the Singer 28k handcrank machine. The 28k came out during the 1880s, so this was a logical choice. However, we all know silk can be no fun to sew by machine, and the long and slippery skirt pieces were determined to be naughty, and I only had my left hand to guide the fabric, because the right hand was cranking the machine! Here's a sample, videoed by my son, Christopher.
I even tested the antique Singer binder attachment. It worked; the attachments nearly always do -- alas that I don't have a video, because it's interesting! -- but again, trying to do all this with a hand crank on silk was annoying and error-prone. The process became so unfun that I chucked that idea, removed the first seam, and hand-sewed them all. The main seam I made in running stitch with a back stitch every five stitches or so, 6-8 stitches per inch. Then the binding was of course hemmed. I enjoy hand-sewing, so it was a relaxed effort.
Here I have pinned the two skirt pieces right sides together, and have pinned the stay/binding to the edge. I am running-stitch the seam with a backstitch every few stitches. Generally I pile up three or four running stitches on the needle, then pull the needle through, then take a back stitch. It becomes a steady, rhythmic pattern of movement.
Here is an example of a completed seam. The sewing thread blends in so well that it's practically invisible to the camera this afternoon.
The hand-sewing makes sense within the context of undergarments of the day. Hand-sewn underthings were desirable as being particularly dainty.
I wasn't the only one relaxing. Nutmeg settled in, too. Here we have evidence that some kitties will sleep on just about anything. For some unaccountable reason, she found my sewing box to be a good pillow.
Interested...
(Yes, I made sure she wasn't into anything sharp.)
Getting nappish...
Oh boy, time to go to sleeeeep...
It's January. A good time for napping. Wishing you safety and many naps this month!
Next steps with the petticoat? Facing the bottom and inserting the surprise stiffening. Yep, a mid-winter surprise for you.
Oh brother, I was supposed to be working on the 1760s stays. Yet here I've packed those naughty, annoying things away, in favor of Belle Epoque swishy skirts.
I don't know why: blame it on the summer air. Blame it on the days and days of rain that grow wild daisies in profusion like those in our arboretum,
Daisies alongside along a path in the Kentucky Arboretum.
but that produced monochrome scenes while we were visiting family at Wrightsville Beach for vacation. The boys swam in waves roughly the color of the sky, and the color was not blue.
Cousin Thomas and Christopher boogie boarding at the beach.
Blame it on remembering energetic days at Heart Lake, blackberrying and swimming, and looking at black and white photos taken the previous -- 19th -- century, when a small hotel stood next to what became our family's barn-red cottage.
Families and with children in fat hair bows and fluffy white frocks stayed there, the deep woods to their back and the inviting water in front. Ladies wearing shirtwaists with puffed sleeves and sturdy boots tied up a rowboat or canoe at the stone dock, and more than a few people drank soda pop out of glass bottles, pushing the metal lids into the bottles, drinking the contents, and then tossing the bottles into the shallows. We used to wade, feeling with our feet, and once in a blue moon they touched hard roundish surfaces instead of mud or stones, and we would pull up a bottle whole. Sometimes people swam.
I'd look and look at the pictures, still kept there at the lake, imagining my wild-haired, mosquito-bitten self in shorts and tee shirt, swishing in a pretty skirt, purposefully taking a brisk walk or canoe paddle.
Remembering the Sense and Sensibility Beatrix shirtwaist pattern, and that pattern cover with the three young women rowing in still water, and stroking water lilies as they passed, like we used to do, I thought, why not? It's summer! Let's swish in a skirt and try on immense puffed sleeves and dream of rowing under a blue sky with a handful of fluffy clouds.
The cover from my copy of the Sense and Sensibility Beatrix shirtwaist pattern
Even if it's so humid that my hair turns to a living barometer or the air is dripping with the remains of another rain, like it's doing right now -- I can hear it outside the window on the sill of which Nutmeg kitty sits, ears twitching as she listens to raindrops patter on the porch roof.
A moody Nutmeg kitty watches the rain from a room dim with the cloudy day.
But I want immense sleeves, and a skirt with a ridiculous diameter. I already have a circa 1895 shirtwaist, cobbled from that Beatrix shirtwaist pattern, and a leg of mutton sleeve from Period Costume for Stage and Screen 1800-1930. It just needs and ironing and a tie, and check, a sensible summer top for rambling -- or thinking of rambling, anyway.
Hmmm: cotton skirt with a Truly Victorian 291E walking skirt pattern, and we have the swishy part of the rambling outfit. All I need is my old grubby paddock boots with the button-like press closures.
But want if I want a bodice to go with the skirt that's a little more afternoon tea-ish? I can use the Sense and Sensibility shirtwaist pattern again, but enlarge the puff sleeves pattern option to more ambitious proportions, and make it of the skirt fabric, with some voile gathered and tacked to the front for ambiance and neck bow tacked to the back for kicks. That should be fun!
Let's top it with my old 1790s silk-covered brimmed hat. It's 1890s size, and just needs some loops of ribbon, stiffened so they roll and make a gargantuan bow for the back, and some stash feathers sticking up at odd 1890s what-were-they-thinking angles. And the American Duchess Tavistock boots...
The outfit would then rather look like this one, that I found on Pinterest some time ago, and to which I lost the reference. My apologies...
Starting the Outfit
What with all the clouds, and the twins busy with cousins and bouncing around and summertime reading, there was time to play and whip right through the skirt.
I purchased Truly Victoria's epattern, and spent a few hours of a non-beach rainy afternoon on vacation taping the pieces together from printer paper and preparing the pattern. The epattern saves on shipping and paper. I hope that TV puts more patterns in their downloadable line.
A Push To Re-Use What I've Got and Reduce Fabric Use
Lot of "use" sounds in the above, yes?
Against better judgement, I purchased inexpensive new navy quilting cotton with white pin dots for skirt and bodice.
This was in direct contradiction to my recent decision to lower my hobby's carbon and environmental footprint by not buying new fabric.
I have been using stash fabric, vintage fabric, vintage and antique notions, and employing old sheets and such for years out of preference -- just like so many of us do -- but wanted to close up the gaps.
And discovered that late Victorian patterns eat fabric for breakfast, turning it into vast expanses of skirt and sleeve.
Only had I found used complete king size used sheets in any pattern would there have been enough fabric for skirt and bodice. And I would have driven all over Wilmington NC looking for it.
Do I make the costume as I want it? Change the specs to what's available used? Factor in gas for travel in choosing new fabric? Make a costume that can be used several ways over time to minimize fabric use?
I tried to balance these factors, and am not sure I chose well, but environmental impact is now part of the costume project equation, as it should be. It's smart and responsible to do so -- and being thrifty is just like our forebears usually were, only for somewhat different and more existential reasons now.
Let's sing a paean to Truly Victorian, shall we? I've used quite a number of their patterns now, have made them as designed and have played with them to create my own designs, and They. Always. Work. They're well cut, the sizing makes sense, the directions usually are concise and clear, and the site's forum, on which I've lurked, a Godsend. I love them very much. Thank you, Heather McNaughton for the No-Fail, No-Nonsense pattern line. You made putting together that skirt just plain fun, even if my Singer 28k hand crank sewing machine (bought in the 2000s) made my right arm tired with all of those long skirt seams. Ooof.
Turn, turn, turn that handle.
The hand crank is actually pretty fast, once you get the hang of turning the crank with your right hand and guiding the fabric with your left. One of my favorite features is that you can go stitch by stitch to ease through existing seams, around steep curves, or what have you. There's no motor to endanger by going so slowly, and there's no electricity used, just your own energy. Gee, a good reason to fuel up with a muffin, eh?
Here I am running a seam using it: one twin managed the camera.
The talking is choppy. It seems I cannot speak and sew at the same time.
Here are all the pieces laid out in front of the windows that tell us we did have a few rays of sunshine once in a while.
The spinning wheel has been quiet for a while, interrupted by the sewing adventure.
The skirt has a front, side front, side back, and back, and a generous hem facing. It's meant to be made with medium-weight fabrics, and with stiffener in the hem. 1890s skirts tended to have stiff hems to stand out nicely. Have a look at the photo of the young lady further up in this post.
Here is that hem facing, before I cut it out. See how wide it is? By the 1890s, fabric was cheaper than labor, and people splurged on their hem treatments.
Yes, that's a wide hem facing.
We will see if the lack of a stiffener affects my skirt too much. I didn't want a hot and heavy skirt. The fabric is fairly loosely woven, and what body it has is thanks to masses of factory-applied sizing, I think. I will starch it so much that it stands up on its own and walks away.
I used French seams throughout. The fabric frays easily, and I didn't want to have to hand-finish each seam, and a French seam is stronger.
There are no other construction photos -- the pattern directions were clear, and there's not really much to tell about a plain skirt. Little scope for imagination, shall we say, nod, wink?
Here we are, the skirt, untrimmed and lacking its facing, but otherwise complete. Look at the diameter of the hem, will you? Holy cats!
I do have an original petticoat from what is likely the 1890s, given its shape. It's complete with massive flounce. It has no train like early Edwardian petticoats, and is too full, I think, for circa 1910-11, when the fluffy skirt revived briefly. It may have been made from an earlier broderie anglaise petticoat. It's good and strong and it fits, so I will carefully wash it and see how it does. Pictures in another post.
If we don't get enough poof and floof, I may add a flounce with a ruffle to the interior of the skirt.
As for trim, well, two rows of white bias tape will do nicely. Maybe I will get to that this weekend. Mid-1890s skirts were usually, mercifully plain. I am getting to like this rather bold but clean-lined era.
Part of the fun of sewing period- or vintage-style clothing is making up the pieces using vintage sewing treadle machines. At least it is for me.
I find antique machines pretty to look at. My boxy, modern Bernina with its single bland pink and blue decal is a visual yawn compared to my Warwick, with its romantic hand-painted tendrils and mother-of-pearl decor on the bed, or to the elegant classicism of the legs, or "irons" that support the Willcox and Gibbs.
That's just a start, though. Most antique treadles were designed to take on a wide variety of materials, some of them very heavy and dense. They power through heavy-duty tasks that will wear out a motor on an electric machine. They won't whine if you want to go one-slow-stitch-at-a-time-in-a-really-delicate-spot.
Granted that this is not a vintage sewing example, but I am proud to write that when I constructed floor length silk curtains recently, the Willcox managed sewing through four layers of silk and cotton lining, all together, and topped off by sticky, heavy commercial curtain header tape, without an issue. I turned to it after the Bernina refused to operate on such a heavy load. Silly me. Should have started with a treadle.
Then too, a vintage machine will produce vintage effects. My handcrank Singer 28k is a whiz at setting up gathers in heavy materials...it was built to do it. The Willcox (mine dates to 1911) will produce stitches so fine you can barely see them. A chainstitch machine, it was popular for making underclothing, among other things. As one contemporary guide explained, the stitches have more stretch and give than do lockstitches. You can produce simple chain stitch embroidery with it too, or sew on soutache braid just as such braid was originally meant to be attached. The "tuckmarker" produces perfectly aligned tucks of all sizes.
There are many of us out there who love these machines, who conserve them and rescue them from being broken up for lampstands or other uses. Some of us collect them, others of us collect and use them, too. Most all of us feel that we are custodians of an important part of sewing history.
Where To Learn More
If you have the least bit of interest in learning more, try these sites.
TreadleOn, "headquarters for a group of almost a thousand people who collect and sew with
antique sewing machines". See http://www.treadleon.net/. This is a truly amazing group of folks from all over the world.
The NeedleBar, "A reference site for collectors of antique and vintage sewing machines". See http://www.needlebar.com/
ISMACS. "The International Sewing Machine Collectors Society caters to those interested in collecting and learning about full size and toy sewing machines". See http://www.ismacs.net/
Photos of the vintage machines in my possession, at http://community.webshots.com/user/inkspot106. My collection is very small. There are many sites across the Web belonging to folks who have collected and conserved dozens and dozens of machines.