Tuesday, August 27, 2019

1895 Outfit: Sproing! A Bouncy, Bouffant Wire Sleeve Plumper


You can clearly see how full the right sleeve with the plumper inside it is,
while the left sleeve is deflated. Oh, and the hair! Yes, those are natural curls. I've let it do its thing for the nonce.


Here's a first view of a wire sleeve plumper I made, set within the 1895 shirtwaist. It works a treat. It's just a prototype. Next I am going to try a version made with stash zip ties. The lighter version will win and I will make the second plumper to match.


I found the design for the prototype on the Augusta Auctions, as part of a previous lot of bustles and crinolines. It's a nice design, using a relatively small amount of wire and plumping both the top and the side of the sleeve at once. It was straightforward to copy, as you will see further on in this post.


First, however, let's talk about another option for sleeve plumping that I didn't take.

The Ladies Home Journal and puffed sleeves


I've been reading a number of 1890s magazines lately. You already know about Illustrierte Frauenzeitung, and of course there's Harper's Bazar, but the one I've found most useful for comparing changes in both fashion and clothing construction over the 1890s is Ladies Home Journal. It's a real treat of a magazine. Including in its target subscribers women of moderate income, the journal offered fiction by well-known American writers of the day, such as Frank R. Stockton (anyone remember the phrase "the lady or the tiger"? It's from a story of his), and articles by luminaries such as William Dean Howells. If you recall reading The Rise of Silas Lapham in high school or college, that's the author.

Ladies Home Journal subjects covered included fashion -- including what to wear to a desk job -- and housekeeping, but also histories of women, editors' responses to women's suffrage, temperance, moral living, and the like. I find quite a number of articles still relevant today, although popular attitudes towards some subjects have changed radically. In one blood-curdling article, the writer suggests that pet cats, if they could not accompany owners to summering places, or cared for by neighbors, be chloroformed -- that is, put down. I gagged.

Whee-oo, let's move on from that nauseating thought, and back to sleeve plumpers. LHJ (let's shorten the title for convenience, shall we?) discussed sleeves in every issue, in the monthly column describing model gowns (their common term for a dress), of course, but also in related articles about springtime sewing or keeping cool in the summer. Sleeves came up in puffy article-like advertisements, too, for products like Fibre Chamois, an cheap-to-make, sold-for-much-more interlining material that was embroiled in at least one lawsuit, according to records turned up on Google.

Right now I won't give you an article-by-article account of the rise of the interlining in sleeves, which is reflected in LHJ articles towards the middle of the decade, but simply say that in 1894 Mrs. Mallon, the usual author of the monthly fashion column, was suggesting lining sleeves with nothing more than lawn. By January 1895, however, in "Gowns for Occasional Use" Emma M. Hooper was recommending that sleeves be constructed with interlining. Here's the text in question: "Sleeves are very large, being one-piece leg-of-mutton style that need three yards of twenty-inch to cut two of the correct size. Interline them from the elbow to the top with book muslin or very thin crinoline...". And the orginal text in situ in the page:

Ladies Home Journal, "Gowns for Occasional Use". January 1895, p.22

Here's a sample of the look Mrs. Hooper was talking about, from an Ivory Soap ad on page 2 of the June 1895 issue. The young lady, standing on what's probably a stage, may be declaiming or getting ready to sing.

Illustration from an Ivory Soap advertisement,
June 1895 issue of Ladies Home Journal.


Here's a bit of one of the articles, shilling the Fibre Chamois product. The "article" is in the far right column of the issue, which is usually taken up by ads. I read somewhere that people objected to what are known in the trade as puff articles -- how apt in this case! --, and LHJ apparently backed off on using them. Advertising is still pulling those kinds of antics.

"Dressmaking Made Easy" puff article touting Fibre Chamois interlining,
in June 1895 Ladies Home Journal, p. 22.

We may be queasy at a magazine so baldly promoting a product, but the how-to instructions certainly are interesting.

I did not want to interline summer sleeves (n.b. I haven't differentiated here between bodices and shirtwaists.) Whatever the interlining I choose, it would mean adding another layer to the sleeves, plus a lining, and, yuck, that was just not to be thought of, given how I wilt in heat. Knowing that a cage option was out there, it was the obvious direction to go.


How I made this prototype plumper


First, here are two pictures from Augusta Auctions, showing the plumper and its construction close up. Please examine them closely. Note that one of the wires seems to be closed with a homemade closure constructed of a cotton or linen tape sewn together. Take note also of how the plumper is placed on the shoulder of the model.


To make my own plumper, I decided to use a springy wire. It's unclear whether or not the original's wire is springy or not. However, I own some original crinoline wire from a decayed crinoline and it is very, very springy. The closest I could get to it locally was compound wire, -- that is, wire made up of multiple strands. It springs back into place quite nicely. Here it is in my hand so you can get a grip on its diameter.


Then I constructed the framework. To make the hoops that feature two loops in one -- the top one to puff the sleeve, the lower one to hold the fabric tape that holds the plumper pieces together, I used a long piece of wire, made part of it into a circle and used the remainder to make an arc above part of the circle. Here below is the first circle.


In this next blurry image, the arc being put atop the first circle, and taped into place.


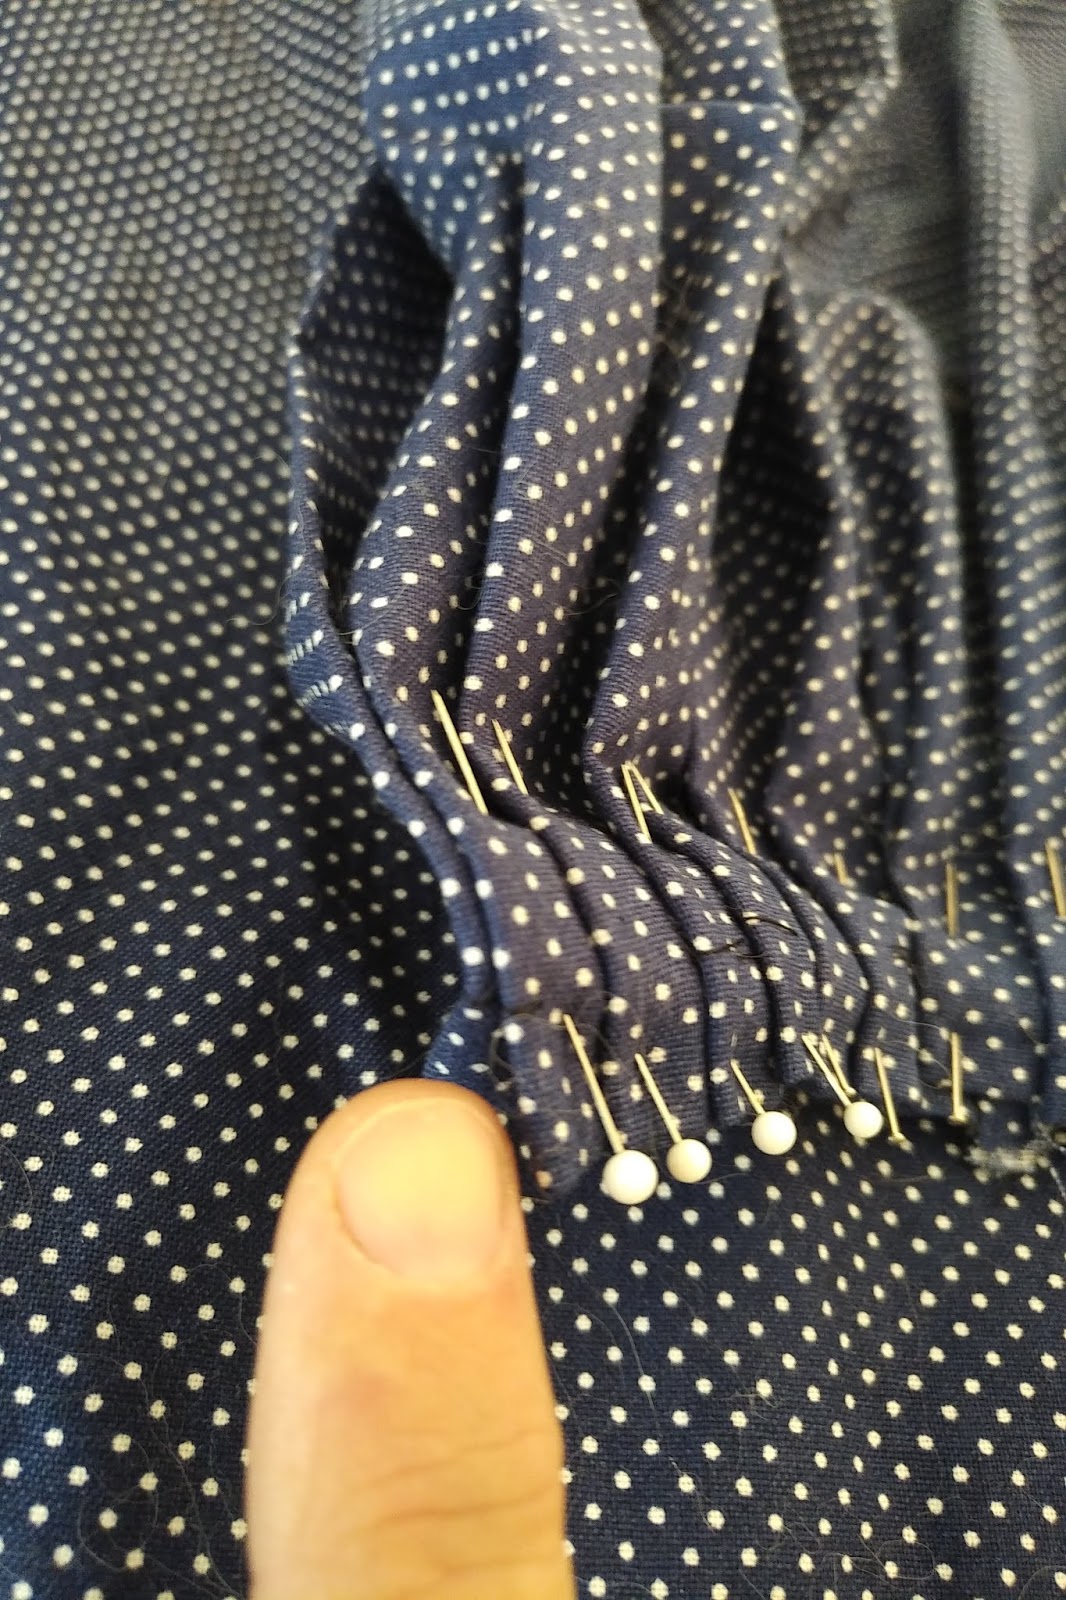
Here is the fabric tape tying the various circles together.


Here is the plumper, stuck down into the sleeve. You can just about tell that the first wire, closest to the armscye, is just a bare bit larger than the armscye.


Here is the plumper tape basted to the shirtwaist's shoulder seam at the armscye.


Once put on, the plumper is not easily apparent through the fabric, although I will have to test that again in stronger light. If I have-have-have to, I'll put a cover over it.


The shirtwaist with one sleeve plumper.
I am wearing it with regular clothing, and
not tucked in properly.


The plumper does what it's supposed to and gives just a bare puff to the top of the sleeve, while concentrating on fluffing out the sides of the sleeve. That's what it was supposed to do.

The plumper collapses flat when it is laid down, and bounces back when you bump it, so it should perform well when I am walking around and do something dumb like walk into a door frame, a shenanigan which is pretty common with me. Either I'm distracted or a little weak on depth perception, probably both.

Next time, I'll show you how the final plumpers are working, and move on to a simple-but-fun part of the outfit I've been raring to make, the neck bow. I've got some dandy sources talking about the construction of those! Ciao!

Sunday, August 11, 2019

1895 Outfit: A Bouffant Shirtwaist, at Last!

Whee! The shirtwaist is bouffant!

Admiring the effect again.

Making Bouffancy: Adding Fabric to the Shirtwaist Front


To add extra bouffancy, bouffantness, puffiness, pouffiness to the front, I needed to add fabric to each front piece and puff it out somehow. I had to mash all of the fabric into the about 5" neck area to the front of the shoulder seam, as marked by the two scissors in the photo of the partially deconstructed shirtwaist, below.


General area to which the extra front fabric will be jammed into.


Perhaps you wonder how I would manage the closure in all that fullness? Well, I thought to fold part of the gathered section right on top of the 1/2" closure, which is made of 1.5" inches wide of fabric. That way there' still be a standard closure, but it would be hidden underneath. Rather as the closure must be worked into this raspberry shirtwaist with its pretty waterfall attached jabot, below.


I found a pair of pieces of extra fabric saved from the shirtwaist cutting. I cut them 13" wide. Here is the fabric added to the right side, pinned to the existing front; it was soon French-seamed into place. The added fabric when stretched out completely covers over the rest of the blouse.


Then it was time to make a new center front closure, using an inch of the fabric to make a wide hem, into which later will be set hooks and eyes.

A quick test gathering of the new front proved that gathers alone were just too weak to hold the front in fluffy ridges. Only an inch or two beyond the gathers had any pouf, with the rest lying limp and flat. It wasn't even worth a picture. ;)

A-pleating we must go, I thought.

Pleating a Bouffant Shirt Front


Let's see, I needed to pleat all that front fabric into 3.25" inches worth of collar at top, with 1.75" of the space in the 5" collar area before the shoulder seam left flat. This would confine the pleated area to the very front of the shirtwaist. The same number of pleats would be matched into position at the shirtwaist's bottom.

I tried it and it worked. Nine pleats at the top, and 9 at the bottom. Will you look at the bouffant effect created? Pleating really was the way to go. 

By the way, for documentation, 11 inches of bottom front remained unpleated. The Sense and Sensibility pattern has plenty of room at the bottom of the shirtwaist. As we will see, it was too much.


I folded a pleat right over the top of the closure, so the closure is invisible. If you look carefully in the image below, you can see the first pleat covering the closure; my forefinger is resting on the closure area. A hook or eye will be nested invisibly under the pleat in there: can't remember just now which goes to the left, hook or eye.


Once the right front was sewn up, then it was time to do the same thing to the left side.

While I Was at It...Shoulder and Armscye Alterations


The more I looked at 1890s shirtwaists, the more I noticed how short the shoulder seams appeared to be. It looks, anyway, as if the armscye edge rode the top of the shoulder.

Further, the tiny pleats on the sleeves looked wussy compared to the bold front pleating.

I'd already taken apart the front of the garment, so why not mess with more? I've already made this into a marathon garment, what's a little more effort?

So, I shortened the shoulder seam by an inch, from 5.25" long to 4.25" long, so just a bit of the sleeve pouf is supported by the shoulder.

The sleeves were re-pleated: 8 in front and 6 behind the shoulder seam, with all pleats facing up to maximize pouf.

Here is the shirtwaist, with one side redone, below. Can you pick out which side was redone?


Training My Eye Before Trying on the Revised Shirtwaist


So far the only evidence I had for how a pleated bouffant front would appear when worn comes from drawings and extant garments worn by mannequins. Wanting to procrastinate a little more, I slipped down a rabbit hole to seek old photos to see how such a shirtwaist might look, before I tried on the garment. Here is what turned up:

Young woman. Flickr: 912greens
Not a shirtwaist, but the bouffant front is instructive. Young woman in white. Flickr: Nora Mezsoly


"Climb as high as you can". Flickr: 912greens


Pinterest: Brandy Auset


Couples, White Oak, PA, 1895. Flickr: Beverly


Jardins du Luxembourg 1895. Feuille d'Automne, at vintage-impressions.tumbler.com


Flickr: antiekie


Again, a bodice, not a shirtwaist, but it gives the general popular line. "Flirty". Flickr: crafty dogma.


Hmm. Of course, because the years the photos cover are likely to cover a fairly wide duration, there is going to be variation. However, I think we can say:
  • the shirtwaist or bodice does puff out over the bustline, but does not delineate its individual curves in the least.
  • the pleats spread out over the bust, but then are drawn back in towards the waist, drawing the eye outwards, then inwards.
  • the shirtwaist is not allowed, until the end of the period, to really blouse over the belt; it is pulled in towards the waist to emphasize a small waistline.
  • the sleeves easily impinge on the bustline puffery, rather covering up the armscye.
  • the waistline is at the natural point or even a bit higher.
  • A wide-ish belt set at the natural waist and allowed to rise above it helps to control the fullness and delineate the waist


Shirtwaist Try-on and Re-Setting the Pleats, Again


It turns out that the pleats I had made at the shirtwaist bottom left the garment tent-like, given all the fabric I had added.

So, for crying out loud...out came the bottom pleats, again.

Then I tried on the garment and pleated it whilst wearing it. You know, this turned out to be the very best way to attain a really nice look. I doubt using a pattern would work as well, because the bottom pleats have to be set to your personal dimensions in both bust and waist, and only fiddling with the fabric yourself is going to allow you to set them to their best effect.

First step was pinning the center front of one side to my corset, while wearing the skirt so I knew where the skirt's waistband would sit.

Second was smoothing the side seam under one arm as well as the fabric over the bust to where the neck pleating started, and pinning it flat in that area. That way I had a bunch of free fabric hanging, ready to pleat.

Here is one side, in the process of me pleating it.

Jeepers, do I smell something nasty, or have I poked myself with a pin?
Anyhow, You can see a double-row of pins marking the pleated front. Maybe if you enlarge the image you can see where I've smoothed and pinned the fabric from the side seam to near the bust.


As soon as the pleats were placed, I left the garment on and rapidly sewed the pleats in place.

Then I repeated the process for the other side.

There was still a little excess of fabric, so on each side I found the excess at the neckline, slid it through my fingers down to the waistline, and made two small pleats of it. Then I removed the pins holding the shirtwaist to my corset, and smoothed the fabric again. By golly, there we were.

We have achieved a bouffant front!


Admiring the effect again.


As hoped, the shirtwaist had the rounded front with its non-specific protrusion over the bustline, and the pulling in of the pleating towards the waist, which helps make the waist look a little smaller. There is still room to move and raise the arms.

After that, I sewed the pleats properly in place, added hooks and eyes for closure, and we're done with the shirtwaist in its plainest form.

Hooray!

Next steps:
  • Making removable sleeve puffers of memory wire. Not necessary, but fun;
  • Making a cute voile neckline bow, using German instructions;
  • Making a voile-covered belt;
  • Futzing with the skirt by using interior elastics to create pretty folds in the back -- again, instructions from my German magazine;
  • More futzing, this time adding an interior ruffle at the skirt base to help it stand out further from the petticoat.
  • Oh, and retrimming my old 1790s silk hat. Wait 'till you see the design for it...it's nutty.
After that, we're done with the first phase of this outfit. Of course, before I wear it, I have to dip-starch both shirtwaist and skirt. I'll follow Jennifer Rosbrugh's directions. Nota bene: after wearing the costume, if it will be stored, wash it, because bugs like to eat starch.

Later, I'd like to whip up the voile plastron, to be worn as needed, and potentially, if I have the energy for it, recycle some of my old stiff silk shantung curtains for a new and improved petticoat with lots of frou-frou sound and froth. I've got the plans all written... Then there are a few more accessories...we'll see if I ever get to them, but it's fun to come up with ways to stretch the basic ensemble into different looks by varying elements and accessories. This was a perfect decade for doing so, because for all its boldness color and shape, it was a practical time. After all, I already have another shirtwaist to wear with this skirt. Without even one more item, I have two outfits!

Friday, August 09, 2019

1895 Outfit: Planning a Puffier Shirtwaist


The first shirtwaist iteration? Well it lacked moxie, I thought. The front was blah, even if the sleeves had potential. So I spent a while looking at original specimens and at fashion pages and advertisements to see how I could add interest to the garment.

Seems as if I can't do anything without involving research...

Finding a Model


Because I'd like the option to dress up the shirtwaist with a "gathered blouse front", in the form of an add-on wide plastron, making a shirt front that's already rounded seemed to be the way to go.

Also, I wanted to wear something rather softer than the trim, masculine, sporting look or the officey look popular then. Here's a perfect example: man's turn-down collar, obvious buttons in front.

Shirt(waist), c 1894. Stanley, United States. Cotton. The Museum at FIT - Online Collections
FIT shirtwaist, circa 1894. From Adasha Moore, Pinterest.
In other words...


Eek, an Office Blouse!


I remember wearing blouses a bit like that tidy example above, with some nausea, from late 1980s-early 1990s daily to the office. Ugh! Those blouses. Either a bit of tight stand collar or a man's turn-down collar. Button-front sometimes, often a frill to each side or pleats, or buttoning in the back, which was a royal pain to get into. Tight sleeves, with earlier a wee puff at the top and later shoulder pads. Often partly dead-dino in fiber, or all cotton and needing careful ironing. Long sleeves, tight cuffs.

You tried to tuck the blouse carefully into your hose*, which would hold the blouse in place better than the waistband of your skirt would. If you reached for something on a shelf, or down into a file drawer, ten to one your blouse would untuck, and you'd have to quick-like-a-bunny tuck it in again before anyone noticed how blowsy you looked. By the end of the day the blouse bottom would be all creased and sometimes dirtied from hands which had been handling paper with carbon that came off, or pencil that rubbed off, or ink that...you get the idea.

*In New York hose were called stockings, and in Atlanta, stockings were called hose. As a child in Germany, I wore "Strumpfhosen": woolen red or navy hose, with braided patterns. They were cute.

Here's a sample style from about 1989. Oh boy. The models are even looking at an office folder just so you know it's office wear, and the lady on the right has her office jacket over her shoulder.

image 0
Londas Elegant Creations - Basic Heirloom Options Blouse - #8902 -
Vintage - circa 1989. On Etsy.
Sometimes we wore a brooch with these blouses for an overt Neo-Victorian image. Often we wore a matching jacket and high-waisted skirt in tropical-weight wool** to make a sharp-lined suit. I worked in New York city and then Atlanta in those days. In NYC both collar and cuffs would be smirched with soot that rained down from buildings' incinerators, clung to our skin, and then was smeared onto whatever we wore as we perspired. Pretty much the same as a century earlier, to which the office fashions harkened, recalling, whether intentionally or not, women's general entrance into the office workforce. Hotlanta was cleaner, but then for most of the year you judged carefully how quickly to move when outdoors, so as to minimize perspiration.

**Suits in various dead dino fabrics didn't breathe and tended to pill. I flat hated wearing those mobile saunas.

Here's a photo from the early 1990s, right before I abandoned blouses for cotton turtlenecks, another style phase. The tight blouse -- gee, I think it's a blouse -- is barely visible under the padded jacket. Do I remember feeling the collar every time I swallowed.

My sister and I, big hair, big earrings,
 hose and all...
Makes me wonder: why in all that's good am I finding these 1890s blouses acceptable, if I dreaded the 1980s and 1990s versions?

It must be the sleeves. It's 2019, after all, and sleeves have been a fashion focus for a year or two, and it's the year the 1830s became really fashionable in costuming, and the folks in New Zealand, Miss Temby and The Dreamstress among them, are making their turn-of-the-century fashions.

Back to Finding a Model


Where were we -- yes, looking for a better mousetrap of a shirtwaist design.

The young lady in the lower left corner of this selection of ready-to-wear shirtwaists struck me as wearing a specially nice one, at once simple and decorative.

Jordan, Marsh and Cmpany shirtwaists. From "Gibson Girl Era Clothing | 1890s-1900s Fashion"

The Met has a handsome example, part of an office suit. The only thing I am not fond of is the loose waist. Gathering all of that loose fabric in neatly, and keeping it tucked would have been a problem then, as it was for me just decades ago.

Blouse from suit, 1892, Metropolitan Museum of Art; C.I.53.72.9a–c.

Some examples use pleating at bottom front to confine the extra fabric. Here's one, from All the Pretty Dresses. This one has a tight lining, as some shirtwaists did, blurring the line between traditional bodice and blouse. Notice how the bottom is finished, in front and in back. Just stitching, no applied band to cover the stitching.

Example of mid-1890s lined bodice, from "So cool! Same fabric, different shaped bodices from the 1890's", in All the Pretty Dresses, 02/28/2012.
Back of same garment.
Those sleeves are epic, aren't they?

Aha: A Model With a Pattern


Also epic, another shirtwaist example, from my new favorite 1890s fashion magazine, the Illustrierte Frauenzeitung, published by Bruckmann in Berlin and Vienna. The neckline is smocked.

Illustrierte Frauenzeitung 1894, Heft 14, p.159 Bluse
The pattern, shown below, is interesting. You cut the shirtwaist body in one piece, marked "a", by placing the center front on the fold (the vertical dotted lines at the left of the top pattern piece). The pattern gives the fabric width as about 20 inches, so the body piece would be laid down the lengthwise grain, which we would find rather unusual. The armscyes would be cut out. The blouse would close in back.

Note that the front piece at the side is fitted to the waist, hence the acute angle. Both front and back would be gathered/pleated -- that's why they are so wide. The sleeve piece, marked "b" will make a very wide sleeve, but one without much of a pouf at the top.

Illustrierte Frauenzeitung 1894, Heft 14, p.159 Bluse


The text in German:
Eingereihte Bluse. -- Schnitt-Methode: Abbildung 19. Stoff: 4,50 meter, 52 cm breit. -- The jugendlichste, besonders fuer schlanke Gestalten kleidsamste Blusenform bleibt immer die eingereihte, aus nur einem Oberstoff-Theile bestehende Form, wie sie der 12 cm Breite schliest den Halsauschnitt, ein 20 cm breiter Guertelstreifen den Taillenschluss ab. b von Abbildung 19 lehrt das Zuschneiden des reichgerafften halblangen Aermels, der leichtes, enges Futter verlangt. Der obere Rand wird eingereiht, der untere, Stern auf Stern treffend, zusammengenommen und der Zipfel Doppelpunkt aus Doppelpunkt in de Hoehe geschoben. Einzelne Stiche unterstuetzen hin und wieder die graziose Raffung. Fig. 3 des dieser Nummer beiliegenden Moden-Panoramas zeigt die Ruckansicht der Bluse. Schleifenschmuck.
My translation:
Lined blouse. -- Cutting method: Figure 19. Fabric: 4.50 meters, 52 cm wide. -- The most youthful dressy blouse shape, especially for slender builds, remains always the lined blouse, consisting of only one fashion fabric piece, as the 12 cm width completes the neckline, a 20 cm wide belt band completes the waist closure. [Drawing] "b" in Figure 19 shows the cutting of the plentifully gathered elbow-length sleeves, which require a lightweight, tight lining. The upper edge is to be lined up, on the lower [edge], draw up star to star [marking] together, and push up the colon marking to colon marking. A few stitches here and there support the graceful gathering [of the sleeves]. Figure 3 in this issue's enclosed fashion panorama [color plate] shows the blouse's back view. Trimmed with bows.

A run of Illustrierte Frauenzetung issues starting with 1885 is available on the Duesseldorf Digitale Sammlungen (digital collections) site. The magazine is fantastic. Garments and accessories are illustrated in gorgeous detail and frequently the same garment will be illustrated from several angles, and sometimes shown in the issue's color plate. Garments are carefully described and often include fabric needed and fairly specific instructions to make them. Most issues also include a small-scale pattern or two for garments illustrated. The patterns are quite detailed and if you have used patterns from a garment-cutting book, you will be familiar with the format. The magazine was nifty in that it included both fashion issues and Unterhaltungsblaetter -- entertainment issues, the latter with stories and so on.

Now I have models to help, I can tweak that shirtwaist.

Ciao until next time!