Showing posts with label antique garment. Show all posts

Friday, April 08, 2011

From the Collection: Feather and Horsehair Aigrette

Front of aigrette
Today, something a little different. In preparation for the Jane Austen Festival Ball this July, in Louisville, I've been looking at aigrettes which can be added to turbans. I happen to have one in my collection, and thought you might find it very interesting not only in terms of looks, but also in its construction.

The images are really big, so please click on them to get details. (In fact, if you are on a Windows machine, click again on the big version to see them huge.)

The aigrette is made of a celluloid comb, very flexible, with two gold-painted and curled feathers (species undetermined) and horsehair. Each feather is divided into small sections, each of which is individually curled.)

Construction: the comb has two small central holes in the top. The feathers and horsehair are gathered into a bunch, wound with tiny wire, then fixed with pitch-like glue at the base, then black thread-wrapped, with the thread carried around the glued base, through one hole to the back of the comb, through the other hole, and back round the base of the aigrette again. The thread is carried this way many times through the holes.

The aigrette is worn such that the base is in front. It must be hidden by hair or some other decoration in order not to show the base.

Here is the back of the aigrette. I've set it next to Curtis Grace's business card so you can get an idea of size.
Back of aigrette

And here is another view, in a different light, in case you would like to look at more details.


How old is this aigrette? Curtis Grace, who studied Fashion Design at Parson's in new York and has quite a collection, thinks it late Victorian; he felt it was late 1880s. Aigrettes really didn't go out of fashion after that...you find them constantly in Edwardian and Jazz Age designs.

The aigrette is incredibly delicate and is damaged with but a whiff of air. The comb, merely an eighth of an inch thick, is also delicate.

With these photos, those of you who would like to make aigrettes probably have enough visual information to work with. To get the spiky effect so important to many aigrettes, you can still use horsehair: it is still available for sale for use in the equine industry (tail extensions, anyone?), for violin bows, for hairwork jewelry, and the like. Here is a supplier, M&M Horsehair, just north of here in Ohio. I haven't used them; the link is just here for convenience. Burnt ostrich would also work, although the effect would be a bit different.

However, if anyone needs more information, I'd be glad to try and help.

Monday, August 04, 2008

A Mid-Century Underskirt, Photographed and Measured


My friend Denise picked up what appears to be a mid-century underskirt, as petticoats were known then, and I have examined, measured, and photographed it. It's a lovely thing, the hem being ornamented with hand-sewn eyelet embroidery and scallops.

I took measurements and examined it carefully, and then asked the lovely folks on the Elizabeth Stewart Clark board about it. Sure enough, it's a mid-century underskirt! As Elizabeth explained, the embroidery made it a nice underskirt, but not a high-fashion one; it might even have been worn by a working class woman for Sunday best.

I like the idea that just a few feet from where I sit, lies a petticoat that would have graced the top of a crinoline, and rustled starchily under someone's dress.

Photo: view of mid-century underskirt.

Measurements

Waistband width: 1"


Waistband circumference: 26 3/4"

Depth to the piecing or "yoke":
- left of placket: 2 1/2" to 3" for 3.25" length
- right of placket: 1 3/4" to 2" for 6 1/2" length
- middle: varying width, 3 1/2" to 4" for 16 1/2"

Length front and back: 39"

Bottom circumference: ~154 1/2" (38 1/2 scallops)

Photo: Detail of the eyelet embroidery.

Inside seam width:
- piecing or yoke: 1/4"
- panels: 1/8"

Placket:
- 16 1/2" long
- left side hemmed with 1/8" hem
- right side hemmed with 3/4" hem

Tuck: depth varies from 2 to 2 1/2"

Scallops:
- depth: 1 1/2"
- width: 3 1/2"

Construction


The waistband is folded in half, long ends turned under, and hemmed to the top 1/8" of the skirt. There appears to have been a tape sewn to the placket, but tape is in tatters and partially missing, and one one side of placket it's covered up by a very modern, very poorly sewn waistband patch. I think someone might have worn this for a costume at one point.

The skirt is in four panels. It's tightly gathered at top and each gather is nicely stroked: gathering is even all the way around the skirt. The result is a soft dome shape.

Photo: detail of waistband showing the finely stroked gathers, and wear to the fabric.

The top of the skirt features what I at first thought to be a yoke, and perhaps it is, but the pieces are not even: they vary in depth and length. So perhaps it was pieced...with the piecing being set at the top so it wouldn't be so obvious at the bottom of the skirt or get in the way of the embroidery.

The placket is set into the middle of one panel.

The eyelet work is lovingly down, and appears to be by hand since the positioning of the flowers varies a little and each flower hole varies a little, and the sewing is so very neat by not machine-like.

The hand stitching is even and straight, the waistband hemming nearly invisible, the tuck stitching is more like even tacking.

Condition

The cotton fabric is mostly in strong condition, but the underskirt has seen heavy use. There are several tears in the eyelet at the bottom and a few scallops have torn off. There is a mend at one spot: it looks neat but may be modern, although the thread is cotton. Stresses on the placket resulted in a tear down from the end of the placket to the tuck. The waistband is quite worn and someone added a horrible patch to one end to hold it together. There is no button and the unpatched end is rather shredded.

The stitching is in perfect condition.

You can see more photos on my Photobucket account.

Tuesday, April 08, 2008

Ornate Mid-Nineteenth-Century Chemise with Front Flap


A month or two ago, when winter still gripped us hard, for solace I browsed a favorite antique shop that sometimes carries vintage and antique clothing. I hadn't looked about for more than a minute when this garment caught my eye. It was listed as a pinafore, and very reasonably priced.

Right: chemise front

It's hardly a pinafore: to my middling understanding those usually fastened at the back and at this length, were worn by children. This garment is clearly sized for an adult.

It is actually a woman's chemise, but of a variant type because it features a front flap. Until very late in the Edwardian era, fashion historians generally write that chemises were worn, along with drawers, as the undermost garments. The chemise absorbed body oils and perspiration and protected the corset, which was worn over it. Over the corset a woman would often add a corset cover/camisole. This protected the dress and corset from each other and might also keep the corset from view if the main dress or waist (blouse) was at all sheer. At times, I have read that the chemise and corset cover were made in one: the chemise would feature a flap that could be pulled out and over the top of the corset. That that is how this garment is meant to be worn.

Very curious as to what I had, and wanting to share pictures of it with others who love antique clothing, I posted information and questions about it on my beloved Sense and Sensibility board. To my delight, other members enjoyed seeing it, and were curious about it or had information to share about it. The garment description that follows is immeasurably improved by their contributions.

Materials

The garment is made of an opaque, tightly woven, mid-weight fabric that hasn't any sheen at all. I thought it to be cotton, then wondered if it might be linen. It's of a plain weave, with occasional very, very small slubs in the thread. The fabric as a whole is the color of high-quality cream from the top of the milk bottle. Not dead white. On the inside of the garment there is a little yellowing , but very little, and there are a few pinpoint rust stains and one or two droplet size stains.

Suzi Clarke, costumier in London (http://www.suziclarke.co.uk/), wrote in a post of the fabric: "It is possible that it was made from "Horrocks's Longcloth", a firm washable cotton made and sold in England by, of course, Horrocks. This was a suitable fabric for underclothes, and was used for, and can be seen in, many still surviving garments."

Carolann Schmitt of the Genteel Arts Academy (http://www.genteelarts.com/) thought it longcloth too, and described the fabric thus: "
a tightly-woven cotton with a smooth "hard" finish. The fabric was produced in England and the US and is very common for this period."

Longcloth has an interesting history, and while my antique sewing manuals and fashion history books mention it with frequency, none of them expound on either its nature or its roots. Finally, here is its story, courtesy Carolann:

"
The name "longcloth" derives from how it was manufactured. Prior to the industrial revolution, weavers would produce fabric in lengths just sufficient to make a particular garment. Why weave more fabric than you need? It's why so many early 19th century garments (and before) have a "squares and rectangles" cut - virtually no waste. If you look at some of the cutting diagrams for chemises in The Workwoman's Guide (published in 1838) you can see how careful planning uses virtually every inch of fabric.

When commerical textile production is established, it's no longer cost effective to weave short lengths of fabric. A cotton fabric made from tightly-spun fibers woven with a tight weave suitable for undergarments and shirts was one of the first textiles woven in long pieces, hence the name "longcloth". A "piece" of longcloth averaged 62-67 yards; even today, textile production is measured in "pieces" - each averaging 62-65 yards.

One of my primary sources, in an "advice to young wives" article, advises purchasing two full pieces of longcloth when the new wife establishes her household. The first piece will provide enough fabric to make the minimum number of undergarments they should have on hand, including a dozen chemises, 4-6 petticoats, 2-3 underskirts, 2 nightdresses and 2 robes. (Notice they don't mention drawers!). Then, as these garments wear out, they should be replaced with new items cut from the second piece of longcloth. A very practical recommendation.
"

Right: chemise back

Construction and Measurements

The neckline is wide and shallow, and it is trimmed with a single ruffle edged with tatting. The neckline is shaped by the yoke, which gives the entire garment its shape. The yoke is quite narrow, measuring only an inch wide over each shoulder, and is identical front and back. It is trimmed with a band of broderie anglaise.

The front and back pieces
are lightly gored: they are of trapezoidal shape, in the fashion that goes back centuries. Very similar to the pattern shape Elizabeth Stewart Clark uses in her chemise pattern on her site. The top of each panelis lightly gathered and stroked into place. In spots you can see the tiny gathering stitches.

The sleeves are short, plain pieces, carefully gathered and stroked into the armscyes, and trimmed like the neckline.

This chemise has a gusset inset under each arm; they are surrounded by a double layer of fabric, presumably to take strains. I understand that gussets under the arms were less and less used as the nineteenth century went on.

The seams and trim inside and out are exquisitely, precisely, almost invisibly sewn. The tatting, for instance, is made of single threads, and the thread used to whip it to the edge of the neckline and sleeves is so fine that it can hardly be seen. I do not know if I could find thread that fine now. The broderie anglaise trim is similarly fine. The main seams and bottom hem are machine sewn with a lockstitch machine, using similar or the same fine thread. These main seams are flat felled and the stitch count is very high, some 16 stitches to the inch. The ruffles are hand whipped to the neckline, and the reinforcement fabric at the underarm gussets is so finely hand-hemmed that it took awhile to find any stitching.

Measurements were taken on a dress form, but loosely:
  • front and back neckline, shoulder to shoulder: 19 1/2 inches
  • yoke width at shoulder: 1 inch
  • sleeve diameter: 5 1/2 inches
  • front flap width: 12 1/2 inches at top, 7 1/4 inches at bottom
  • front flap length: 7 inches
  • front and back panel width measured at arm gusset bottom, each: 27 inches
  • front and back panel width measured at garment hem: 34 inches
  • garment length, shoulder to hem: 32 inches
Its Date and Context in Fashion History

Much of the posting back and forth today concerned the chemise date. Portions of the posts are included here, and offer not only a date for this garment, but give a sense for how a decision was arrived at.

  • Emma Ruth: You're right, it is a chemise. I would date it to the 1850s or 1860s because of the horizontal band yoke. That was the style of chemise worn while dropped shoulder seams were used on dresses. Once shoulder seams moved up to a more modern position by the early 1870s chemises with straight horizontal yokes could no longer be worn and chemises with shaped yokes came into fashion instead.
  • Elizabeth Stewart Clark: "I'd ditto a mid-century date, due to the shape and "set" of the yoke. How are the seams in the chemise body handled? Is the body gored, or straight panels?"
  • Acacia: "Perhaps more of us will join in here: I've done "surface study" of mid century but certainly not in depth. My first impulse was 1840's. I suspect it's the style of the white work that will help date it. It looks to be entirely hand sewn - is that right? It possibly could go one decade earlier into the 1830's - as you say the wide neckline hints at that, but this style neckline was still worn later - especially for ball gowns, which retained that style of open, wide neck. (After this, I detail its construction as a mix of machine and handsewing.)
  • Suzi Clarke: "If it is machine sewn, it is highly unlikely to have been sewn before the 1850's when sewing machines were first commercially available for domestic sewing. Also, I can't remember the date when lock stitch, as opposed to chain stitch became the regular stitch, but chain stitch was the earlier."
  • Carolann Schmitt: Mid-19th century chemises are one of my "specialties". I have 25+ in my collection.

    I'd date this chemise c.1855-early 1860s.
    - The neckline is starting to transition from the straight band of the early-mid1850s to the deeper shaped yokes c.1860-1865.
    - It still has the square cut sleeves, gussets and reinforcements typical of this period, before the transition to sleeves cut with a bias seam and no gussets.
    - This is the same period when the cut of the body of the chemise transitions from the full width of the fabric with inset triangular gores to add width at the lower edge (look carefully - the seams can be almos invisible!) to a body cut with gored seams. In the mid1860s this cut will transition again to one with some slight shaping at the waist.
    - The fabric does appear to be longcloth - a tightly-woven cotton with a smooth "hard" finish. The fabric was produced in England and the US and is very common for this period. Cotton had pretty much replaced linen for undergarments in the late 1840s-1850s.
    - Chemises from the 1840s are square cut, with a wide 'scoop' neckline, longer and fuller sleeves, and are much longer in length. The length of this one indicates it could have been worn tucked or untucked.
    - The flap protects the inside of the dress from wear and crocking from the corset. It's a characteristic feature of late 1850s chemises. I have two chemises with a flap in the front and the back. You'll also find flaps on nursing chemises - covering the slits in the fabric.
    - The trimming at the neckline - corded tucks, whitework band, tatted edging - is very common. I have two or three chemises with almost identical trim.

    Chemises like this were available ready-made at very affordable prices from merchants across the country in towns and cities of any size.

    It's a lovely piece, Natalie.
Additional Pictures

Side view


Yoke and neckline detail showing tatting, piping, broderie anglaise trim and stroked gathers on sleeves. Note: if you view the large version of this image by clicking on it, please be aware that I used telephoto to approximately twice the actual size: it blurred the image a little but also made the tatting look coarse. In actuality, the tatting threads are fine as sewing thread. Each picot is an eighth of an inch tall. The yoke is but one inch wide at the shoulder, and the ruffle but 3/8 of an inch wide.

Detail showing gusset with reinforcement fabric under arm

Monday, January 14, 2008

A Wrapper, But of What Year?

Sometime last fall I was lucky enough to purchase a vintage wrapper. From its shape and construction, I estimate to be anywhere from the 1890s to the early 1900s, but am not quite sure of the real date.

The garment is of a black and white soft cotton flannel, and appears, from construction details to have been sewn at home. The bodice trim is a soft ecru coarse ribbon or tape. It is sewn on the dress in nice curves, but when viewed up close, the stitching that holds it down wanders a great deal, as if done in a hurry.

The bodice opens way down the front and the neckline opens into a squared V. The upper portion of the placket opening is closed three black buttons reaching down to the waistline. The buttons are mounted to an overlap that is made of a separate band of fabric sewn to the left bodice front, and the underlap piece holding the buttonholes is also separate and sewn to the right bodice front.

At the waistline a self belt with ends cut to arrow points is attached at the side seams; I imagine that it ties in front. Otherwise the rest of the front placket would gap open. Part of that remaining opening is -- partially -- covered by a small rectangular band the width of the underlap, sewn with a line of the ecru trim down the middle, and tacked to the underlap. It is not nearly long enough to reach to the bottom of the placket opening and I can't see how it was ever effective. Is a piece missing? Was this a hasty fix to a faulty front opening?

The yoke section of the bodice is lined with coarse muslin that's now ecru in color; it might once have been white. The curved yoke seams are not seamed right sides together. Instead, the wrong side of the yoke curve is seamed to the right side of the bodice front. The seam edges are left unfinished and that ecru trim is just sewn up from the seam up to the edge of the allowance. If you look carefully underneath you can see that the edge of the fabric is very slightly frayed.

The collar is set on separately and trimmed with the same trim as elsewhere.

Towards the yoke bottom a very prettily arranged frill is sewn, the join seam covered by more ecru trim.

The sleeves are set right on the top of the shoulder and are gathered in enough to create a very small puff. Again, the gathering was done in a hurry: some gathers are sewn so the resulting pleat lays frontwards, others backwards, and the gathers vary greatly in position from one sleeve to the other. Note that the sleeves are shaped: each sleeve is cut in one piece, but curving in from the elbow, so that when worn the sleeve will sit nicely on the arm, without excess wrinkling. A small tear at the front sleeve seam shows where stress was likely applied to the garment by the person wearing it. I doubt that the garment would have torn there otherwise, but could be wrong.

The self cuffs are some two inches deep. They are constructed in four pieces, sewn right sides together and then turned to create a finished tube, and joined to the sleeve. The seam is covered with the ecru trim. The cuffs ensure less wear at the sleeve edge.

The back of the wrapper below the toke is in two pieces, seamed down the center. At the top, an inner and outer box pleat are set in a point at the yoke point.

The wrapper hem would just trail the ground, I believe. The bottom of the skirt is simply turned up rather than being faced. A narrow edge is turned to hide the raw edge, and then turned again in a wide hem. To help pull the skirts to the back of the body, the hem is some three inches wide in front, while it gradually widens to between four and five inches in back. Where necessary, small pleats are taken in the hem to account for the fact that there is more fabric in the hem length than in the length it is hemmed to.

All in all, the wrapper shows what I think are some nice design and construction elements: the pretty front bodice frill, the handsome yoke and flowing back pleat treatment, the graduated hem. At other points, however, the garment appears to have been constructed rather hastily, and not everything worked. That front opening just confuses me.

Monday, June 12, 2006

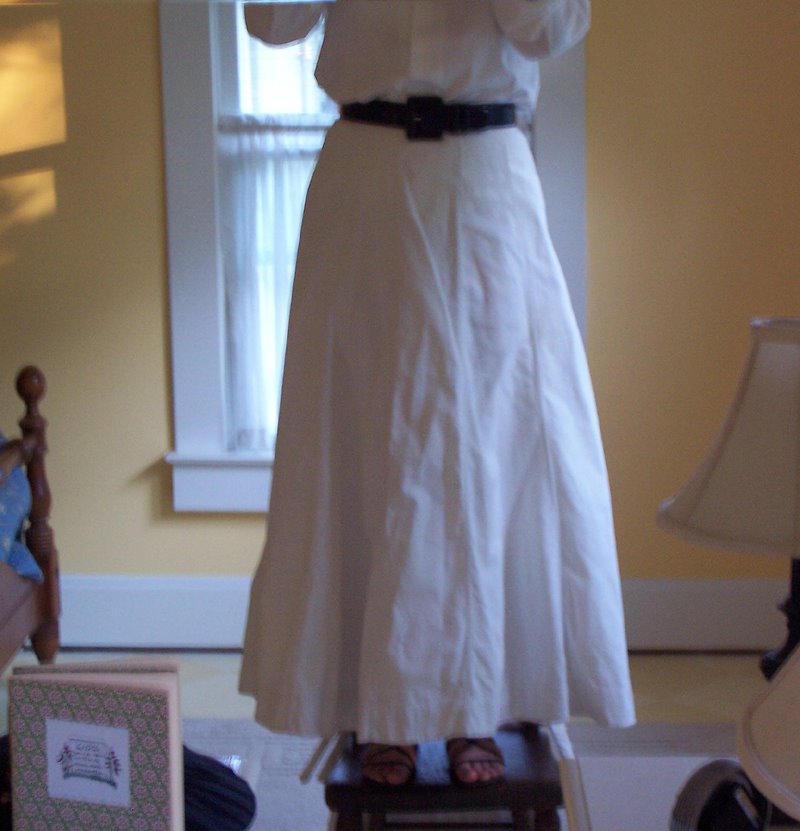
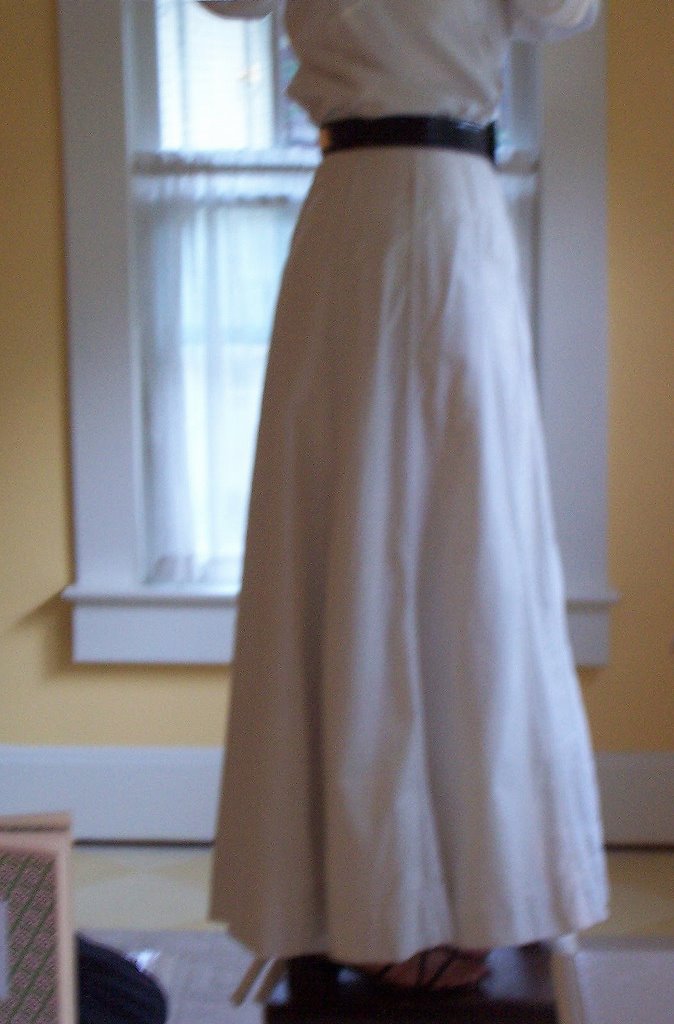
Anatomy of an Edwardian 1900-1911 vintage white heavy cotton skirt

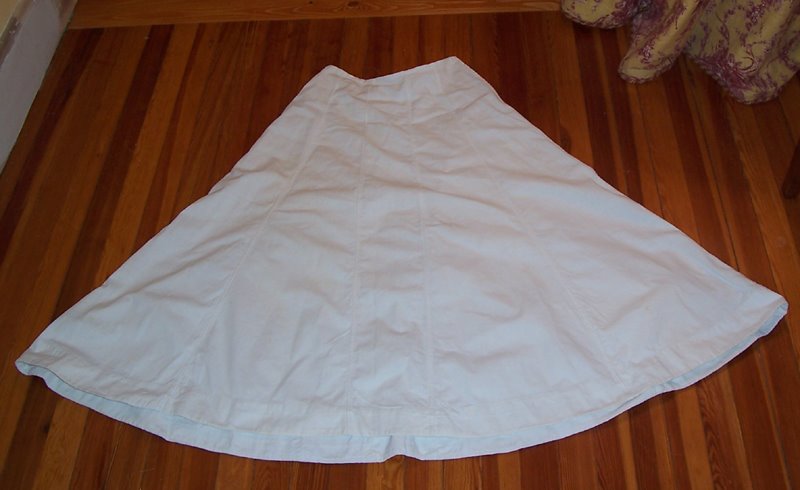
Yesterday I was fortunate enough to purchase a truly nifty circa, I am guessing, 1900-1911 day skirt. It's made of heavy white cotton or cotton-linen blend (for a linen drape and wrinkle, but without the linen sheen), and is cut with 9 wide-flaring gores. It fits very smoothly across the waist and hips, and then flares gently and evenly to almost the floor to create an elegant line. 

In the pictures here it's worn over a double-flounced petticoat drafted from a 1911 textbook (see previous blog entries). The design is sophisticated: the seams are felled, but instead of the double stitching showing on the exterior, the single stitching does, and the raised effect of the seams accentuates the vertical lines and even creates attractive shadow lines.

In addition, the front gore is very narrow, and barely seems to narrow towards the top. This creates what appears to be a straight narrow panel right in front, that again subtly elongates the figure. 


Dating the Skirt

Dating is a puzzle, but I argue for a date after 1900 but before 1912. Why?
  • The narrow front panel was popular after 1905 or so.
  • The elongated lines and emphasis on decorative seaming also date to this period.
  • So does the smoothness of the habit-style back: there is no pleating or gathering in back, as was common in the 1890s.
  • Habit-style day skirts often had back-closing skirts and this skirt is back-closing; the side closing wasn't the only popular closing during the Edwardian period.
  • The waist falls at the natural waistline, as it might on a plain skirt after 1905 but before 1912-1913; it is neither raised nor cut so that the back waistline is higher than the front to fit a straight-front, S-bend corset. At 37 inches long in the front, it would fall to the shoe tops. In back it falls to 39", but when worn the hips and derriere cause the back to raise a bit so that all around the skirt falls to the same 37-inch length all the way around. After 1905 this length and hemming style was favored for day wear.
  • On the other hand, the skirt has approximately 3.5 yard (125 inches) sweep. I will have to research closely to see how the recommended sweep varied during 1900-1911, but there were periods when it was narrower. I do know that wider sweeps were prevalent in the 1890s.
  • The skirt almost surely doesn't date before the 1890s. There is no room for a bustle or other skirt enhancer or any sort, and the heavy goring and butter-smooth fit around the hips came in the with Edwardians.

What Was This Skirt Worn For?

My suspicion is that this was some sort of plain day skirt or traveling skirt. The sturdy fabric would wear well and wash easily...and this skirt certainly was worn; there are wear marks on some seams and one tiny wear pinhole at the bottom. Or perhaps this was a sporting skirt used for golf or long walks, although it is full length, and some pictures of the period have women wearing slightly shorter skirts for these activities. The cut is too neat and attractive, in my mind, to be just a utility or house-work skirt. 

Further, the inside is fully finished. Homemade skirt seams were often just overcast: these are strongly felled to prevent fraying. 

The skirt is a delight to wear. I tried it over a double-flounced petticoat I made following the directions from a 1991 textbook and it fits beautifully. The fabric slides over the petticoat to create a clean line, the vertical panels and shadow lines from the seams give the fabric a strong vertical, architectural, sporty, natty look, and the fabric is stiff enough and the hem heavy enough to give it body so that it does not cling to the feet or get in the way when one walks or leans. It's easy to see the value of a good wide hem in performing this function. The double flounce of the petticoat helps hold the skirt away from the feet too. 

Construction 

Nine gores. The front nearly straight and forming a subtle vertical panel, as mentioned, then two side front gores, wide-ish side gores, wide-ish side back gores, and two quite wide back gores with a seam at center back, habit style. 

The two back side gores just a teeny-tiny scant gathering in them, so slight as to be barely discernable; all other gores are eased flat into the 1/2-inch plain waistband. The placket stitching continues the line of stitching of the back seam in standard hidden-back placket style. However, the invisible effect is spoiled because there's another row of stitching about quarter inch away that betrays the rest of the placket. 

The skirt closes with three hooks and eyes; the bottom two have the flat bar-shaped eye, while the top eye is circular- or hoop-shaped for a secure closure. This hook-and-eye treatment is in approved fashion for this period. 

The skirt has a two-inch faced hem; the facing is the same material but it has been pieced in places, so we know the skirt is homemade. Other homemade touches include some less-than-perfect seaming: the hem varies a bit in width and bits of the stitching are not quite in a perfect line. 

The fabric is a heavy straight-weave cotton. It may have been dead white when new; it's the color of fresh heavy cream now. 

The front gore is cut on the straight grain. All other gores are cut so that the straight edge is on the straight of the goods, while the gored edge is on the bias. This means the back two gores meet on a fully bias seam, which produces an attractive, subtle drape, again in the approved fashion for this period, according to several contemporaneous texts of I have read. (See the texts referred to in previous blog entries.) 

Measurements 

All measurements are approximate, having been taken when the garment was laid flat. 
  • waist: 27" 
  • waistband: 1/2" 
  • wide front gore: 37" long 6" wide at bottom 3 3/4" wide at top 
  • side front gores: 37 1/2" long 14" wide at bottom 3" wide at top 
  • side gores: 38 1/2" long 15" wide at bottom 2/12" wide at top 
  • back side gores: 38 1/2" 12 1/2" wide at bottom 2 1/4" wide at top 
  • back gores (2): 39" long 18" wide at bottom 4 1/2" wide at top barely discernable gathers only in these two gores. 
  • Back center seam is between these two gores; it's 39" long 
  • Sweep: approximately 125 inches (about 3.5 yards) 
  • Placket: 8 1/2" deep 
  • Hem: 2" deep, faced with same fabric as exterior.
  • Seams: felled, with single-stitch side on exterior of skirt for nice raised effect, and double-stitched side on interior for full finish (no fraying)