As I look out the front windows, a soft snow is fluttering and the temperature is dropping rapidly. Snuggle up, Kentucky, and all safety and health these holidays, wherever you are.
My goodness, it is gray outside. So gray that, unusually for me, I am sitting facing away from the windows, view trained on the warm light of the lamps nearby. Saint Lucia's Day is just past. Winter has settled in here in the Kentucky Bluegrass, and the thick veils and clots of clouds that bring rain and snow that feed the numberless streams and creeks and ponds and the Kentucky River snaking deep beneath its palisades -- or the more realistically foreboding name, gorge -- are here for the next months. Gloriously bright days will be relatively few and valuable.
As valuable as the knitted mitts from my sheep that sit unfinished here beside me. A moment ago I cut a length of yarn to sew up the sides of the rectangle that will make a mitt, and quite suddenly was viscerally aware of the impossibly high value of that yarn.
--- Green, green grass on a Bluegrass farm --- Sheep grazing --- A year's daily shepherding, morning and night --- Shearing --- Fleece skirting --- Picking vegetable matter --- Scouring --- Drying --- More picking --- Separating outer coat from inner coat --- Carding --- Winding into nests --- Spinning --- Plying --- Skeining --- Washing and blocking --- Yarn.
And, other than the mower that trims the grass if needed, every single bit accomplished by pairs of hands and the most ancient of tools:
--- fingers --- shears --- soap and water and tub --- air --- wood and wire hand-carders or hand-cranked drum carder (quite an old tool) --- foot-powered spinning wheel --- time --- patience --- persistence.
Hours and days, days and hours and hours. Months. Years.
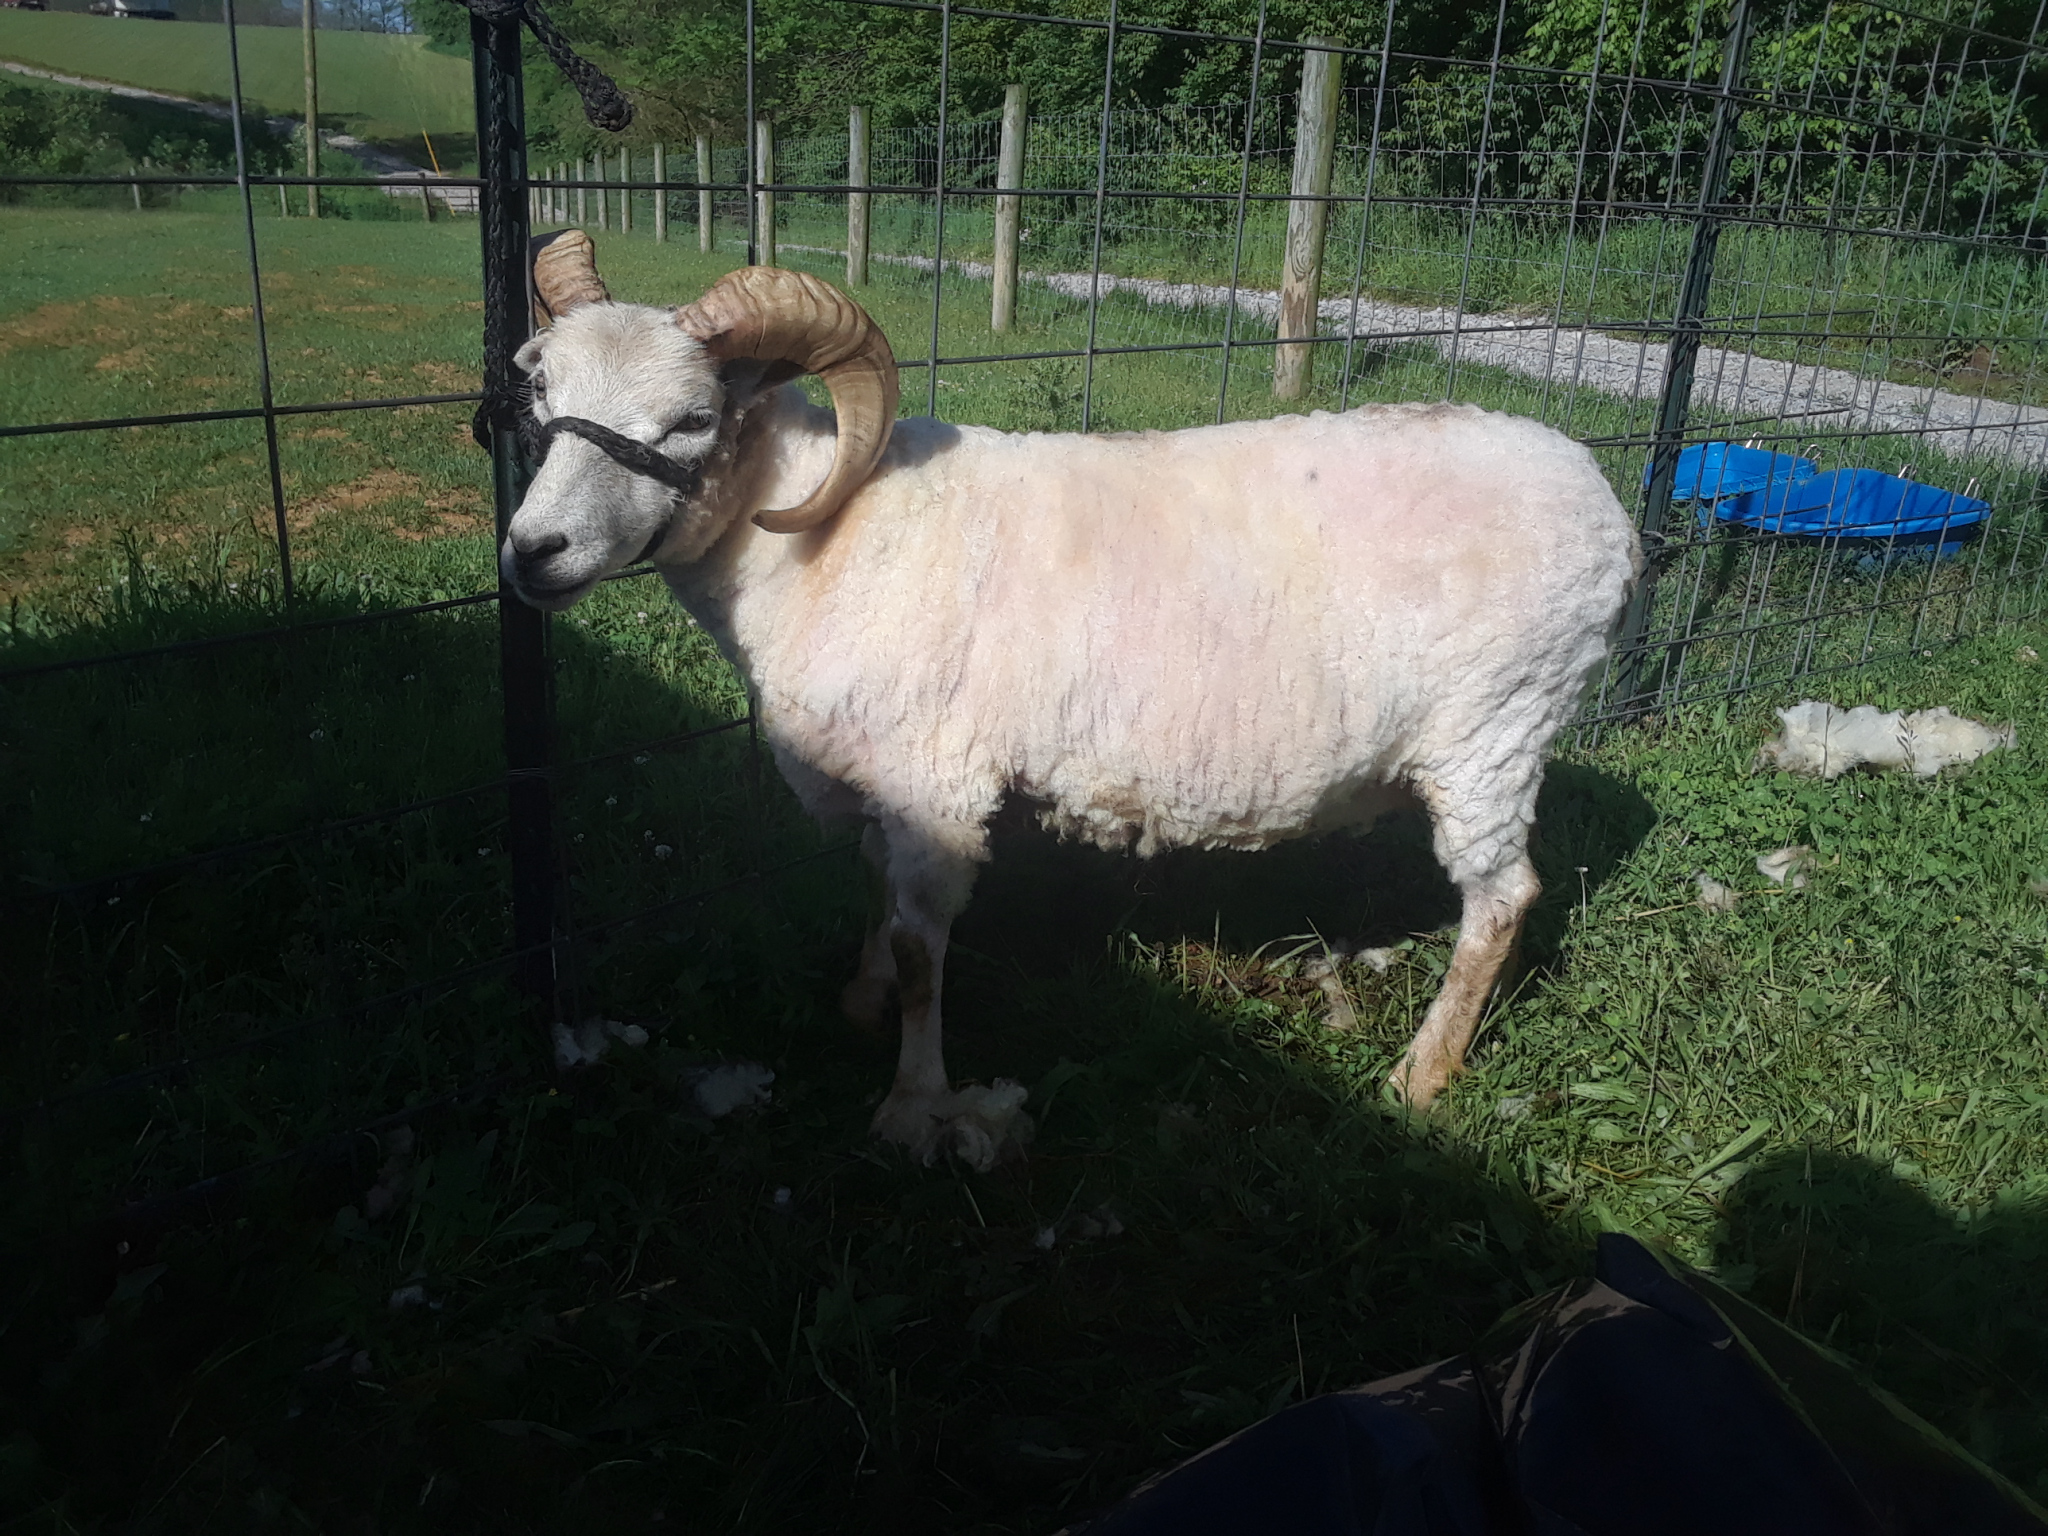
Lana and Nina grew the fleece on their backs three summers and winters ago, munching on the grass of my friend Sarah's farm not far away.
Nina, Liam the English gentleman, Neo the honorary Shetland, and skittish Lana October 2020.
Every day, Sarah cares for the sheep, whether it's muddy or parched, icy or foggy, or finger-cramping or beautiful enough to cry and thank God for the peace of it and the sweetness and interest of the sheep. She is patient and loving and the sheep thrive and she knows each one and its character and society. I am lucky to have her as a friend.
Liam at the hay rack. Lana is nearby. November 30, 2020. Read about the drama just past in "Disruptions Due to Snow" on Sarah's blog.
On a nippy morning the next early spring, around about 8:00 a.m. when our breath streams in clouds around us when the rest of the flock leaves the barn for a day in their fields, Sarah and I have the task of separating out ever-fey Lana from her boyfriend Liam and daughter Nina in their stall, and she leaps and evades until by main persuasion with torsos and arms and legs we halter her, so that she could be sheared. The only time each year that she wears anything but her own self. In a month or so her fleece, her skin a hand's width deep under her blond-tipped locks, would start to separate and slowly, imperfectly shed. She needs shearing before that happens, and before the heat of a Kentucky summer makes life far too hot for her under such a blanket.
So the two of us, each with a pair of hand shears, lean or kneel the either side of Lana, haltered to a fence outside and in sight of her flockmates to calm her and begin to shear. She kicks and trembles and we work as softly as we can so as not to nick her so-tender skin. She calls out to her grown baby and pees so that you move quickly to avoid the piercingly nose-wrinkling liquid. We trade places frequently as muscles cramp, and Sarah's mother Peggy talks quietly to Lana and strokes her. Occasionally one of us runs to gulp a bit of tea from our Thermoses. Some of the wool is spoiled by dung and urine, other parts so full of VM (vegetable matter) that I cannot efficiently clean it. That lot goes to the hedgerow for birds and rodents to carry off for their springtime nests. We smell of lanolin and dung and trampled grass.
Sheared, Lana's halter is gently removed and she kicks and wriggles and runs to her family. A good part of the time the flock is non-plussed by the fleeceless stranger, and will butt and carry on until they are convinced and assured that she belongs with them. That can take a while because sheep are so visual, and seems to us humans grossly unfair, unless we should think of the day we wore an unpopular outfit to school and were laughed at and occasionally pushed by the more thoughtless of our classmates, until they tired of the game. In the last years, however, the flock is kinder and Liam and Nina welcome her with raised heads and low bleats and she resumes her life just a few yards from Liam, her life's love and companion, while her daughter pretends she's not Shetland, but Soay, and leaps and climbs and talks with her flockmates until returning to her mama, as an offspring usually will. A flock is made of clans and it is a complex society.
I gather the mounds of yielding, springy brown and blond fleece and stuff it into an old pillowcase. It scents the Tahoe. We go and shed our outer things outdoors, and wash up thoroughly, and lunch together next to the kitchen, watching the flock from a bank of windows that look to the West.
On other mornings it will be one or two more sheep, Nina and Liam, and sometimes one of the other Shetlands. Soay sheep are less likely to be sheared. Some roo, that is, the slowly shedding bits are pulled off lock by lock -- this is what humans did before shears were common.
After that? The fleece is packed into a tightly closed plastic bag and goes into my deep freezer to evade the clothes moths that would entirely spoil it.
Then, when I have energy and time, the oddly pleasant pastime of picking. In springtime Kentucky can be a breezy, windy place. Just outside the back doors at home I sit on a step with the open bag of fleece, scented with lanolin and straw and a bit of dung. Picking up a lock or two in my fingers -- sheep grow their fleece in sets of hairs that tend to stick and curl together -- I pull at the lock, holding it in front of me so that the airs can toss the hairs and release bits of straw and grass and seeds and the occasional dead bug or tad of dung; they fall in a random rain to my lap and the ground and some makes its way, airborne, into the tall trees that rim our little property. Usually it's necessary to pick out individual bits, fingers pinching and pulling. The lock, a bit cleaner now, goes into another bag, ready for scouring, which is a gentle washing, not the rubbing and scrubbing that the word generally implies.
Hundreds of locks later, washing. Drying in limp bunches, like hairy Spanish moss or the wrack of a mummy's wrappings, in the basement. A little disturbing if you come upon it unexpectedly.
Packed again in an airtight bag until there is time to do what most fleece does not need. My dual-coated Shetlands are a crofter's dream, for they offer downy undercoat for airy yarn and long outer hairs good for socks and rugs, all on one small and delightful animal. Yet the undercoat grows in among the outer coat and the two must be pulled apart. This is slow, my friends, and after a time the hands and wrists and arms tire of pulling on the resisting locks of fleece as the tightly integrated parts release their hold on each other. Of course, some down is lost into the hairs and the other way around. A few fiber mills who take small wool batches have specialty equipment for handling this sort of uncommon wool, but the process is expensive and the only mill, a state away, that I could afford closed. This year I sent fleece to another mill, because I simply cannot hand-process it all and the freezer was full to bursting, but it will not be separated. It has been nearly a year, and the roving isn't ready. I fear it's lost.
The sorted wool is bagged again, and again waits for time to hand-card it, or to run it slowly through my hand-cranked carder, a largely wooden machine with two drums lined on their outer surfaces with closely set wires, which arrange the locks into a fluffy batt.
I pull and elongate the carded wool into a fluffy strips, roving, and wind them into nests. Back they go into a bag.
Later, months and months later, as fancy strikes I pull out the newer spinning wheel, a Kromski Minstrel from Poland, a beautiful and versatile machine, and spin the roving, unwound from its nests, into a thinnish yarn. Good for weaving as a "singles" yarn.
Spinning on the Minstrel, early 2020, not long before lockdown.
Again later, I pull out the wooden bobbins of yarn, and ply some of it into two-ply, Aran-size yarn. It's not always that consistent of course, because I am no very accomplished spinner, but it's still pretty wearable stuff.
The yarn rests a bit after plying and then it's out with the homemade yarn swift or skeiner, and the bobbin is unwound from the distance of half a room as I turn the yard-circumference tool to allow the twist to even out, and wind it into a skein. The turns are counted so I know and mark down the yardage.
Then goes the skein, which twists of itself into a braid, into a bag, until I am ready to swish it in some warm water with a tiny bit of soft soap, and to hang it to dry so that the yarn relaxes a little, and sets into a useful state.
And then, and only then, is it ready for knitting.
And so I knit the Pluviose mitts in garter stitch, the yarn now, from a moorit (warm brown) fleece with bleached tips, to a rich German chocolate color.
Pluviose mitts are simply garter stitch, and thus nice and stretchy over the hand.
Let's not knit just now, but nap instead, says Nutmeg. She loves wool and seeks it out to rest upon.
Just now the mitts sit beside me, ready to be sewn with more yarn into their final shape, the leather button ready to be added to each wristband. Then they will be, after a three-year journey, complete and ready to be wrapped in tissue paper to go under my mother's Christmas tree. She will open the parcel Christmas morning, and wear the mitts, I hope, that started as grass a few miles away, to keep out the chill of a Kentucky winter. While Lana and Nina wear their fleece again this year, warm and toasty under it even in the sere fields lined with leafless trees, the damp and chilling -- or bracing, take your pick -- breeze soughing through the branches.
The cycle does not end, the sheeps' lives and the hands' work, so long as we remember to practice the skills that keep the sheep healthy and the yarns ready to envelop and warm us.
Whatever your beliefs, and wherever you are, may you live in Thanksgiving, Patience, and Hope into the new year and the spring, or the harvest, that isn't so very far away.
Note: because of COVID, most of the images of the sheep are from Sarah's blog. We haven't been able to visit one another, which has felt very strange.
During a walk this afternoon, all bundled up against a sneaky breeze and November's weakening sunshine, I found fallen leaves to appreciate, and spotted mistletoe maybe 15 feet overhead, waxy white flowers blooming while it lives off the sap of the trees that support it. A neighbor waved and I wondered if she could tell that I was pretty tired out despite having walked rather less than a mile. Sure hoped not.
Tired or not, it was a mentally relaxing half hour, a time away from what is honestly is, and has been for years, a daily offensive to push through all the duties of mother and wife and worker before the daily afternoon or evening physical crash. All while knowing that COVID is spreading fast, and knowing that if, Heaven help me, I get the disease, this body cannot fight it very well.
I have a kidney transplant. Have written that before, so some of you have heard about it. Also high blood pressure and other issues, brought on by the disease for which a transplant is a treatment, not a cure, as well as the very medications that keep this person ticking. Like mistletoe berries, they are toxic, but paradoxically, in the right amounts keep the body from rejecting my mother's kidney, a gift beyond any that I tear up about in gratitude so many years later. Those same medications suppress the immune system, making me easier prey for a host of bugs, COVID among them.
When in health, I exercise to build a cache of strength. In health or not, I watch food carefully, am compliant about taking the meds, one of which, a half inch long capsule smells like skunk. Good thing have gotten used to that: the first while taking it was a battle against gagging. The healthy times are largely good, and gratefulness to Heaven and those around me is a daily wave that washes over, as my husband and I raise our twins, now half-grown, and try to be useful and loving to those around us. We live pretty unremarkable lives.
Take this life, and multiply it by the hundreds of millions. Change the circumstances, modest, or excruciatingly difficult, or easy.
As a student in public health, I helped with a quality of life survey in a public hospital in a large city -- in the oncology wing. Where people waiting to be treated for their cancer sat on a concrete floor if there was no chair left, prisoners walked, cuffed hand and foot, to their appointments with their accompanying officer. Some windows opened, some didn't, so the air was usually a temperature you didn't want it to be. And the staff worked against such odds. The patients, too. We talked about how they made their way to their appointment: could they catch a ride, how far was the bus stop from their home, could anyone accompany them to help them with steps or be there if something happened? Some had children, some were raising grandchildren. Some were holding jobs despite their cancer; some were too sick. Most spoke with humor, or upbeat tone, some were still, expressionless, holding it together in an endless tunnel of this-is-what-it-is, this-is-all-it-is.
When I had sepsis once, a hellish gift from E. coli, and had such shooting pains in my legs that I was crying out in the emergency bay for was it 24 hours, and...no, no...it's too hard to bring back; there was a woman nearby yelling imprecations at anyone who came close. She had overdosed on something. How we felt for her, through our own suffering. I got better, and that spring we hiked -- the boys were old enough to appreciate moss and the joy of wading a burbling stream, stick in hand, mud boots on. I hope that woman survived and recovered and is living clean and has happiness.
There was a girl at the transplant recovery house, a preteen, dragging an oxygen tank but cute as a button and talking with her friends on her cell phone. She'd had her second heart transplant, having been born with damaged organs after her family's apartment was sprayed heavily for pests, repeatedly. Her mother was pregnant. I imagine, with her grit, that she made it and maybe she has a family now. She will always take medications. She will always be at risk. Her fellow patient, and mine, a man in his 50s who had worked and raised a family while on peritoneal dialysis for a decade, and had a big garden he liked to talk about with us, as we recuperated in wicker rocking chairs on the porch. His transplant from his brother was a perfect match and he didn't have to take medications like we did. He had damage to his nerves, though, so walked with a permanent shuffle.
These millions and tens of millions of people have lives and stories and many of them have suffered, oh suffered unimaginably, but they are working and raising families and many probably have funds of empathy and understanding and love for others that bring relief and grace to those they meet who are in need themselves.
A few days ago, something had the chance of happening that might have brought COVID home. The environment would be conducive to spread. Hearing about the potential event -- details aren't pertinent -- I held my hand to the kitchen counter, felt the chest tighten, the pulse skyrocket, the ears attempt to ring, all in a nanosecond. Like the evening ages ago when a man stared at me on the sidewalk, then fell in behind as I neared the apartment building, matching his footfalls to mine, and was able to get in the door and into the hallway with me, staring, his face hard, before I made it into a full elevator and the door closed between us. Like the time the lady in the eggplant-colored van pulled into our lane on a highway when my stepmother, sister and I were out to look at wedding dresses, and the car went out of control and hit the median wall head-on. That kind of fear. Existential. I swallowed it down, gritted myself into normality, but not before squeaking so hastily that attending wouldn't be a good plan that I ruffled feathers. It's like that, living under this shadow, continous low-grade stress that blows up every so often. We're most of us humans very stressed anyway. we most of us carry extra burdens, for which God give us strength. The addition of an existing illness to the cocktail is an unwelcome splash of wormwood.
You all, that's what it is, this COVID thing. An existential threat to people who somehow have been dealt the hard hand -- already. Any age, infant to elder, people who already have faced trouble and pain, some physical, some the economic or social fallout of severe illness, many both. Sometimes over and bloody over. The cancer comes back, another brittle bone breaks, a heart attack, an organ fails. I was thirty-two when they told me, during final exams in graduate school, that I had a carcinoma, severe kidney disease, and pink eye, all at once. Who had to visit the dean to beg off exams for a while, and who could barely see to get down the hallway to his office. Felt pretty goofy doing it. That girl at the transplant recuperation house, she was still a kid, our fellow patient a father. We put our lives back together and went on. Most of us? You'd never know there had ever been anything amiss, or if you did, we had the grace to just accept (most of the time) and keep going. There are so many of us with such similar experiences, living right now.
This is going to be a long winter, and for those living way south, a long summer. I don't know what I am asking. Just that the person next door may have already had a bad bout with some awful disease. They're probably pretty good folks. Why not give them a chance? After all, we're all in boats that can tip at any time.
All the best of safety and health to you. Vaccines are coming.
Never trust your first draft, right? Edits are always necessary, and the truism held here, too. Only, for once it wasn't my fault, but a typo on the original 1895 Illustrierte Frauenzeitung draft! Despite the extra work, it's nice not to be saying, "Oh, noooooo".
Anyhow, I cut out all the pattern pieces, and laid them on the floor, folding in the seam allowances where needed so I could check the fit.
Ruh-roh.
Something wrong with the side-back piece, which, in action, actually forms part of the back and gives enough fabric to allow the godet flutes or organ pleats to take shape. Or the back piece.
Uh-oh, something's not right...
Thinking I could have mis-measured, the next eon was spent in running a meter stick along all the seams, measuring them, and checking them against the numbers on the draft. I couldn't find my mistake.
The Pattern Draft Typo
Frustrated, and wanting to get the draft right so that we could see what a godet petticoat cut is really like, I went to bed. And thought about it, and thought about angles. That side-back piece was the one that confused me when drafting it, for the original draft of the piece had two different measures for the line that would be used to create the side-back seam angle. The top of the draft read 90, and the bottom, 99. What if one was wrong and it created a bad angle on the pattern piece?
Urr, thinking about pattern pieces is just what I should be doing instead of falling asleep. On the other hand, I could be thinking of far darker things. Our poor, hurting world... Perhaps a quiet geometry problem before bed is what the doctor ordered.
Now, if you have compared the cut pattern pieces with the draft, you may already have guessed which measure was the correct one and which was the typo.
The bottom measure -- the 99cm -- was the culprit. The FrauenZeitung typesetter may be having his little joke on me, all these years later, and you know what, it happened right at Halloween. OOOoo...
By drawing out the draft's bottom measure to 99cm, the back seam on that piece strettttched out. When the pattern piece was cut out and its right side laid up next to the back piece, its right side was too long.
Good thing I caught the mistake, or we would have even more fabric in the back than we meant to!
The Fix
Pulling out the meter stick and ruler and pencil -- and eraser -- I redrew just the mistaken draft line, this time 9 cm less than before, and that changed the angle and made the right side seam shorter, as hoped. Problem solved. Phew.
That's better! Yes, I'll fudge the one little off bit
Oh, and the little gap between the side front and side back piece length? Fudging it. A cm or so is not worth it.
Rohrenfalten-Rock skirt pattern piece completed! Now I have a master pattern any time I want to make this sort of skirt.
The Petticoat Pattern Pieces
This next step isn't illustrated.
Petticoats are usually a little shorter than outer skirts. I am going to need to cut 2 1/2" inches (6.35cm) off this skirt that's ~ 40 inches/100cm in front, or 2 inches shorter with 1/2" seam allowance that I will need to seam the bottom facing and a hem binding to. Hem binding on a petticoat that doesn't touch the ground? What an oddity, but, that's what's suggested.
So I will copy the pattern pieces onto fresh paper (oh joy), and cut off the bottoms. Then we'll be ready to cut the fabric, at long last!
In other news...
...the boys and Grandmother carved a pumpkin for Halloween, and the boys made Pan de Muerto for Spanish class to celebrate Dia de Muertos, which has a bit of similarity to our church's All Souls Day but which has, to my mind, more joyful elements. Our pumpkin's looking forward to noshing on some of that semi-sweet, orange-and-lemon scented yeast bread, and so am I.
The past few days saw me camped out on the den floor, stretching and leaning and murmuring "ooph, ow!" as I drafted the Illustrierte Frauen-Zeitung Roehrenfalten-Rock (a four yard godet skirt) pattern to full size. In case you want to use it, let me guide you through drafting it, for there are some spots that confused me and a pitfall that it's really, really easy to fall into.
If you look at the original draft above, from left to right the skirt pattern includes four pieces:
"a", the front piece;
"b", the side-front piece;
"c", the side-back piece;
"d", the back piece.
I don't think the draft includes seam allowances, although I could be wrong.
The grainline is vertical, but none of edges of any gore fall on the straight of grain, so that "c" in particular, appears tipped. Cut them exactly as shown or the skirt will not work out as it's supposed to. Many 1890s skirt patterns tend to be cut such that one edge of a gore is on the straight of grain while the other is on the bias; this makes for a seam that's less likely to stretch or bag. This skirt is pretty much all bias seams.: I am a little worried about it but authors of the period say that keeping the fabric on a flat surface as much as possible while cutting and sewing it, and binding each seam with seam tape, are two ways to prevent problems.
The pattern pieces are marked in centimeters, and each number marks an important spot in the pattern. To draft up the pattern, you replicate the drawing, measuring out with a rule marked in centimeters.
I found out what the measurements work out to in American/Imperial inches. The skirt front measures about 40", while the back measures 44". This back length is NOT a train; the length is needed to create those wonderful godets that stand out at the back and brush the floor at the same level as the rest of the skirt. The skirt measures 145" around, or about 4 yards. There some room in the waistline; before darts and the essential godet pleats in the back are taken, we have a total of 44" to work with.
It's easy to simply draft up the pattern in centimeters, rather than fuss with converting the measures. This is especially so because some of the measurements are of less than an inch, and it would be a royal pain to squint at the 16th marks on your rule when you can simply use nice round centimeters.
Note: if you should need to resize the pattern, see the Sense and Sensibility site's page called How to Resize a Pattern. She covers resizing a gored skirt, or you could use the slash and spread method. Just know that you will affect the circumference of the lower edge of the skirt.
Let's Start Drafting
Here below is the first piece (a), the front of the skirt. It's cut on the fold, hence the dotted line on the left side of the pattern piece.
Let's assume that you have a yard stick or meter stick and large sheets of paper ready to draw on, and a pencil with a good eraser. Also, a T-square or L-shaped ruler marked in cm is a great help, because it's nice to be able to lay one arm along a measured line and then measure up or down the vertical arm.
Before you start measuring,watch out! Each vertical or horizontal line starts at the 1 cm mark, NOT at the 0 cm mark. Don't do as I did and merrily slide your ruler to its beginning point, which is usually zero, as you would with many American drafts. Instead, draw on your ruler at the 1 cm point with pencil so you will remember to start from there. If you measure at 0, you will add a cm to each part of your draft and it will be off, off, off. You can see the one I use in the photo of the first piece below; it's black with white marks.
I don't know why the patterns start at 1 cm rather than 0. Perhaps it's because wooden or tape rulers easily wear at their ends and the markings get a little off. Perhaps it's convention. If anyone wants to enlighten me, that would be so nice.
Here's how I drafted the first piece, so you get the idea. Again, you're just replicating the original draft in the magazine, but at full size.
Each pattern piece is set inside a rectangle. Draw that out first:
starting from the top left, at the 1cm mark on your rule, draw a line out to the right to 26cm.
starting again from the top left, at the 1cm mark on your rule, draw a line down to 103cm.
starting at the top right, at the 26cm mark, drawn a line down to 103cm.
starting at the bottom right, draw a line to the left from 26cm to the 1cm mark.
Now you can draw in the pattern piece itself. Here's how I did it; I labeled each step from A to I:
A to B: From the 1cm point on the left side of your pencilled rectangle, measure down to the 2cm point and draw a point. This is where the center of the front waistline is.
B to C: draw down the left side of the pencilled rectangle from 2 cm to 103 cm. This forms the center front of the skirt. Mark it darkly in a dotted line so that you remember to cut your fabric, which you have folded in half lengthwise, on the fold.
D to E: draw a straight line at the bottom of your pencilled box outwards from the 1cm mark to 9cm.
E to F: at the bottom right of your pencilled rectangle, measure up the right side from 103cm to 100cm. Now, from the 9cm mark on the bottom of your rectangle, draw a gentle curve up to that 100cm point. You've formed the bottom edge of the skirt piece.
G to H: at the top of your pencilled rectangle, measure from the 1cm mark to 9cm and make a point there. Now draw a very gentle, almost imperceptible curve from the 2cm point on the left edge to the 9cm point you made along the top. This is your waistline curve.
H to I: Draw an angled line from the 9cm mark on the top line down to the 100cm mark on the right edge. This is the outer edge of the front piece.
Draw in the darts lightly in the approximate place the original draft has them; you will set the darts to best fit your body when fitting the skirt to you.
Now you have your first pattern piece!
The picture below my first pattern piece drawn on some newsprint my husband had stashed for some 30 years. It's getting age spots :}
If you look carefully you can see that none of my pattern lines are closer to the edge of the paper than 2cm; I wanted room to mark everything carefully.
If you really squint you can see that I drew a dotted line 2cm outside the waistline and the right edge of the front piece. These are seam allowances. I didn't drawn an extra seam allowance for the skirt bottom because we are going to shorten it to petticoat length later.
I made sure to label the piece with the name of the skirt, which piece it is, and the grainline. As I drew my lines, I wrote down the cm measures just as they appear on the original draft. Obviously you don't have to do that, but I like knowing what everything measures.
I drew out each skirt piece in the same way, and only found the markings on the "c", side-back piece to be confusing. Here is the original draft -- we're looking at the large pattern piece on the left side.
Here are the three spots I was confused:
Look at the little "6" and the "3" drawn inside the top left of the pattern. Well, the little "3", which sits on its side, reminds us that the waistline of the skirt starts vertically at the 3cm mark, where 1cm is the starting point. That part I understand. However, I cannot believe that the little "6" marks the spot where the top of the skirt gore begins horizontally. When I drew the line for the left side of the the skirt pattern piece from 6cm, boy! The angle sure didn't match that on the original drawing; it was too wide. So, I decided to start at 3cm.
Then too, I don't know what the 9cm mark is along the top of the rectangle that outlines the skirt pattern piece. Surely it isn't the spot where the first "X" on the pattern is placed...when I set it there, it was far to the left of where the pattern has it.
Finally, I don't know what the "90cm" mark is for that sits at the far right of the top. The bottom of the skirt flares out to 99cm wide, not 90cm. I can't help but think that's a typo.
For those of you wondering what those star shapes are that appear on the side-back and back pieces? That's where you are going to attach the elastic band that holds the godet plaits into position. Once the skirt seams are sewn, you will see that the three star marks fall in a line. Be sure to include them on your pattern pieces!
The "X" marks and dots on these two back pattern pieces, I believe, show you where to set the box pleats, I believe, but haven't verified it as yet.
Here is the "c", the side-back piece, as I have drafted it.
That ends drafting the skirt. The next step is to cut out the pieces and make sure they match up, and then compare them to my actual fashion skirt. I will want to copy the pieces and then trim the bottom parts a bit so that the petticoat doesn't show beneath the skirt. Two inches or 5cm should do it.
May You Be as Snug as Nutmeg Kitty
These are trying days, but they have their light moments. Nutmeg kitty has been very, very relaxed with the onset of cool weather. Look at those part-colored paws! Then, a few days ago I was folding laundry prior to drafting out the pattern. She decided to interrupt the folding so that I could focus on the drafting. Good kitty...she gave me almost 2 hours of free time :}
I wish you the snuggy feeling she has been feeling: we sure need a bit of cozy time...
Next time, we will look at the pattern all cut out and set onto the fashion skirt so that we can see
how much should be trimmed off the bottom so that it's petticoat length
what I might need to do to the fashion skirt (!), if anything, to deal with the fact the petticoat is cut for godets while the skirt is definitely not.*
* Yes, I know cotton "wash" skirts like mine weren't supposed to have godets, only skirts made of thicker materials, according to Emma M. Hooper in the Ladies Home Journal, but that doesn't mean that the petticoat couldn't be of a godet cut to hold out the skirt some!
Finally, life has a bit of sewing in it again. The energy simply hasn't been there, a common refrain during annus horribilis 2020. Behind the scenes I've been musing over what I've learned and re-researching as necessary, filling the email inbox with a sequence of emails to self, edited and re-edited to obsession, but touching a piece of fabric? Couldn't muster the muscles. Today's sunshine woke me up. It's so lambent with light and warmth and color, this lizard-chilly body finally felt ready to go, so we're off on a petticoat adventure.
The petticoat is designed several goals in mind: to do the support work for the plain, unlined cotton skirt, as was common; to add as little bulk to the waistline as possible; to be adjustable in size.
The cut is all-important, and boy, advice abounds. There's so much of it that an entire post should be added to the Period Methods to Add Skirt Fullness series, but that will have to wait.
At base, I'd like the cut to produce a look close to that from TheDelineator's petticoat, with its wonderful back godet fluting.
The Delineator, Jan 1895 pp. 58-59
Elegant, isn't it? However, a copy of the pattern is elusive. Besides, it's 3 1/4 yard circumference. Now, writers have said that this is enough; Emma Hooper said three yards "wide" was enough (see quote below); she emphatically did not mean 9 feet across, but circumference.
We know from previous posts that the petticoat could be cut just like the final skirt, so I could use the TV 291 1898 Walking Skirt pattern, which I used for my outer skirt. Its back piece is a straight panel gathered to fit, though, and I want a godet look. However, using oodles of fabric to create a godet cut with the pattern isn't an option, nor have I the design chops that Atelier Nostalgia has with redrawing 1890s skirt patterns.
The pattern I took from An Antique 1890s Black Skirt With Brush Braid In My Collection could work too. It has an interesting back in two pieces, with straight edge on the outer sides, and a bias seam in the middle. However, I wasn't comfortable experimenting with it because I don't know how the back was originally handled at the top, the finishing band having been taken off at some point before I bought it.
So, enter once again The Illustrierte Frauen-Zeitung, a favorite magazine. The March 10, 1895 issue offers a pattern for a Roehren-falten-Rock, or pipe-fold skirt. Here it is:
Illustrierte Frauen-Zeitung, March 10, 1895, p. 68 Side note: you can clearly see the skirt binding or brush braid at the skirt bottom.
Illustrierte Frauen-Zeitung, March 10, 1895
Illustrierte Frauen-Zeitung, March 10, 1895
Illustrierte Frauen-Zeitung, March 10, 1895, p. 64
The skirt base comes to just about four yards (the original pattern is in metric). That's perfect. The top has plenty of room for different waist sizes, including mine, and comes with helpful directions. (The translation will sit in a construction post.) I don't even have to grade it! For those of you who might, do see the Sense and Sensibility site's page called How to Resize a Pattern. She covers resizing a gored skirt, or you could use the slash and spread method. Just know that you will affect the circumference of the lower edge of the skirt.
Some of you might be alarmed by all those bias edge to bias edge seams. Yikes! Ripe for fabric stretching and sagging and all kinds of trouble. The 1890s dressmakers had a cure for that. Miss Davis of Elements of Modern Dressmaking, along with others, suggested that each bias seam be held with a cotton tape, after handling the pieces on a flat surface, trying not to stretch them. The skirt in my collection has just that. It's pretty thin cotton, not today's thick twill tape. A little trepidatious, am still going to use the pattern, and trust to bias tape :}
2. Godets Made from Box Plaits (Pleats)
Look at the Delineator and Illustrierte Frauen-Zeitung pictures again. There are those wonderful godet flutes supporting the back of the skirt, and you can clearly see how each flute is rounded right up to the waistband. It's just ducky. However, for maximum skirt support, the magazine suggests that it be made of haircloth. Well, that's a no-go for me, as it's beyond the budget I've set for this project. Still, I can riff off of the godet idea.
"Each back gore is arranged in a box plait, the plaits being narrow at the top and flaring into godet or organ-pipe folds" (The Delineator, Jan 1895 pp. 58-59). Box pleats, or plaits, as I've been calling them because that's the word usually used then, were a primary, but not exclusive way of creating the actual folds that grew to great, lovely undulations at floor level. To shape the increasing width of the folds and to hold them into place, they were "held well to the back by an elastic strap tacked underneath." (ibid.) Naturally, we'll use both of these methods.
There were different plans for how far up or down the strap would be set, and indeed, how many straps would be used. See Skirt Godet Plaits and Interior Ties for more about shaping the folds. By the way, I've learned so much about them since that post that it needs an overhaul.
By back gores, they mean that the back section would be made of multiple wedge-shaped pieces narrow at the top and widening quite a bit at the bottom, each with two edges on the bias -- a version of today's triangular godet.
3. Yoke and Drawstring
A yoke for a top finish makes sense, too. The wide yoke holds in the abdomen a bit, and the shape is smooth, where a belt can make the fabric below it puff out in the front and sides, something nobody wants. Here's the February 1895 Delineator:
The yoke doesn't have to go all the way around the waist, though, a bonus if you want some good godet flute action as well as size adjustability. Listen to Emma Hooper in Home Dressmaking Made Easy (p. 27):
Make it on a yoke; have it three yards wide, well faced, and then bind with the bias velveteen featherbone binding, which will keep the petticoat comfortably extended; add three bias gathered ruffles, overlapping each other, each five inches wide and the top one with an erect heading; finish the top with a yoke four inches deep; no opening, but a drawstring in the back from the side seams where the yoke ends, the back being faced.
There's a lot packed in there, but for now we're focusing on the yoke:
it's 4 inches deep
there's no placket opening
the fabric in the top back has a facing
two tapes, each attached to the side seam, are run through the top of the facing to make a drawstring
Hooray! No placket (the Delineator petticoat calls for one) and no closure. If I need one I can make an opening with folded edges. I've done plackets for Edwardian skirts, and they're nice, but fiddly and I don't see the need in a petticoat.
Of course, Ms. Davis' petticoat doesn't have godet plaits itself. So how to merge the godet plaits I want with the faced-back on a drawstring? Make three godet plaits in the center, backed with their elastic, then have a small portion of faced fabric in between the godet plaits and the side seam, with two sets of drawstrings. This gives the adjustability that we need, although I may have to cave and put in a hemmed opening in one of those two sections. Complicated, but I want this petticoat to last a while.
4. Boning
Boning the petticoat to hold it out was suggested by so many sources in both the Petticoats with Crinoline, Ties, Bones, Wires! post and in Petticoats Redux that I had to do it. There are lots of ways handle the boning, from encasing it into the hem binding (yes, binding petticoat hems was a thing too), to inserting one to five rows near the hem at inch or less intervals. Obviously, the more you use, the stiffer the hold. And the more like a hoopskirt it gets, I deem, but I have not found a wired example still extant, so I can't say.
Because godet skirts could include a bit of boning or wiring, rather than five rows, that's the way we are going.
Researching replacement boning consumed well over a month, and there were multiple points at which the Grail seemed found --Eureka! -- but then I'd find a deal-breaking flaw. The special products invented to do the job have gone the way of the dinosaur. However, I have two options waiting in the wings. One can cost you nothing, the other is taken from another of my hobbies and is an example of the benefit of having multiple interests. I will start with the no-cost option and if it works, we're done. Otherwise, I will invest the cash for option two.
Lest the wires be too in evidence, frills, ruffles and flounces go over them, so we come to the last ingredient.
Petticoat with haircloth box pleating .Ladies Home Journal, July 1895, p.25
Let her describe the petticoat once again:
The newest skirt, however, is the one shown at Illustration No. 2. It is made of white moreen, and is to be worn under cotton, silk, or any light-weight material that will not stand a stiff lining. It is cut by the godet pattern and has as decoration three box-plaitings of the white haircloth, the top one having as a finish a thick silk cord.
Yum.
I could use true haircloth from B. Black and Sons or Bias Bespoke, but again, there's the expense. Instead, I've chosen Takach Press stiff tarlatan, a tried and true stiffener much used in the decade for such jobs as giving shape to sleeves.
Next Steps
Next up is drawing out that pattern onto large sheets of old drawing paper.
The petticoat body will be made from a set of silk curtains I made for the living room years ago. Just a bit of the silk started shattering due to getting direct sunlight so they were replaced, but I kept the fabric.
Updated August 28, 2021 to add additional information
Goodness gracious, the set of posts about 1890s skirt fullness, of which this is another installment, has gone on for nearly a year. It's getting ridiculous. I mean, really, do we need two posts, 2A and now 2B, about petticoats? Yes: there is quite a lot of information in magazines and newspapers that fills out the picture of the myriad ways petticoats could be designed to give the desired silhouette.
Petticoat pattern with front and back views...and circumference!
The Delineator, March 1895, p. 337
Still outstanding too were questions about appropriate petticoat fabrics that I can actually obtain today. Also, I wanted to know more about constructing those so-tempting petticoats loaded with boning or wire at the bottom. Fashion writers were careful not to utter the word "hoopskirt" or "crinoline", and I daresay they were smart not to do so. Less than a decade previously you might carry a half-grown kitten on your bustled derriere and not know it. I don't think women were really ready for a full-on return of wires in their underthings.
What? There's a kitty getting a ride? Where?
And no, this is clearly not an 1890s outfit,
but a first, unfinished experiment in the 1870s.
Darling kitten courtesy
Leijurv - Own work, CC BY-SA 4.0,
https://commons.
wikimedia.org/w/index.php?curid=90553702
Wait, really? A kitty riding on top of your bustle? I imagined that image, but decided to look it up, because that's what we do these days when we're homebound, and it happened, sort of... Read about Feline Dress Improvers: The Victorian Fashion in Bustle Baskets for Cats on Mimi Matthews' site. It's too funny!
Back to mid-1890s petticoats. Back I went into available literature and pictures of extant petticoats. Therefore, in this post we look at two period petticoat patterns for hem circumference and design information, then mine 1895 newspaper articles for more ideas on how to make petticoats stand out. In between we talk fabrics. Then let's be done; I just want to make the petticoats already!
Two 1895 Petticoat Patterns Address the Problem of Flaring the Skirt Bottom
Front of 1890s brocade skirt and-petticoat, from Liveauctioneers
Side view. Such back amplitude!
The petticoat, from what appears to be a side-back angle.
Notice that it's cut more narrowly. I wonder if they
stuffed it to make it look so stiff...or if part of it
contains wires?
Such a heavy skirt did not need petticoats that were roughly the skirt circumference to hold them out. So we don't read oodles and oodles about exactly what petticoat hem circumferences should be. I did find a mention in the Evening Star (July 13, 1895, p. 15), saying "The petticoat should be only moderately full, two yards and a half is ample width for a medium-size woman, and three yards and a half of embroidery, a big allowance for a ruffle, no matter how wide." Advice like this tended to change over time, however. For example, by 1896 fashionable petticoats had a larger hem circumference.
Other writers appear to say something quite different. Here is the Ladies Home Journal writer Isobel Mallon's advice:
Except for a greater fullness the petticoats are cut almost exactly like the dress skirt. Lawn or cambric is used for them, although when thin white dresses are worn petticoats of dotted muslin are chosen, and being light tend to make the whole costume very cool and pleasant. The skirt of lawn with three ruffles, having upon them a group of tucks on each side of the lace insertion, and then below that a lace edge, is one that can endure much soap and water, and, not being over-trimmed, is good form. The fancy for setting lace in the skirt itself no longer obtains, and if anything, the trimming, which is all put on by hand, is simpler than ever before. A ribbon belt is usually drawn through a casing at the top, so that one may have one's skirt belt as loose or as tight as may be agreeable, and then, too, the doing away with the old close belt, to which the skirt was gathered, makes it much easier to iron the petticoat itself. ("Dainty Styles in Lingerie", by Isobel Mallon, Ladies Home Journal, August, 1894, p. 23.)
I simply don't understand the "except for a greater fullness" part. Should I pull out my skirt pattern
(TV 291), and cut it a bit fuller to make a petticoat, or is it the dress skirt that is cut fuller? What are my design options?
Well, I finally have located two petticoat patterns with circumference information, and two different ways of handling a fullness, especially on the all-important backside.
A Haircloth or Moreen or Sateen, Etc. Godet Petticoat
Here's the first pattern, dating to January, 1895. Do you see the pencil marking 3 1/4 yards? Whomever owned this Delineator issue was concerned about petticoat circumference too, for that's the actual circumference of the petticoat. It's actually not a super-flaring petticoat. Not surprising: fashion would decree much more flare later in 1895 and 1896.
The Delineator, Jan 1895 pp. 58-59
First part of the description
The Delineator, Jan 1895, text pp. 58-59
Second part of the description
The Delineator, Jan 1895, text pp. 58-59
This godet plait design wouldn't work for Isobel Mallon's recommended summer petticoats of lawn or muslin or dotted muslin. None of those thin, soft fabrics will hold an organ pleat. Instead, the pattern description recommends moreen (more on which later) or silk. The moreen has good body and the silk some body.
The pattern description also suggests the seamstress make it in haircloth. An outer petticoat could be put over it, as haircloth isn't exactly prepossessing. Then it would take the place of a heavy interlining in the skirt itself. We read about haircloth a good bit in previous posts. Now that we can see a pattern of a petticoat that uses it, it makes a great deal of sense. However, you can also intuitively that such a petticoat would be warm to wear in the summertime, especially in humidity.
A Lighter Petticoat in Taffeta, Muslin, Etc.
What of petticoat pattern option two? This one is a little more flared at bottom, at 3 1/2 yards in circumference. While it is designed to be made of taffeta, and would be very pretty indeed with its pinked ruffles, this one can be made in muslin or lawn, just as Isobel Mallon recommends for summer wear, if a little starch was applied to the ruffles. Remember from the last petticoat post that lots of starch was frowned upon.) In very thin fabrics the bunching of the gathers would not create a large foot flare, even if multiple were worn, but as the pattern description claims, in a taffeta it would offer some fullness and flare. Silk is hot to wear in the summer, though; be advised!
The Delineator, Mar 1895, p.337
The Delineator, Mar 1895, p.336
Do note the waistline finish on this petticoat: it's smooth, no waistband! Instead, it relies on an interior facing (in the text labeled an "underfacing") to "avoid the need of a placket". They might also have written that such a facing would present a smooth finish, with no potential for poofing at the front or sides due to a narrow waistband, and that a facing, being wider, distributes the weight of the petticoat more across the body.
If I were to use this pattern in lawn for enough petticoat-ery to add real flare, I'd need two or three! Speaking of flare...
Aside: New Information About Skirt Fullness and Flare In Unlined Outer Skirts -- Not Every Skirt Flared
How much skirt flare do I want? I've recently discovered that some people felt that a flaring silhouette in a plain cotton "wash" dress, like the one I have made, wasn't good form, and that some illustrated summer dresses are narrow indeed, while there's a lovely extant with what looks like plenty of flare. I've edited the Period Methods to Add Skirt Fullness, Part 1: Fullness and Flare post with the new information.
Yet Another Look at a Widely Flared Petticoat: No Godets This Time
For research's sake, I'd like to introduce you to another petticoat sans waistband at top, and also sans godet plaits, that relies on cut, drawstring, and flounce to set the silhouette. The description shows that this pattern was designed to use fabrics with some body to them and that it was considered "dressy". This pattern is also from the prolific Delineator Magazine, this time in June 1896. We'll let the magazine speak for itself again:
Ladies' Gored Petticoat-Skirt, With Ruffle-Bordered, Bias Spanish Flounce Forming the Lower Part
No. 8392. Taffeta silk was chosen for making this dressy petticoat-skirt, which, because of its deep flounce, retains the stylish flare at the foot without unnecessary width at the waist. The skirt consists of a front-gore, two gores at each side and a back-breadth. It is fitted smoothly at the top of the front and sides by darts and the skirt is lengthened by a bias flounce, the upper edge of which is turned under and shirred on a cord. To the lower edge of the flounce is sewed a narrow, bias ruffle that holds the skirt out well from the figure and forms a dainty finish. The flounce is ornamented by a deep, bias trimming flounce that is turned under at the top to form a self-heading and shirred on cords at the top and hemmed narrowly at the bottom; the trimming flounce is decorated with two silk ruchings, the whole arrangement increasing the flaring effect and making quite an elaborate foot-trimming. The top of the petticoat is finished with an under-facing, which forms a casing for tapes that are tacked back of the darts in the side-gores and drawn out through openings made at the center of the back, thus regulating the fullness about the waist and avoiding the need of a placket. The lower edge of the petticoat-skirt measures three yards and a fourth round in the medium sizes.
Silk, sateen, mohair and alpaca will be appropriate for petticoats of this style, and ribbon, beading, insertion and lace edging may be chosen for decoration.
We have pattern No. 8392 in nine sizes for ladies from twenty to thirty-six inches, waist measure. To make the petticoat-skirt with the trimming flounce for a lady of medium size, will need twelve yards of material twenty inches side, or eight yards and an eighth twenty-seven inches wide, or seven yards and a fourth thirty-six inches wide. The petticoat-skirt without the rimming flounce requires seven yards and five-eights twenty inches wide, or five yards and three-fourths twenty-seven inches wide, or four yards and three-fourths thirty-six inches wide. Price of pattern, 1s. or 25 cents.
Delineator 8392, June 1896, front
Delineator 8392, June 1896, back, and showing alternative, highly decorative fabric
Delineator 8392, June 1896, plain version
N.B. Source: Internet Archive Wayback Machine copy of defunct Dressmaking Research site: https://web.archive.org/web/20160614084019/http:/dressmakingresearch.com/1890s_under_dress.htm. Ordinarily I would not pull such a large section of text and images straight from another site, but this HTML page was defunct, and was itself a direct copy of the original Delineator content.
About the Spanish flounce: Home Dressmaking Made Easy (1896, p.59), defines the Spanish flounce as "A flounce extending fully half the depth of the skirt, gathered usually to form an erect ruffle." We will hear about it again in the section about newspaper articles, below: it appears to have been quite popular.
This particular passage shows us just how fabric-eating these petticoats could be.
Newspaper Evidence: More Ideas for Designing a Petticoat That Stands Out
Last go-round I dug around in women's magazines, but left the newspapers alone. I shouldn't have. The then-called women's pages (!) tended to cover all things fashion, as well as housekeeping and society doings. There is actually a good deal of petticoat talk, stashed among the doings of society women and beauty secrets and calisthenics, and advertisements for Dr. Price's Cream Baking Powder.
Let's see, we have illustrated calisthenics...now I like that. We'll skip the "Dress for Elderly
Ladies", for they'd assign me to that category without comment. There's "A Pen Picture of Rome" from a correspondent, a whipcord suit, and, bingo! a bit about a short lawn petticoat. Where this is, there's more.
Kansas City Daily Journal. June 09, 1895, Page 10
I've gathered for you a nice collection of newspaper clippings from January through October, 1895. There are tons of them, and it's common to see the same article and photos syndicated in multiple newspapers, while content from other magazines and newspapers is quoted or referenced in the texts.
Springy Alpaca Petticoats Are Compelled to Stand Out...and So Are Their Corded Ruffles
The Salt Lake Herald reported that for warmer weather, alpaca "skirting" fabric had a stiffness that made it stand out to hold "expansive dress skirts".
The Salt Lake Herald, May 24,1895, p. 5
Alpaca fabric that I know has lots of amazing drape but no stiffness, so this must have had some sort of treatment added to it. Perhaps it was a bit felted. Alpaca is hard to felt because the hairs lack the rough edges that wool has, but it can be done. Today, I don't believe we have this sort of fabric. On to the next article.
Hidden in the text is another excellent fluff-making trick: "The ruffles, which for a portion of the decoration of every petticoat, are usually more or less corded". Corded ruffles! Why yes, those will stick out nicely. File that one in your memory.
Petticoats Made Stiff With Embroidery
The Evening Star reported in June that petticoats can be stiffened with large amounts of embroidery.
/
Evening Star, July 13, 1895, p. 15
A few embroidered petticoats are in museum collections, so we have independent confirmation of their existence. It could be possible to use machine embroidery to embellish a truly gorgeous petticoat, but this would be a massive project. Sewstine has videos about the process, and it's time-consuming. You might also think about using one of the new embroidered home décor fabrics; not all of them are heavy; but it might be tricky to get the right sort of design.
The article talks at length of how ornate petticoats tend to be, with lace, ruffles, flounces, embroidery, and ribbons, especially in comparison to dress skirts themselves, which in this year frequently were entirely plain.
Pragmatic: Removable Flounces Make One Petticoat Good For Two Purposes
One could make a single petticoat do double duty. Use it plain for a daytime or work dress outfit, and button a pretty muslin and lace flounce to add fullness and luxe to afternoon or evening dress, which generally have more amplitude. This makes really good sense for costumers, as so many of us do not have the wherewithal in time or finances to accumulate too many petticoats.
The Norfolk Virginian, May 26, 1895, p. 13
Petticoats Themselves Stiffened Partway Up
Here's another useful tidbit. Why not stiffen the underneath of your silk or alpaca petticoat? Well, why not? "(L)iberally trimmed", as The Stark County Democrat has it, no one is going to notice. The flounce will hide the business part. Hair cloth would be a period lining, with strong interfacing a modern interpretation, and of course wires or cords would be natural features.
The Stark County Democrat, July 18, 1895, Part Two, p. 9
The Ballet Skirt
Quinn, if you happen to read this post, the next clipping is for you. It tells women about the fashion for especially "fussy" frilly petticoats that they can create to make a divided skirt for dancing.
Evening Dispatch, June 3,1895
Newspaper Articles That Confirm What We Learned Last Fall
Then there were articles that quoted magazine articles we already learned about in the petticoat post last fall, or that talked about methods for distending skirts that magazines also covered.
Brocaded Silk Petticoats With Generous Flounce, Featherbone Hidden Beneath -- and Perfumed
Remember this Met petticoat? Look carefully, it has the rosettes the article talks about.
Then there is the boning mentioned: "frequently a featherbone inserted around the hem". Featherbone was a popular boning product made from turkey quills by the Warren Featherbone Company. Here then is another mention of the helping hoop, if you can call it that, that Isobel Mallon et al spoke of! More confirmation that this is a thing, a fashion movement, if not ubiquitous.
Why, here featherbone is mentioned again, in the Evening Star article quoted above, "To make these skirts yet stiffer, white featherbone is stitched, three or four rows, into the hem under the narrow ruffle. It launders well." By the narrow ruffle is meant "a great many [petticoats] are made with a very full narrow ruffle of embroidery at the foot...." (Evening Star July 13, 1895, p. 15)
It's worthwhile to note that Warren's Featherbone was fabric-covered and thicker than Warren's Skirt Bone, which may have come out in late 1895, if an ad for it may be believed.
I would think that the boning the writer discusses would be hidden by a flounce or ruffling, especially because all of the examples mention them, but it bothers me that the article doesn't say it explicitly.
What also is not clear is what shape the petticoat carries. Is it round due to the featherbone? Does it have godets? Somehow I think not the latter, if pictures of petticoats are any guide.
The Moreen Petticoat With Hair-Cloth Frillings, Again
The Salt Lake Journal draws on Isobel Mallon's Ladies Home Journal advice that we read of in the last post about petticoats. However, this article highlights several bits of important information:
Moreen is used for one of my favorite summer petticoat designs, the LHJ model, the one with the triple haircloth box-pleated frills, in the picture below. Moreen at the turn of the 20th century turns out to be a midweight or heavy wool or wool-cotton fabric, usually ribbed, that's treated with heat and moisture to give it a watered silk effect. (This makes sense to me: when pressed under heat, wool will take on a sheen, and the tendency to felt will be controlled by the cotton content.)
Moreen is pretty, something that neither the Salt Lake Journal nor the LHJ picture show, so the petticoat wouldn't look plain at all, the wool and cotton don't have to be terribly hot, and it's a lot less hot and scratchy than a petticoat entirely made of haircloth.
Petticoat with haircloth box pleatings.
Ladies Home Journal, July 1895, p.25
Alas, when real moreen is available at all, it seems to be a heavy type, sold expensively for upholstery, and finding enough of it vintage would be a real coup. Still, it's clear that the petticoat with the box-pleated haircloth is made of a thickish material, that already has some body. A cotton faille, which is ribbed, might work, a woven pique, or even a cotton ticking. Too thin a fabric and those pretty hair-cloth box pleats would have a hard time doing much.
I wouldn't recommend using synthetic moire fabric to imitate the moreen. It's going to be hot as blazes, unless your summers are usually cool.
The article also rather makes me feel better about my limited petticoat budget. Elaborate petticoats were always expensive, and we knew that. Still, it's nice to be told again that our plain costumer's petticoats are perfectly fine, and that confections still come at a price.
Finally, if you were interested in a short petticoat instead of a long one under your skirt, go ahead, costumer, here's how right in the article, below.
The Salt Lake Herald, June 9, 1895, p. 5
If you look carefully, you can see that the newspaper has adapted
the LHJ drawing f
The Salt Lake Herald, June 9, 1895, p. 5
The above image goes with the article above.
Have you had enough of petticoats for one sitting? I confess that I am worn out by all the options and constant mulling, figuring, and refiguring out how I want to adapt them for one or two of my own 1890s petticoats. That's what is supposed to be the topic of the next post, anyway...how I took everything I learned and put together my own interpretations.
You never know, though. This blog is full of side trips. I have a half written post showing two 1880s wire bustles from my collection in fine detail and with measurements.
In Other News
This year is an Annus Horribilis for our world. For a minute or two I thought I could broach a discussion of local events and how they are related to what is happening across the planet. I can't. Not now. All I can do is wish you all health and safety and secure work, and hope.
(August 28, 2021) Here it is a year later and the Annus Horribilis of 2020 has morphed into Annos Horribilis -- in the plural. I've taken to calling this period the plague years. In contrast to the period from March 2020-March 2021, when we simply all stayed at home, in August 2021 my husband and boys are out and about and vaccinated while the Delta variant rampages and fills our hospitals and cases appear within a degree of separation. I am once again at home, though, on recommendation of the transplant clinic, and life follows a narrow round, while across the planet countless are suffering.


