Our dear friend Debbie, also a professional photographer, captured the day.
 Tommy is christened.
 Noah points at his cousins and friends, who are running about just beyond the camera lens.
 Tommy leads Noah out to play.
 Christopher being Christopher.
 Tommy is christened.Noah points at his cousins and friends, who are running about just beyond the camera lens.Tommy leads Noah out to play.Christopher being Christopher.
 The Parisian fashion world's claim that the fashion was American, and not their own design? Read this article by a non-plussed reporter: "HOBBLE SKIRT IS AMERICAN.; So Paris Man Dressmakers Declare After It Breaks Parislenne's Leg." August 14, 1910.
 Do you want to understand how to construct 18th century clothing from the inside out? Do you want to get close-up shots of cutting, stitching, and trimming details, photographed as the garment is created? Do you want to see an entire museum exhibition in its development phase? Then you might want to visit the "Rockin' the Rococo" blog. It's an oddly bouffant, pouffant name for a seriously researched project, but it fits.
 over the months of July and August in the Museum of London’s costume stores examining extant garments one after another. I spent an average of 1 hour with each garment taking notes according to a template I drew up for myself and shooting an average of 10-12 photographs of the construction details of each artifact.
 The third component is this project, including the exhibition that will be on display on-campus at the University of Alberta over March and April 2009.
This reproduction project represents experiential research and data collection. In addition to reproducing garments I am also replicating certain aspects of an early modern seamstress’s working experience. The garments are made from historically appropriate materials, and constructed using equally appropriate techniques and processes.
Beyond this, I do the work all by either natural or candlelight in order to get some idea of a pre-electricity experience of time and working conditions.
I also (and I know this is going to sound a little hokey) dress up in an outfit that is somewhat appropriate for a fairly successful seamstress of the time. While planning the project, I realized that being “corseted” would be important to the experience, as nearly all women of the period wore stays under their clothing (even the very poor). I also happened to have a costume/reproduction dress on hand that I had made (just for fun!) several years ago. The pattern for this dress was taken from Janet Arnold’s Patterns of Fashion, and so derives from an actual artifact garment. I also wear 2 cotton petticoats, a neckerchief, stockings and a pair of period reminiscent shoes (ok, they’re really pretty and I just like them). I had inteded to make a linen cap to cover my not-so-period hair, but have just never managed the time for it.
 For working I sit on an uncushioned wooden kitchen chair. And at the risk of sounding….uncouth(?) I don’t bathe on my sewing days - on purpose.
I work 10-12hrs/per day, 3 or 4 days/week, and am keeping a log/journal of the specs of the project along with thoughts, impressions, and questions that arise from the experience.
Navigating the Blog
The top portion of the left navigation bar, labeled "Pages", contains blog pages devoted to each garment, and to overviews of the project and the author's background.
The "Archives" pages contain more journalesque information.
Do have at least one visit, and marvel.
Photo: detail of sack dress the Rockin' the Rococo blog author constructed.

 First, hairpins! They appear to be made of a sort of plastic, but they vary a good deal in color and pattern, which I am not used to plastic tortiseshell pieces doing.
The box, labeled "Imperial", isn't much help either. I have no idea how old they are but thought them fascinating.
Photo: six tortiseshell-patterned hairpins from a box of eight.
Second, a length of black bauble trim! It's fun to hold, as the cord is silky and the baubles, which are shaped like tiny short cylinders, bang around in a satisfying way. Again, no idea how old this is.
Photo: length of black silky bauble trim.
First, hairpins! They appear to be made of a sort of plastic, but they vary a good deal in color and pattern, which I am not used to plastic tortiseshell pieces doing.
The box, labeled "Imperial", isn't much help either. I have no idea how old they are but thought them fascinating.
Photo: six tortiseshell-patterned hairpins from a box of eight.
Second, a length of black bauble trim! It's fun to hold, as the cord is silky and the baubles, which are shaped like tiny short cylinders, bang around in a satisfying way. Again, no idea how old this is.
Photo: length of black silky bauble trim.


 Design Options
 In this version, the bodice is a basic square-necked look(again, TV 400), trimmed at neck edge with a tiny tightly gathered lace or voile frill. The overskirt is the common apron-front design, gathered up at the sides and then falling in a fluffy, polonaise-y pouf in back. Both bodice and overskirt would be made of the flowered fabric; again the underskirt and trim would appear in the plain fabric.
 In this dress, the trims are all variations on puffings. The neckline features a narrow puffing with a header on each side; in the center front, about the button closure, there is a small bow. The overskirt is edged with a wider puffing, the stitching on either side of the puffing covered with a blue bias band. Above the scantily flounced underskirt bottom is a similar puffing, even a bit wider.
 Petticoat Patterns

 Sophie Finds a Home...with Natalie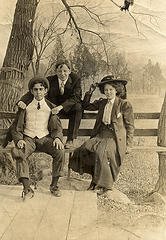
 they make a good starting project. Fashionable and wearable they can be, too. Who doesn't like a little swish around the ankles?
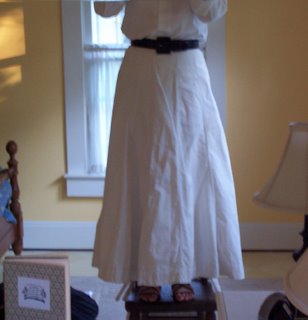 Here's an original walking skirt with felled seams. Functional and pretty! See the blog post "Anatomy of a 1900-1911 Vintage White Heavy Cotton Skirt".
 The skirt is fullish, but is not meant to flare out. Like most skirts of that year, it's composed of multiple gored panels: 9, in this case. The panels help shape the skirt around the body for a smoother line.
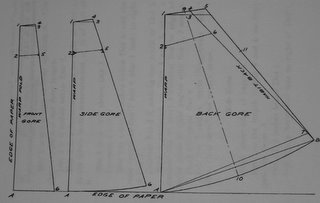 You might also be interested in a plain five-gore dress skirt from 1911. That year skirts flared out around the feet a bit more...the last year long skirts would do so. This pattern for this one comes from a high school textbook of the era called Textbook on Domestic Art and must be drafted. You can download the entire book from Google and print out the pages you need.
 An Narrow 1912 Skirt


 sandwiching the lining, as the lining hangs free. I hemmed it to the inside of the skirt carefully with what the Regency era called "side stitches" and later eras called a hemming stitch.
 After that? I "feathered" the edges of the fabric by laboriously pulling threads until I had a narrow fringe.
 From our family to yours, a very merry Christmas. The creche you see belonged to my mother's family, and battered as the figurines are, I couldn't imagine unwrapping and setting out any others. Displaying them, I see the Christmas miracle, but also memories.


 Indoors, we will create a little springtime of our own, in the back guestroom, where morning and afternoon, it is always bright.


