Last evening marks the second time the boys had fun with a pan of warm water. I set it out, plopped one boy on each side, and let them have at it. On the first go-round several weeks ago, Noah leaned over and put both hands in, splat. Christopher tested the water with a hand repeatedly, pulling his fingers away after a moment's contact and then looking at them.
This time? Both boys put their hands in the water splat. And splat. And splash, plash, plash. Their outfits both received a soaking, as did the front of my skirt and slip.
Oh, did they have fun, and oh, did they want to smile at us about it all!
Here's a little video.

Wednesday, January 23, 2008


Friday, January 18, 2008
Christopher Kneels at Crib's Edge
 Today, for what we think is one of the first times, Christopher pulled himself up to a kneeling position using the crib rail. He was so proud of himself that he remained there, meditatively sticking out his tongue from time to time, telling us about the view, and smiling. He remained there so long we were able to get photos and even a short video.
 Later on, as the chilly air outside got chillier, the draft coming from under the front door became worse, so I ran to the grocery and bought two 10-pound bags of rice. No, we're not eating rice to generate heat. Instead, I sewed up a tube of fabric long enough to reach from one end of the door to the other, and stuffed it with the rice. Now it excludes the air quite well, if not perfectly. Since it's to drop to 5 degrees tomorrow night, we needed this aid in a hurry.
Noah helped me. He is fascinated with the sewing machine; don't worry, his fingers are being kept far, far away from moving parts.
 Here's another of Noah and the machine, a Singer 27 handcrank, who, as Miz Johnny explained to me recently, is a very companionable, amenable, hard-working elderly lady :}
Here is Christopher at the edge of the crib:
Monday, January 14, 2008
A Wrapper, But of What Year?
 Sometime last fall I was lucky enough to purchase a vintage wrapper. From its shape and construction, I estimate to be anywhere from the 1890s to the early 1900s, but am not quite sure of the real date.
The garment is of a black and white soft cotton flannel, and appears, from construction details to have been sewn at home. The bodice trim is a soft ecru coarse ribbon or tape. It is sewn on the dress in nice curves, but when viewed up close, the stitching that holds it down wanders a great deal, as if done in a hurry.
The bodice opens way down the front and the neckline opens into a squared V. The upper portion of the placket opening is closed three black buttons reaching down to the waistline. The buttons are mounted to an overlap that is made of a separate band of fabric sewn to the left bodice front, and the underlap piece holding the buttonholes is also separate and sewn to the right bodice front.
At the waistline a self belt with ends cut to arrow points  is attached at the side seams;
  I imagine that it ties in front. Otherwise the rest of the front placket would gap open. Part of that remaining opening is -- partially -- covered by a small rectangular band the width of the underlap, sewn with a line of the ecru trim down the middle, and tacked to the underlap. It is not nearly long enough to reach to the bottom of the placket opening and I can't see how it was ever effective. Is a piece missing? Was this a hasty fix to a faulty front opening?
 is attached at the side seams;
  I imagine that it ties in front. Otherwise the rest of the front placket would gap open. Part of that remaining opening is -- partially -- covered by a small rectangular band the width of the underlap, sewn with a line of the ecru trim down the middle, and tacked to the underlap. It is not nearly long enough to reach to the bottom of the placket opening and I can't see how it was ever effective. Is a piece missing? Was this a hasty fix to a faulty front opening?
The yoke section of the bodice is lined with coarse muslin that's now ecru in color; it might once have been white. The curved yoke seams are not seamed right sides together. Instead, the wrong side of the yoke curve is seamed to the right side of the bodice front. The seam edges are left unfinished and that ecru trim is just sewn up from the seam up to the edge of the allowance. If you look carefully underneath you can see that the edge of the fabric is very slightly frayed.
 The collar is set on separately and trimmed with the same trim as elsewhere.
Towards the yoke bottom a very prettily arranged frill is sewn, the join seam covered by more ecru trim.
The sleeves are set right on the top of the shoulder and are gathered in enough to create a very small puff. Again, the gathering was done in a hurry: some gathers are sewn so the resulting pleat lays frontwards, others backwards, and the gathers vary greatly in position from one sleeve to the other.
 Note that the sleeves are shaped: each sleeve is cut in one piece, but curving in from the elbow, so that when worn the sleeve will sit nicely on the arm, without excess wrinkling. A small tear at the front sleeve seam shows where stress was likely applied to the garment by the person wearing it. I doubt that the garment would have torn there otherwise, but could be wrong.
The self cuffs are some two inches deep. They are constructed in four pieces, sewn right sides together and then turned to create a finished tube, and joined to the sleeve. The seam is covered with the ecru trim. The cuffs ensure less wear at the sleeve edge.
The back of the wrapper below the toke is in two pieces, seamed down the center. At the top, an inner and outer box pleat are set in a point at the yoke point.
 The wrapper hem would just trail the ground, I believe. The bottom of the skirt is simply turned up rather than being faced. A narrow edge is turned to hide the raw edge, and then turned again in a wide hem. To help pull the skirts to the back of the body, the hem is some three inches wide in front, while it gradually widens to between four and five inches in back. Where necessary, small pleats are taken in the hem to account for the fact that there is more fabric in the hem length than in the length it is hemmed to.
All in all, the wrapper shows what I think are some nice design and construction elements: the pretty front bodice frill, the handsome yoke and flowing back pleat treatment, the graduated hem. At other points, however, the garment appears to have been constructed rather hastily, and not everything worked. That front opening just confuses me.
An Edwardian Ruche-Trimmed Hat, part 2: Pictures
 Oh, seven or so months after I finished and wore this straw hat to tea with our society at Flag Fork Herb Farm, here finally are pictures. Over a year and a half ago I'd started the hat and steamed it into shape, and had begun the laborious task of pinking and then ruching cream-colored dupioni silk to the entire underside of the hat brim and a bit of the top.
By the time the hat was finished, the shape had worn out and the hat brim flopped again. If you want the shape to be stable, you should store your hat in its own box, the brim sewn, if necessary, into the correct position. Instead, I had put the hat in a closet and eventually other hats came to rest on top.
Here are pictures of the results. At the tea we decided we preferred the flat brim to the original Cavalier-tilt version planned.

Here is the hat underside.
And a detail of the silk ruching.

Finally, the hat as worn to tea.
 Since the hat design is meant to evoke 1910-1910, the era of enormous, grand, over-the-top hats, the era which also saw a pencil-thin dress silhouette to balance the wide toppers, I wore a narrow-lined dress. However, since I'd had those twin boys two months before, the silhouette was less slim and appealing than planned. Ah well.
Note that had I worn the hat in period fashion, it would have sat tilted more forward by far than it does and the underside would not show nearly as much. It would also have been trimmed with several long, full ostrich plumes.
Wednesday, January 02, 2008
What, More Baby Videos?
The remainder of the Christmastime clips of Noah and Christopher, promised a few days ago:
Our Babies Dance to Aaron Neville
They really enjoyed Aaron Neville's Lousiana Christmas Day.
Christopher Says, "Mna, Mna, Mna, Mna"
This one you'll have to turn sideways, because I don't have video editing software yet and so cannot change the orientation!
Our Babies Dance to Aaron Neville
They really enjoyed Aaron Neville's Lousiana Christmas Day.
Christopher Says, "Mna, Mna, Mna, Mna"
This one you'll have to turn sideways, because I don't have video editing software yet and so cannot change the orientation!
Sunday, December 30, 2007
Christmastime Silliness with the Twins
The boys sure have enjoyed their first Christmas season. They've laughed and giggled until they've worn themselves out, have shaken wrapping paper and crinkled up circulars from the daily paper, Christopher has mastered sitting up, and Noah has mastered the art of the screech. Herewith, video documentation:
Christopher Gets More Than He Bargained For
Playing in the Good Ship "Noah"
I didn't know boys could laugh together so much. This sort of thing goes on intermittently all day.
Noah Takes Control
...of the video camera. Apparently he wasn't enamoured of all the attention his brother was getting.
To Come on Monday or Tuesday:
Christopher Gets More Than He Bargained For
Playing in the Good Ship "Noah"
I didn't know boys could laugh together so much. This sort of thing goes on intermittently all day.
Noah Takes Control
...of the video camera. Apparently he wasn't enamoured of all the attention his brother was getting.
To Come on Monday or Tuesday:
- our babies dance to Aaron Neville
- Noah's hiccups have him trying to go airborne
- Christopher says: "mna mna mna mna"
- The tumble and what came of it
Wednesday, December 19, 2007
The Twins Again: Merry Christmas!
Noah and Christopher wish you a very merry Christmas.
This morning, Noah played a baby shepherd. Here he is:
On the Third Sunday in Advent, we dined out with friends at Holly Hill Inn, and the boys dressed up. After returning home, they played in the family room, and at one point Christopher decided to take one of Noah's socks off. Lots of laughter followed. Here they are:
This morning, Noah played a baby shepherd. Here he is:
On the Third Sunday in Advent, we dined out with friends at Holly Hill Inn, and the boys dressed up. After returning home, they played in the family room, and at one point Christopher decided to take one of Noah's socks off. Lots of laughter followed. Here they are:
Tuesday, December 11, 2007
Dad, a Few More Scenes of the Twins!
My, my, my, are the babies morphing. A few weeks ago, they noticed each other but only one at a time. As of a few days ago, boom, we have two little babies who enjoy each others' company!
Noah and Christopher are fun to feed, too. No more tickling their faces to encourage them to eat cereal. Like little birds, they're ready with their mouths open, these days. Mmm, Noah says, mmmm, good.
Laptime
Here, then, Noah and Christopher sitting on Mama's lap on a cloudy day, giggling and talking and batting each others' faces.
Now, the results aren't always this giggly...was it two days ago? Christopher liked Noah's apple-bright cheek so much that he reached over and pinched it, and didn't let go. Jane had to step in, and of course Noah was wailing. When I walked in a few minutes later, Christopher played up his angelic face, while Noah's eyes were rimmed with red.
MMM, MMM, Good!
Here we have Noah telling us that rice cereal, like Campbell's Soup, is yummy in the tummy.
Noah and Christopher are fun to feed, too. No more tickling their faces to encourage them to eat cereal. Like little birds, they're ready with their mouths open, these days. Mmm, Noah says, mmmm, good.
Laptime
Here, then, Noah and Christopher sitting on Mama's lap on a cloudy day, giggling and talking and batting each others' faces.
Now, the results aren't always this giggly...was it two days ago? Christopher liked Noah's apple-bright cheek so much that he reached over and pinched it, and didn't let go. Jane had to step in, and of course Noah was wailing. When I walked in a few minutes later, Christopher played up his angelic face, while Noah's eyes were rimmed with red.
MMM, MMM, Good!
Here we have Noah telling us that rice cereal, like Campbell's Soup, is yummy in the tummy.
Sunday, November 25, 2007
The Twins Are Growing, and Each Has Discovered He Has a Brother
This past month I've been taking short videos of the twins with my camera. The results may be grainy but they sure are fun. At this point the boys have each discovered that there is another creature like himself in the house. This results in some interesting exchanges. Sometimes things are a little one-sided, and at other times (oh no!) the boys already show their facility for claiming what is another's. You'll see if you watch...
Noah Discovers He Has a Brother
Noah Steals the Ducky Book from Christopher...
and Christopher Steals it Back (after a distracted moment)
Happy Twins Say Good Morning!
Noah Discovers He Has a Brother
Noah Steals the Ducky Book from Christopher...
and Christopher Steals it Back (after a distracted moment)
Happy Twins Say Good Morning!
Wednesday, November 07, 2007
Two Little Halloween Bears

Here are Noah and Christopher in their Halloween hats and mitts: they dressed as little brown bears. They didn't want to show their paws, little bums: the insides of the paws have little light-brown paw pads!
I sewed the hats and mitts on my antique Singer 28 handcrank, a lovely machine, so easy to use, so accommodating of fleece!
Wednesday, October 31, 2007
A Half-Edwardian Ensemble (Historybounding)
 Edited Sept 17, 2021 to note: This was an early example of historybounding :}
Today is Hallowe'en, and this week on the Sense and Sensibility board it's "Week in Historical Dress". So today I dressed in an Edwardian-inspired mode. Curte and I lunched at the Ashland estate, home of Henry Clay, Kentucky's hero and our nation's Great Compromiser. Afterwards we took a few pictures. The first shot was taken in Ashland's formal garden, which is walled by 7-foot hedges, and arranged into beds of perennials, topiaries and shrubberies, lime trees in pots, and statuary.
About the outfit: The 5-panel herringbone wool skirt and underlying flounced cotton petticoat were drafted from a 1911 pattern. My locket is from my mother's family and is inscribed for Christmas, 1911, while the gold bangle dates to somewhere in the same period. The turtleneck mimics the high neck and tight sleeves popular during that age, as does the loose bun hairstyle. The belt is appropriate for work wear, although its dimensions mayn't be right. As is typical with these types of outfits, my shoes aren't appropriate; I am wearing loafers. I have some heels with a basically proper look, but they are too high, so that the skirt length goes off: it should be around the shoe tops or so.
 The second image was taken on the piazza at the back of Ashland house. Ashland was built in the 1850s, and is such a friendly place. It sits on 17 acres in the Ashland Park neighborhood of old Lexington; that neighborhood was developed in the 1920s from Ashland farm and neighboring Woodland Farm (I believe), under the design guidance of the Olmsted brothers. What a rich farm it had been; we live in Ashland Park and the topsoil in our back garden is thick, dark, earthworm-riddled loam. Here it is October 31 and a local strain of phlox, from a family in nearby Versailles, is still blooming, as it has been since June.
It seems that most Ashland Park residents treat Ashland as home and a sort of extended back yard. We lunch there at the Gingko Tree, an outdoor cafe that offers traditional Kentucky lunch dishes, loaded with cream and good things, we picnic there, walk, jog and play frisbee there, we help in the gardens and volunteer in the house, and each Labor Day we attend a jazz concert there. I like to hope that the Clays would be pleased that we love their old home so well.

About the outfit: The 5-panel herringbone wool skirt and underlying flounced cotton petticoat were drafted from a 1911 pattern. My locket is from my mother's family and is inscribed for Christmas, 1911, while the gold bangle dates to somewhere in the same period. The turtleneck mimics the high neck and tight sleeves popular during that age, as does the loose bun hairstyle. The belt is appropriate for work wear, although its dimensions mayn't be right. As is typical with these types of outfits, my shoes aren't appropriate; I am wearing loafers. I have some heels with a basically proper look, but they are too high, so that the skirt length goes off: it should be around the shoe tops or so.
 The second image was taken on the piazza at the back of Ashland house. Ashland was built in the 1850s, and is such a friendly place. It sits on 17 acres in the Ashland Park neighborhood of old Lexington; that neighborhood was developed in the 1920s from Ashland farm and neighboring Woodland Farm (I believe), under the design guidance of the Olmsted brothers. What a rich farm it had been; we live in Ashland Park and the topsoil in our back garden is thick, dark, earthworm-riddled loam. Here it is October 31 and a local strain of phlox, from a family in nearby Versailles, is still blooming, as it has been since June.
It seems that most Ashland Park residents treat Ashland as home and a sort of extended back yard. We lunch there at the Gingko Tree, an outdoor cafe that offers traditional Kentucky lunch dishes, loaded with cream and good things, we picnic there, walk, jog and play frisbee there, we help in the gardens and volunteer in the house, and each Labor Day we attend a jazz concert there. I like to hope that the Clays would be pleased that we love their old home so well.


Wednesday, October 24, 2007
Christopher and Noah, in Motion
Summer passed, and fall is passing. Outside the bedroom window I hear a heavy breeze, heavy with rain, and cold to boot. Yes, it's 50 degrees; so says the thermometer. Goodbye, warm weather!
 It's beginning to be the time of year for more indoor activities, and pulling together family pictures and videos is just one of those. Of course, we've been inside most of the warm months anyway. The twins needed so much care, being preemies, and the drought brought dog days to Lexington from June onwards, with few breaks. There weren't many evenings cool enough to plop the boys in the stroller and take them outside.
Left: Christopher in an arty shot, burrowed into his blankets.
Despite the heat and all the work, we had time to enjoy our new little family, and so this evening I have a few videos and pictures to share. The videos are short, but, well, we enjoy them. Perhaps you will too.
And no, I haven't forgotten sewing. I have pictures to share of several more pieces of vintage clothing I've come home with and studies, and several new online sources for vintage fashion information.
The Twins' First Videos
Here is Christopher trying rice cereal for the first time.
Here's Noah's first solid food experience, and yes, it's rice cereal, too.
Here is a slice of a incandescent Sunday afternoon, with babies and cats, on the front porch.
Finally, we record Christopher's private language. Is he a soprano chipmunk?
A Few Still Pictures

The boys of a sunny morning, watching their mobile. Noah is to the left, while Christopher, at right, works on turning over. Getting himself from back to stomach is his primary activity these days.
 Noah at the dinner table.
 It's beginning to be the time of year for more indoor activities, and pulling together family pictures and videos is just one of those. Of course, we've been inside most of the warm months anyway. The twins needed so much care, being preemies, and the drought brought dog days to Lexington from June onwards, with few breaks. There weren't many evenings cool enough to plop the boys in the stroller and take them outside.
Left: Christopher in an arty shot, burrowed into his blankets.
Despite the heat and all the work, we had time to enjoy our new little family, and so this evening I have a few videos and pictures to share. The videos are short, but, well, we enjoy them. Perhaps you will too.
And no, I haven't forgotten sewing. I have pictures to share of several more pieces of vintage clothing I've come home with and studies, and several new online sources for vintage fashion information.
The Twins' First Videos
Here is Christopher trying rice cereal for the first time.
Here's Noah's first solid food experience, and yes, it's rice cereal, too.
Here is a slice of a incandescent Sunday afternoon, with babies and cats, on the front porch.
Finally, we record Christopher's private language. Is he a soprano chipmunk?
A Few Still Pictures

The boys of a sunny morning, watching their mobile. Noah is to the left, while Christopher, at right, works on turning over. Getting himself from back to stomach is his primary activity these days.
 Noah at the dinner table.
Thursday, June 28, 2007
In Memoriam: Zip Zip Kitty, April 1992 - June 2007

Our Zip Zip. Oh how we miss her. Our Purrpaw; little Foursquare - her squares of calico color decorating the back of her neck in quadrants; Purrball; Kitty Zip; Kitty in a Catsuit; Wibble; Whipple; Kittens Plural (applied to one cat: go figure); Sweet Purr, Zhip-Zhip. Endless affectionate names to call our sweet best companion for 15 years. Her mother, Inkspot, of whom Zip was probably the last living of her five kittens, is so blue without her kitten-soft, thick-furred, blue-eyed, dilute calico daughter. She asks to go outside and then sleeps endlessly in her rocking chair on the front porch, and we find it as hard to console her as we find it to console ourselves.
At left, Zip Zip in late 2004.
Zip Zip, my husband, and I shared our lives' most important moments to date. Zip's fascination with strings and sewing notions, her waiting at the base of trees, nose upraised, ears perked, tail quivering, while squirrels danced, heads down, and chattering, teasing her just feet above. She wouldn't hunt, but loved to watch, and the squirrel population grazed nearby restful and unmolested. Zip, her tail like a flag, galloping ecstatically to Curte in the backyard, to roll over in the grass and rub her back in it, purring, while he talked to her, Zhiiiip, Zhipppp, you silly. Her bout with bone cancer, which took her left foreleg; I stayed and slept with her in the guest room until she recovered enough to manage the rest of the house. Through rounds of kitty dialysis and special food, from which she'd rebound with energy and purring largely intact.
 She helped us through my bout with severe chronic illness, through graduate school, multiple moves, meeting my future husband and thinking he was a good guy worthy of napping in his lap, marriage, two house renovations and endless furniture rearragements, both of which she disliked as a unwanted change in a happy routine. Though our marriage, and move to my husband's hometown: the drive up I-75 left her meowing faintly and continuously in my arms while I tried to steer, while her mother foamed at the mouth, all of us panting because we had the heat on in the Saturn to help the overheating car survive a traffic jam. Through my pregnancy and the arrival of the two boys.
At left, Zip Zip on June 22nd.
She fell at age 15 years to the effects of chronic kidney disease and the stress of getting around without her left foreleg, lost to bone cancer two years ago. The arrival of the boys didn't help: she felt confused and we were all stressed trying to pay loving attention to all of each other, and none getting enough.
Not Much Sewing for Awhile: The Twins Have Taken Over!

My goodness, is time a different entity now! Since the arrival of our twin boys on May 31, time has become both more blurred and less elastic. We live by their stomach clocks: every three hours the boys open their bow-shaped mouths like tiny birds for their next bottle of milk. We grab sleep, wake, run errands, wash them, love and hug and kiss them, during the intervening hours, whose minutes flee so quickly.
At left, our twins at three days old.
So quickly and through the fog of sleep deprivation, so that it's already difficult to remember that their fingers measured less than the length of my pinky fingernail just four weeks ago, that they slept through their feedings, that we hardly knew what color their eyes were, that we were elated and I was in pain from the sequelae to the c-section for weeks, that to compound the change we lost our beloved companion Zip Zip, for whom this blog is named, and spent days worrying about her decline, days crying mourning our loss, until now it's a soft ache that I doubt, like all good loves, will ever fully fade away.
Now we each of us have had some measure of sleep, Mom, my husband, and I, and the boys are growing and growing, and the smaller twin, at six pounds, and plucky as he was in the NICU, is first to look around him with interest, first to examine patterns of black and white. Born at 35 weeks, 4 lbs. and 15 oz., he didn't need but a little forced air for a short time, and the warmth of the heated beds, and by his second day my husband was feeding him with a bottle and he was drinking in the same methodical way that he maintains now. He was Baby B, the baby to the right, before birth, and he didn't move and wiggle as much as his brother, so we named him Noah, which means restful and peaceful.
 His brother is more volatile: he gulps his milk and then has a hard time burping; he eats too fast unless you set him up for a slow, quiet meal, and then is gassy and miserable and worries his parents and grandmother. He's bigger, too, and was at birth too, but, we understand from the NICU that the bigger twin often has a harder time. He needed forced oxygen and a feeding tube, and his heated bed, although at day 3 he graduated to our room and to the regular nursery so that we could care for he and his brother. He's still a little slower to develop; his huge eyes watch you with warm, vital interest, and his looks are loving, I fancy, and he loves, loves, loves to be held, but his face has yet to light up to that almost smile that Noah is already gracing us with. He fusses and fumes, and his soundtrack of peeps and gassy groans is practically continuous, even in sleep.
Above, the twins on June 17th.
So these are our boys and for awhile sewing and vintage machines, like other hobbies, move to the background, remembered fondly but with detachment and engaged in at odd moments, and right now, truth be known, not at all.
Monday, April 30, 2007
Box Pleating Dress Trim by Hand and By Machine
I had been planning to trim a bed jacket with box-pleated trim for some time but wasn't sure how to do it. None of my antique sewing manuals were of help; the closest I got was the Harper's Bazar reprints in Frances Grimble's Reconstruction Fashions book. They illustrate complex pleatings but don't say how to achieve them!
Turns out there's help!
If you want to box pleat narrow trim by hand, it's simpler than it looks. All you need is pins and the fabric to be pleated. What you do is to make little accordion (knife) pleats of the same size, one to the right, then one to the left, and then one to the right, and then one to the left, and so on.
To see how it's done, have a look at Jennie La Fleur's YouTube tutorial at http://www.youtube.com/watch?v=DbJyLaHS6b4. Thank you, Jenny!
To make box pleats by machine, you can use a fork to manipulate the fabric to the left and right, just in front of the sewing machine needle. Heather McNaughton demonstrates this on her Truly Victorian pattern site. See her Help and Answers page at http://trulyvictorian.netfirms.com/FAQ.html and click on Fork Pleating. The video is in Quicktime, takes forever to load. Be patient. I had to wait nearly an hour to download it.
Turns out there's help!
If you want to box pleat narrow trim by hand, it's simpler than it looks. All you need is pins and the fabric to be pleated. What you do is to make little accordion (knife) pleats of the same size, one to the right, then one to the left, and then one to the right, and then one to the left, and so on.
To see how it's done, have a look at Jennie La Fleur's YouTube tutorial at http://www.youtube.com/watch?v=DbJyLaHS6b4. Thank you, Jenny!
To make box pleats by machine, you can use a fork to manipulate the fabric to the left and right, just in front of the sewing machine needle. Heather McNaughton demonstrates this on her Truly Victorian pattern site. See her Help and Answers page at http://trulyvictorian.netfirms.com/FAQ.html and click on Fork Pleating. The video is in Quicktime, takes forever to load. Be patient. I had to wait nearly an hour to download it.
Sunday, March 18, 2007
Two New Posts All of a Sudden: Why the Delay?
To put it plainly, life has changed a lot since last fall. Back then I was working on an Edwardian corset cover in batiste, with a 26" waist. That waistline is temporarily no more, as my husband and I are expecting twin boys late this spring. So all the sewing action is centered around maternity wear and baby wear. Plus wear for the house...curtains and London shades, crib ruffles. Mom and I are very busy on that score. Yes, that's the other big change: my mother retired to our town and is now close by. It's delightful.
The maternity wear is still retro inspired: I prefer high-waisted loose dresses, not the clingy fashions now current. The two posts below make that clear.
If a chance presents itself, will show the embroidered saques I am making for the boys. The patterns from them come from the World War II era.
Well, dinner calls. When you're expecting, dinner times have a new urgency and it's best not to wait too long.
The maternity wear is still retro inspired: I prefer high-waisted loose dresses, not the clingy fashions now current. The two posts below make that clear.
If a chance presents itself, will show the embroidered saques I am making for the boys. The patterns from them come from the World War II era.
Well, dinner calls. When you're expecting, dinner times have a new urgency and it's best not to wait too long.
New Chocolate and Mint Polka Dot Maternity Dress! Brief Dress Diary
Barely five minutes before my friend arrived yesterday so we could go to our ladies' tea society St. Patrick's Day tea, I finished this new maternity jumper. My heart was in my mouth...wasn't sure she'd ring the doorbell and I'd still not be quite dressed and at the ironing board.


Had a favorite jumper that I outgrew a few weeks ago, and loved the bodice. So simple and you just slip it over your blouse...no zips or buttons or strings. When you get bigger, twisting and turning is less easy than it was.
Plus, the high waist is very slimming. Some of my other dresses have a natural waistline and I look much, much bigger -- I kid you not! Plus, most maternity dresses today highlight the shape too much: I am happier with flowing curves, not tight delineations.
Thought to use the Threads magazine pattern-making trick that uses painter's tape. I placed tape over each piece of the jumper bodice in turn. I made sure to cover each piece entirely and carefully so that when I pulled it off it would retain the shape of the original. (Exception: center front and center back pieces I just did half of, like one would in a regular pattern.)
Then I flattened them all out onto Kraft paper and made adjustments. I added extra room, lowered and widened the neckline, as the original was a little claustrophobic looking, and added 1" seam allowances for fitting. Voila: pattern pieces!
This jumper had no darts, but curved seams instead. They are easier to pattern and produce a lovely line, but are harder to sew.
After that I made a muslin toile, found I had too much room, and cut everything down, and made sure to adjust the pattern.
Using the toile as a full lining, I made up the bodice in the chocolate and mint polka dot polished cotton from Hancock's. Unlike some of their quilter's cotton, this is tightly woven -- it didn't fray much.
For the skirt portion, I used pattern pieces from a maternity dress pattern I already own, but because that pattern was not for late pregnancy, much less a twins pregnancy, I added two panels, one to each side of the front. I fully lined the skirt as well for better body and durability.
Only the front is gathered, and the gathers were handsewn at about 5-6 to the inch, as I think finer gathers look better. Sadly, some of them flattened out a bit too much when I machine sewed over them for durability. Phoo.
The dress has room to grow in both bodice and skirt yet because I have several months to go. It's loose in back. I wanted a straight back line, nothing clingy, but this looseness was too much, so I tied on a ribbon on the waist and it created two back bodice pleats naturally, one near each underarm, so the back still looks smooth (phew!). Now that was a nice, unexpected result.
The only thing I am unhappy with was part of the original: the back bodice seam between bodice and skirt is lower than the front; the ribbon tie accentuates the sliding line. I should have changed that too but wasn't thinking. Oh well.
Yes, the front hem rides up: I have a temporary hem there, but room to hem it properly. Just didn't have time yesterday!
If energy allows, would like to make the Regency dress pattern from Jennie Chancey's Sense and Sensibility pattern line, slightly shortened, as another springtime dress.
Had a favorite jumper that I outgrew a few weeks ago, and loved the bodice. So simple and you just slip it over your blouse...no zips or buttons or strings. When you get bigger, twisting and turning is less easy than it was.
Plus, the high waist is very slimming. Some of my other dresses have a natural waistline and I look much, much bigger -- I kid you not! Plus, most maternity dresses today highlight the shape too much: I am happier with flowing curves, not tight delineations.
Thought to use the Threads magazine pattern-making trick that uses painter's tape. I placed tape over each piece of the jumper bodice in turn. I made sure to cover each piece entirely and carefully so that when I pulled it off it would retain the shape of the original. (Exception: center front and center back pieces I just did half of, like one would in a regular pattern.)
Then I flattened them all out onto Kraft paper and made adjustments. I added extra room, lowered and widened the neckline, as the original was a little claustrophobic looking, and added 1" seam allowances for fitting. Voila: pattern pieces!
This jumper had no darts, but curved seams instead. They are easier to pattern and produce a lovely line, but are harder to sew.
After that I made a muslin toile, found I had too much room, and cut everything down, and made sure to adjust the pattern.
Using the toile as a full lining, I made up the bodice in the chocolate and mint polka dot polished cotton from Hancock's. Unlike some of their quilter's cotton, this is tightly woven -- it didn't fray much.
For the skirt portion, I used pattern pieces from a maternity dress pattern I already own, but because that pattern was not for late pregnancy, much less a twins pregnancy, I added two panels, one to each side of the front. I fully lined the skirt as well for better body and durability.
Only the front is gathered, and the gathers were handsewn at about 5-6 to the inch, as I think finer gathers look better. Sadly, some of them flattened out a bit too much when I machine sewed over them for durability. Phoo.
The dress has room to grow in both bodice and skirt yet because I have several months to go. It's loose in back. I wanted a straight back line, nothing clingy, but this looseness was too much, so I tied on a ribbon on the waist and it created two back bodice pleats naturally, one near each underarm, so the back still looks smooth (phew!). Now that was a nice, unexpected result.
The only thing I am unhappy with was part of the original: the back bodice seam between bodice and skirt is lower than the front; the ribbon tie accentuates the sliding line. I should have changed that too but wasn't thinking. Oh well.
Yes, the front hem rides up: I have a temporary hem there, but room to hem it properly. Just didn't have time yesterday!
If energy allows, would like to make the Regency dress pattern from Jennie Chancey's Sense and Sensibility pattern line, slightly shortened, as another springtime dress.
Regency Chemise Made into Maternity Nightgown Brief Dress Diary
At long, long, last, I completed the Jenny Chancey's Sense and Sensibility Regency chemise...tweaking the pattern to make it into a maternity nightgown with lace and a ruffle.
Here is the gown on my dressmaker's form, with pillows added to simulate the, um, maternal, look. I howled at the result; maybe you will too.

Here is the gown from the back:

You can see that there is plenty of room. Indeed, when I wore it the other night it turned out to be a great fit: it doesn't bind or cling or bother your torso. Most maternity wear these days has a waistline and I find that soooooooo uncomfortable.
I used the Simplicity version of Jennie's pattern, which as we know has more ease. Then, per her instructions on this site, I added width to the front and back panels.
The gown made of 99-cent natural muslin. Sure, it's a low thread count, but it softens up in a hurry. Let's hope it doesn't disintegrate.
The gown is trimmed with cotton lace hand whipped on at the neckline; it is gathered with Offray pink cording. I added a ruffle at the bottom too, set on wrong side to wrong side, and overlaid with cotton beading threaded with Offray pink and white ribbed ribbon to hide the join. All seams are flat-felled. Sleeve hems are hand rolled and whipped and the hem behind the ruffle made using a machine hemmer.
The gown was sewn on two antique machines. For the flat felled seams I used a 1911 Wilcox and Gibbs treadle machine that you see in the background of one of the pictures. It looks very small up top and has the prettiest cast-iron legs, all scrolls and leaves. It produces remarkably tiny, perfectly precise stitches.
I also used a Singer hand crank of the same era. That machine you crank by hand, as the name implies. It's actually quite a fast, reliable machine, doesn't tire your arm, and can go literally anywhere with you.
I used a Singer ruffler attachment to create a fairly tight ruffle. Have attached pictures of the ruffler on the machine and the results. The ruffler is actually older than the machine: ones made after the 19-teens have more settings.
Here is the ruffler. The regular sewing foot is behind it so you get some idea of the difference:

and the results:

There are a few more photos of the gown minus those silly pillows at http://s83.photobucket.com/albums/j306/ZipZIpInkspot/
Lastly, because I couldn't resist, here is Zip kitty, our darling who had bone cancer and a resulting amputation, napping in our laundry basket.

Here is the gown on my dressmaker's form, with pillows added to simulate the, um, maternal, look. I howled at the result; maybe you will too.
Here is the gown from the back:
You can see that there is plenty of room. Indeed, when I wore it the other night it turned out to be a great fit: it doesn't bind or cling or bother your torso. Most maternity wear these days has a waistline and I find that soooooooo uncomfortable.
I used the Simplicity version of Jennie's pattern, which as we know has more ease. Then, per her instructions on this site, I added width to the front and back panels.
The gown made of 99-cent natural muslin. Sure, it's a low thread count, but it softens up in a hurry. Let's hope it doesn't disintegrate.
The gown is trimmed with cotton lace hand whipped on at the neckline; it is gathered with Offray pink cording. I added a ruffle at the bottom too, set on wrong side to wrong side, and overlaid with cotton beading threaded with Offray pink and white ribbed ribbon to hide the join. All seams are flat-felled. Sleeve hems are hand rolled and whipped and the hem behind the ruffle made using a machine hemmer.
The gown was sewn on two antique machines. For the flat felled seams I used a 1911 Wilcox and Gibbs treadle machine that you see in the background of one of the pictures. It looks very small up top and has the prettiest cast-iron legs, all scrolls and leaves. It produces remarkably tiny, perfectly precise stitches.
I also used a Singer hand crank of the same era. That machine you crank by hand, as the name implies. It's actually quite a fast, reliable machine, doesn't tire your arm, and can go literally anywhere with you.
I used a Singer ruffler attachment to create a fairly tight ruffle. Have attached pictures of the ruffler on the machine and the results. The ruffler is actually older than the machine: ones made after the 19-teens have more settings.
Here is the ruffler. The regular sewing foot is behind it so you get some idea of the difference:
and the results:
There are a few more photos of the gown minus those silly pillows at http://s83.photobucket.com/albums/j306/ZipZIpInkspot/
Lastly, because I couldn't resist, here is Zip kitty, our darling who had bone cancer and a resulting amputation, napping in our laundry basket.
Saturday, September 02, 2006
A 1909 Edwardian Fitted Corset Cover Dress Diary, Part 2: Cutting, Basting, Stitching
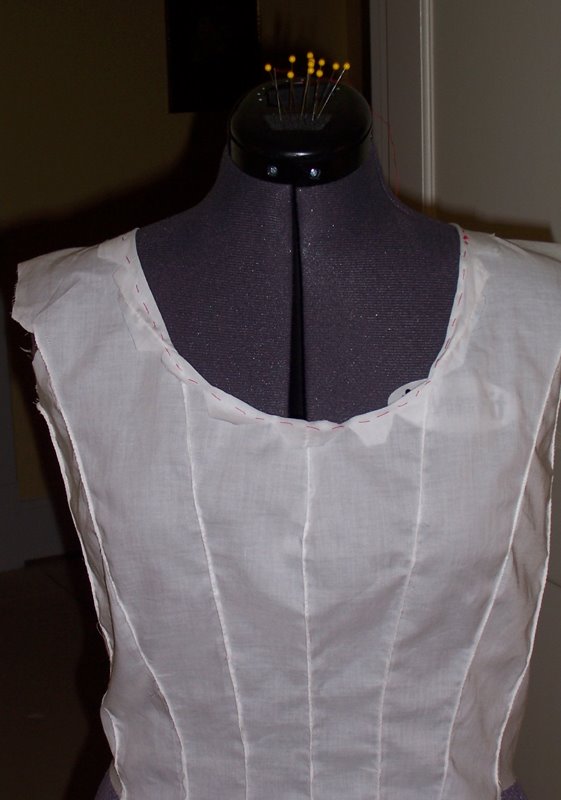 Here is the second set of steps I followed in making up a 1909-era fitted corset cover from Frances' Grimbles' The Edwardian Modiste.
All the pattern pieces being drafted in pencil on heavy Kraft paper, I next cut them out. I marked each in pencil with all the pattern markings from the originals in the book. I also noted on each piece where the shoulder and side seams are, where hems and finished edged are. I marked how many pieces of fabric to cut from each pattern piece, and marked the grainlines (following Frances' instructions, p.8).
Cutting the Pieces from the Fashion Fabric
For this project I used 100% cotton fine white batiste fabric.
After ironing it, I laid it doubled on the work table, since I'd need to cut two fabric pieces from each pattern piece.
Each pattern piece was carefully pinned to both fabric layers, and outlined entirely around with blue tailor's chalk. Then I cut out all the pieces.
After that came something that proved critical: when sewing books tell you to transfer all pattern marks to the fabric, they mean it. With a garment as fitted as this, it's a major pain if you forget to copy a mark and thus can't line up a piece with its mate properly or can't figure out where a hole goes.
When transferring marks such as seamlines, make the with full lines, not a series of dots. I used both pencil and tailor's chalk. It's SO much easier to follow a full line when pinning and basting pattern pieces together than to try to reconstruct the seamline in your head from a couple of wide-apart dots. Just try to follow a few dots when pinning prcisely curved bodice seams, for example!
Pinning the Corset Cover Pieces
Next I pinned the fabric pieces together. I pinned them on the mannequin, because that was was able to see the fabric drape on teh body and know with more surety which piece was to go where. All the pieces ended matching up pretty surprisingly well when I took into account easing curved pieces one to another...when I pinned them straight with no ease the pieces didn't match up at their ends. Another reason to pin on the mannequin and not flat!
Only pieces that didn't match perfectly was the side underarm to side front piece. Still don't know why but it didn't end up affecting the fit.
Also found that following Frances' suggestion and pinning from the bottom of the pieces up to the neckline, with the pin points facing up, worked better for some reason.
Basting the Corset Cover Together
Being rather persnickety, I follow old sewing book guidelines and baste everything before I sew it.
Following Frances' suggestion, I basted pieces together from the waistline upwards. Again following suggestion, I basted in this order:
Here is the second set of steps I followed in making up a 1909-era fitted corset cover from Frances' Grimbles' The Edwardian Modiste.
All the pattern pieces being drafted in pencil on heavy Kraft paper, I next cut them out. I marked each in pencil with all the pattern markings from the originals in the book. I also noted on each piece where the shoulder and side seams are, where hems and finished edged are. I marked how many pieces of fabric to cut from each pattern piece, and marked the grainlines (following Frances' instructions, p.8).
Cutting the Pieces from the Fashion Fabric
For this project I used 100% cotton fine white batiste fabric.
After ironing it, I laid it doubled on the work table, since I'd need to cut two fabric pieces from each pattern piece.
Each pattern piece was carefully pinned to both fabric layers, and outlined entirely around with blue tailor's chalk. Then I cut out all the pieces.
After that came something that proved critical: when sewing books tell you to transfer all pattern marks to the fabric, they mean it. With a garment as fitted as this, it's a major pain if you forget to copy a mark and thus can't line up a piece with its mate properly or can't figure out where a hole goes.
When transferring marks such as seamlines, make the with full lines, not a series of dots. I used both pencil and tailor's chalk. It's SO much easier to follow a full line when pinning and basting pattern pieces together than to try to reconstruct the seamline in your head from a couple of wide-apart dots. Just try to follow a few dots when pinning prcisely curved bodice seams, for example!
Pinning the Corset Cover Pieces
Next I pinned the fabric pieces together. I pinned them on the mannequin, because that was was able to see the fabric drape on teh body and know with more surety which piece was to go where. All the pieces ended matching up pretty surprisingly well when I took into account easing curved pieces one to another...when I pinned them straight with no ease the pieces didn't match up at their ends. Another reason to pin on the mannequin and not flat!
Only pieces that didn't match perfectly was the side underarm to side front piece. Still don't know why but it didn't end up affecting the fit.
Also found that following Frances' suggestion and pinning from the bottom of the pieces up to the neckline, with the pin points facing up, worked better for some reason.
Basting the Corset Cover Together
Being rather persnickety, I follow old sewing book guidelines and baste everything before I sew it.
Following Frances' suggestion, I basted pieces together from the waistline upwards. Again following suggestion, I basted in this order:
- the front pieces together,
- then the side front pieces to the front pieces,
- then the underarm pieces to the side front pieces,
- finally the back pieces to the underarm pieces and the top of the back pieces to the side front pieces at the shoulders.
If alterations were needed, I was told to make them at the underarm seams and the shoulders, but none were needed really as far as fit to the body. The fit was pretty close.
What didn't fit was the lengths of the pieces. Some were too long, so I marked the spot where they should be cut on the original Kraft pattern pieces.
Stitching the Corset Cover Together
I could have used felled seams, but chose to use French seams. Both seams leave no edges needing some sort of finishing...all raw edges are enclosed by fabric.
Here's where I made a silly mistake! A French seam is sewn in two parts.
First you stitch 3/8 (or 1/4) inch OUTSIDE the seam line, in the seam allowance area. Then you flip the pieces inwards and sew ON TOP of the seam line to enclose the fabric pieces' raw edges.
Note that means marking the seam line carefully on your fabric...do not guess on this one unless you're really skilled, which obviously I am not.
What I did by mistake was to start by sewing on the actual seam line. That meant that when I flipped the pieces over and sewing about 3/8" in from the edge, I was taking up 3/8" or so of fabric on each side. All in all I lost an inch and 3/4, at least, so when I put the corset cover on the mannequin and then tried it on me, the poor corset cover was WAY too tight. Had to take out all the seams and start over.
Yet at that point I had trimmed the seams! So this second round I couldn't do French seams because I didn't have the needed amount of fabric. Instead I did straight seams, and then carefully rolled and closely overhand stitched the raw edges by hand (with both raw edges of each seam held together and treated as one). The effect is quite dainty actually, and probably better in terms of less bulk than all but the finest French seam would be, although the seams are not as strong.
 Cutting the Neckline and Armscyes
What, you say, this hasn't been determined by the pattern?
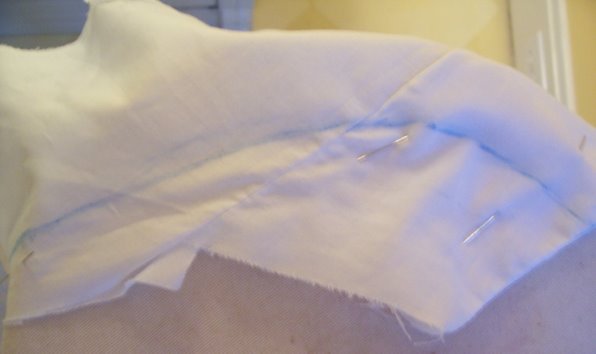
Nope, it hasn't, really. You could go with the original neckline, but the general directions written in The Edwardian Modiste allow, nay almost expect, you to play with the results and get them to what you want, not what the pattern thinks you may want.
I decided where I wanted the neckline to be based on the cut of a chemise I have. I actually put on the chemise and then the corset cover over it.
To make an even curve that matched on both left and right sides of the neckline, I then marked the curve of the neckline, following the curve of the chemise but just a little higher up on the chest, marking on ONE SIDE of the neckline ONLY, in my case the left side. Then I took off the corset cover, folded it along the front seam, and then copied the neckline curve to the right side of the neckline. To copy the chalkline more easily I held up the doubled fabric against a windowpane so I could see through the fabric and trace the marking.
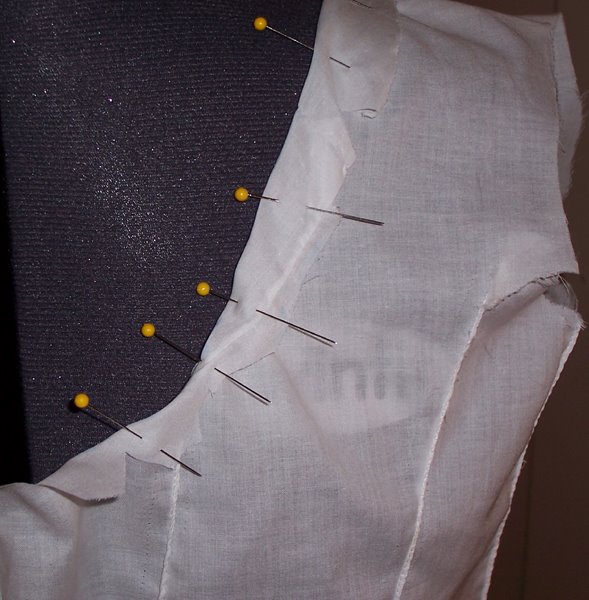 The back of this corset cover is made in a V surplice, so there is no back neckline to speak of. All I had to do was blend the neckline with upper hemline of the back pieces. Mine matched without much blending neccessary.
Now I needed to set the hem allowance OUT from the actual neckline. Did this by measuring 1 inch out from the neckline and marking a second line.
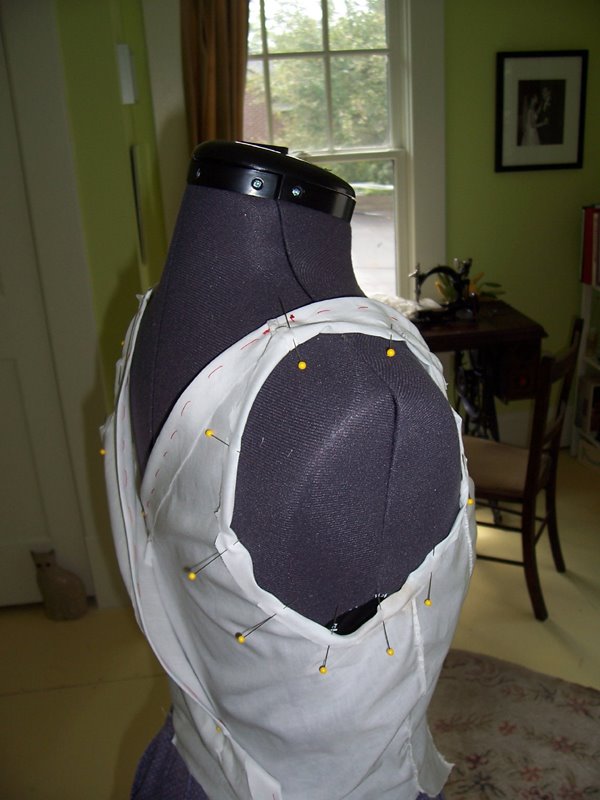 Now I put the cover back on the mannequin inside out and turned in the neckline, clipping little Vs as needed so the fabric would turn in neatly. I avoided clipping seams as much as possible but when I had to, dotted the seam edge with Fray Chek.
For the armscyes (armholds), I did basically the same thing. This time I based the armholes on a semi-loose, semit-fitted armholes of a sleeveless princess-cut chemise dress that I wear a lot and whose armholes are very comfortable.
Monday, August 21, 2006
A 1909 Edwardian Fitted Corset Cover Dress Diary, Part 1: Drafting
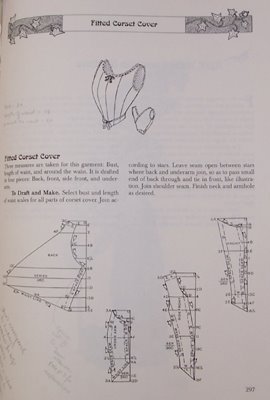 A more form-fitting corset cover being needed for an ensemble nearly completed, I decided to construct a fitted sleeveless corset cover from the January 1909 issue of The American Modiste. The pattern is reprinted in full in Frances Grimble's The Edwardian Modiste. So far, the project has gone amazingly well, excepting one silly mistake on my part.
This Part 1 of the dress diary covers drafting and cutting the pattern.
Left: The corset cover diagram and its pattern pieces.
The cover fits snugly in front, and has no front closing. Instead, the two back pieces end in long ties; the back pieces cross over one another and the ties come around front and are tied. This means that the cover can be eased or fitted as needed. I liked that simplicity.
Using the American Modiste Pattern
The American Modiste patterns were designed to be used with a set of special proportionally scaled rulers. They are marked in proprietary units made of numbers and letters. Frances Grimble's book supplies you with printed copies of the scales in the back of the book. You pick the particular rulers that fit your measurements, and then use them to draft copies of the pattern up to your size. Since Frances didn't have access to the curved ruler, she suggests using a French curve to make up the curved parts of the pattern.
Drafting the pattern proved to be much, much, much easier than I thought. Certainly easier than trying to size up the pattern on the computer and then printing out and matching bits of paper to one another. I don't have a big projector and so couldn't project the pieces up on a wall.
A more form-fitting corset cover being needed for an ensemble nearly completed, I decided to construct a fitted sleeveless corset cover from the January 1909 issue of The American Modiste. The pattern is reprinted in full in Frances Grimble's The Edwardian Modiste. So far, the project has gone amazingly well, excepting one silly mistake on my part.
This Part 1 of the dress diary covers drafting and cutting the pattern.
Left: The corset cover diagram and its pattern pieces.
The cover fits snugly in front, and has no front closing. Instead, the two back pieces end in long ties; the back pieces cross over one another and the ties come around front and are tied. This means that the cover can be eased or fitted as needed. I liked that simplicity.
Using the American Modiste Pattern
The American Modiste patterns were designed to be used with a set of special proportionally scaled rulers. They are marked in proprietary units made of numbers and letters. Frances Grimble's book supplies you with printed copies of the scales in the back of the book. You pick the particular rulers that fit your measurements, and then use them to draft copies of the pattern up to your size. Since Frances didn't have access to the curved ruler, she suggests using a French curve to make up the curved parts of the pattern.
Drafting the pattern proved to be much, much, much easier than I thought. Certainly easier than trying to size up the pattern on the computer and then printing out and matching bits of paper to one another. I don't have a big projector and so couldn't project the pieces up on a wall.
 Creating Scaled Rulers
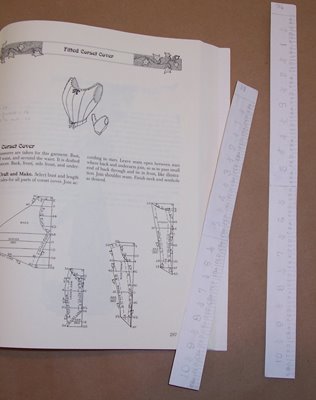
This pattern required a bust measurement ruler, called a "scale", and a "length of waist" (neckbone to waist) measurement scale. Mine are 36" and 18".
Left: The corset cover diagram and the two scaled rulers.
Therefore, I needed the 36" scale ruler for the bust. According to instructions, I doubled the length of waist measurement and came out with 36" again for that scale.
I traced the 36" scale onto a sheet of paper. I pasted that to a piece of cardboard, and then cut it out carefully, and taped to a housepaint stirrer. Voila: scale ruler!
Creating Scaled Rulers
This pattern required a bust measurement ruler, called a "scale", and a "length of waist" (neckbone to waist) measurement scale. Mine are 36" and 18".
Left: The corset cover diagram and the two scaled rulers.
Therefore, I needed the 36" scale ruler for the bust. According to instructions, I doubled the length of waist measurement and came out with 36" again for that scale.
I traced the 36" scale onto a sheet of paper. I pasted that to a piece of cardboard, and then cut it out carefully, and taped to a housepaint stirrer. Voila: scale ruler!
 Drafting the Pattern Pieces
You need a big sheet of nice, stiff Kraft paper, a pencil and eraser, a French curve, that special scale ruler, and an L-square marked in inches.
Each pattern piece is marked onto a sort of grid, with a "baseline" across the top, the 0 point at top right, and a vertical axis running straight downwards from 0. The result looks like a backwards, upside-down L. Each pattern piece is laid so that the straight of grain runs straight up and down.
Drafting the Pattern Pieces
You need a big sheet of nice, stiff Kraft paper, a pencil and eraser, a French curve, that special scale ruler, and an L-square marked in inches.
Each pattern piece is marked onto a sort of grid, with a "baseline" across the top, the 0 point at top right, and a vertical axis running straight downwards from 0. The result looks like a backwards, upside-down L. Each pattern piece is laid so that the straight of grain runs straight up and down.

 At key points in the pattern piece, such as a left edge or the top of a curve, horizontal lines are measured out from the vertical axis. For example, if you're looking at the pattern piece for the back, there is a horizontal line drawn at 11 units+D sub-units down from 0. It is drawn out to the left 15 units+C sub-units. It marks the extreme left edge of the pattern piece at the waistline.
Above: Drafting horizontal crossline points on the Kraft pattern paper with the special ruler.
What you do for each pattern piece is to:
At key points in the pattern piece, such as a left edge or the top of a curve, horizontal lines are measured out from the vertical axis. For example, if you're looking at the pattern piece for the back, there is a horizontal line drawn at 11 units+D sub-units down from 0. It is drawn out to the left 15 units+C sub-units. It marks the extreme left edge of the pattern piece at the waistline.
Above: Drafting horizontal crossline points on the Kraft pattern paper with the special ruler.
What you do for each pattern piece is to:
- draw the baseline and vertical axis with the L square.
- Then you use the scale ruler, and working from the copy of the pattern piece in Frances' book, measure where each of the horizontal grid lines meets the vertical axis.
- Then you use the scale again and draw out each horizontal grid line to the length marked on the book's copy of the pattern piece.
- Then you connect each end of each horizontal line like you would dots, following the outline of the pattern piece in the book. You use a French curve to help you with curved sections.
Above: drafting a curved section of the pattern. Not having my own French curve, I copied one on paper and cut it out.
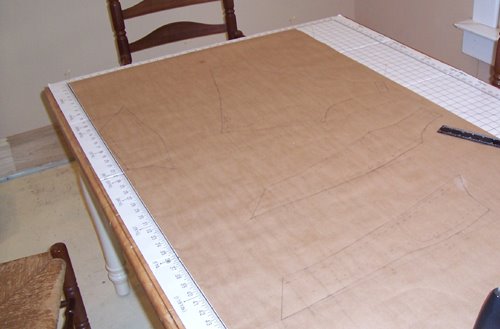 The pattern pieces have a certain amount of ease built in, but not much. Some hems are built in and some aren't, and some seam allowances are marked, and some aren't. Frances Grimbles' directions tell you to add extra for seam allowances and ease, and so I did...ended up having plenty and to spare, and was able after fitting the cut pieces, to re-mark the pattern pieces with adjustments so next time I have a good fit for me right off the bat.
Left: The pattern pieces drafted.
Subscribe to:
Posts (Atom)