
Whee! The shirtwaist is bouffant!
To add extra bouffancy, bouffantness, puffiness, pouffiness to the front, I needed to add fabric to each front piece and puff it out somehow. I had to mash all of the fabric into the about 5" neck area to the front of the shoulder seam, as marked by the two scissors in the photo of the partially deconstructed shirtwaist, below.
Perhaps you wonder how I would manage the closure in all that fullness? Well, I thought to fold part of the gathered section right on top of the 1/2" closure, which is made of 1.5" inches wide of fabric. That way there' still be a standard closure, but it would be hidden underneath. Rather as the closure must be worked into this raspberry shirtwaist with its pretty waterfall attached jabot, below.

I found a pair of pieces of extra fabric saved from the shirtwaist cutting. I cut them 13" wide. Here is the fabric added to the right side, pinned to the existing front; it was soon French-seamed into place. The added fabric when stretched out completely covers over the rest of the blouse.

Then it was time to make a new center front closure, using an inch of the fabric to make a wide hem, into which later will be set hooks and eyes.
A quick test gathering of the new front proved that gathers alone were just too weak to hold the front in fluffy ridges. Only an inch or two beyond the gathers had any pouf, with the rest lying limp and flat. It wasn't even worth a picture. ;)
A-pleating we must go, I thought.
Let's see, I needed to pleat all that front fabric into 3.25" inches worth of collar at top, with 1.75" of the space in the 5" collar area before the shoulder seam left flat. This would confine the pleated area to the very front of the shirtwaist. The same number of pleats would be matched into position at the shirtwaist's bottom.
I tried it and it worked. Nine pleats at the top, and 9 at the bottom. Will you look at the bouffant effect created? Pleating really was the way to go.
By the way, for documentation, 11 inches of bottom front remained unpleated. The Sense and Sensibility pattern has plenty of room at the bottom of the shirtwaist. As we will see, it was too much.

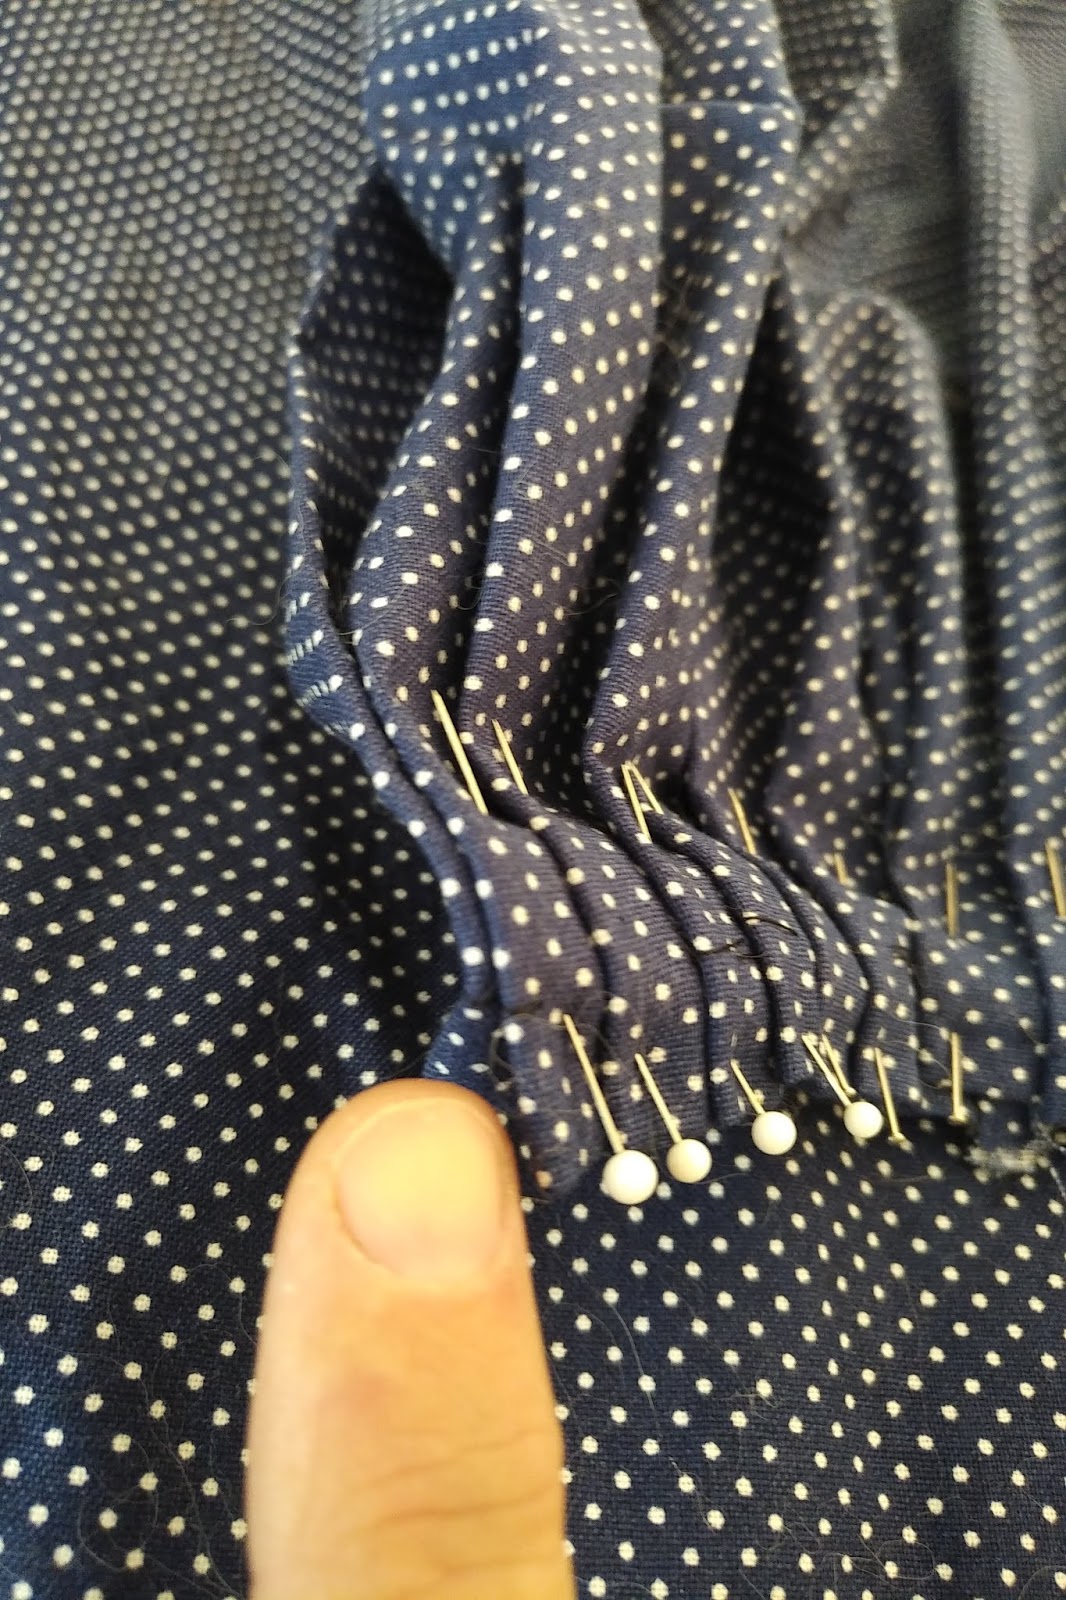
I folded a pleat right over the top of the closure, so the closure is invisible. If you look carefully in the image below, you can see the first pleat covering the closure; my forefinger is resting on the closure area. A hook or eye will be nested invisibly under the pleat in there: can't remember just now which goes to the left, hook or eye.

Once the right front was sewn up, then it was time to do the same thing to the left side.
The more I looked at 1890s shirtwaists, the more I noticed how short the shoulder seams appeared to be. It looks, anyway, as if the armscye edge rode the top of the shoulder.
Further, the tiny pleats on the sleeves looked wussy compared to the bold front pleating.
I'd already taken apart the front of the garment, so why not mess with more? I've already made this into a marathon garment, what's a little more effort?
So, I shortened the shoulder seam by an inch, from 5.25" long to 4.25" long, so just a bit of the sleeve pouf is supported by the shoulder.
The sleeves were re-pleated: 8 in front and 6 behind the shoulder seam, with all pleats facing up to maximize pouf.
Here is the shirtwaist, with one side redone, below. Can you pick out which side was redone?

So far the only evidence I had for how a pleated bouffant front would appear when worn comes from drawings and extant garments worn by mannequins. Wanting to procrastinate a little more, I slipped down a rabbit hole to seek old photos to see how such a shirtwaist might look, before I tried on the garment. Here is what turned up:
Hmm. Of course, because the years the photos cover are likely to cover a fairly wide duration, there is going to be variation. However, I think we can say:
 |
| Admiring the effect again. |
Making Bouffancy: Adding Fabric to the Shirtwaist Front
To add extra bouffancy, bouffantness, puffiness, pouffiness to the front, I needed to add fabric to each front piece and puff it out somehow. I had to mash all of the fabric into the about 5" neck area to the front of the shoulder seam, as marked by the two scissors in the photo of the partially deconstructed shirtwaist, below.
 |
| General area to which the extra front fabric will be jammed into. |
Perhaps you wonder how I would manage the closure in all that fullness? Well, I thought to fold part of the gathered section right on top of the 1/2" closure, which is made of 1.5" inches wide of fabric. That way there' still be a standard closure, but it would be hidden underneath. Rather as the closure must be worked into this raspberry shirtwaist with its pretty waterfall attached jabot, below.

I found a pair of pieces of extra fabric saved from the shirtwaist cutting. I cut them 13" wide. Here is the fabric added to the right side, pinned to the existing front; it was soon French-seamed into place. The added fabric when stretched out completely covers over the rest of the blouse.

Then it was time to make a new center front closure, using an inch of the fabric to make a wide hem, into which later will be set hooks and eyes.
A quick test gathering of the new front proved that gathers alone were just too weak to hold the front in fluffy ridges. Only an inch or two beyond the gathers had any pouf, with the rest lying limp and flat. It wasn't even worth a picture. ;)
A-pleating we must go, I thought.
Pleating a Bouffant Shirt Front
Let's see, I needed to pleat all that front fabric into 3.25" inches worth of collar at top, with 1.75" of the space in the 5" collar area before the shoulder seam left flat. This would confine the pleated area to the very front of the shirtwaist. The same number of pleats would be matched into position at the shirtwaist's bottom.
I tried it and it worked. Nine pleats at the top, and 9 at the bottom. Will you look at the bouffant effect created? Pleating really was the way to go.
By the way, for documentation, 11 inches of bottom front remained unpleated. The Sense and Sensibility pattern has plenty of room at the bottom of the shirtwaist. As we will see, it was too much.

I folded a pleat right over the top of the closure, so the closure is invisible. If you look carefully in the image below, you can see the first pleat covering the closure; my forefinger is resting on the closure area. A hook or eye will be nested invisibly under the pleat in there: can't remember just now which goes to the left, hook or eye.
Once the right front was sewn up, then it was time to do the same thing to the left side.
While I Was at It...Shoulder and Armscye Alterations
The more I looked at 1890s shirtwaists, the more I noticed how short the shoulder seams appeared to be. It looks, anyway, as if the armscye edge rode the top of the shoulder.
Further, the tiny pleats on the sleeves looked wussy compared to the bold front pleating.
I'd already taken apart the front of the garment, so why not mess with more? I've already made this into a marathon garment, what's a little more effort?
So, I shortened the shoulder seam by an inch, from 5.25" long to 4.25" long, so just a bit of the sleeve pouf is supported by the shoulder.
The sleeves were re-pleated: 8 in front and 6 behind the shoulder seam, with all pleats facing up to maximize pouf.
Here is the shirtwaist, with one side redone, below. Can you pick out which side was redone?

Training My Eye Before Trying on the Revised Shirtwaist
So far the only evidence I had for how a pleated bouffant front would appear when worn comes from drawings and extant garments worn by mannequins. Wanting to procrastinate a little more, I slipped down a rabbit hole to seek old photos to see how such a shirtwaist might look, before I tried on the garment. Here is what turned up:
 |
| Young woman. Flickr: 912greens |
 |
| Not a shirtwaist, but the bouffant front is instructive. Young woman in white. Flickr: Nora Mezsoly |
 |
| "Climb as high as you can". Flickr: 912greens |
 |
| Pinterest: Brandy Auset |
 |
| Couples, White Oak, PA, 1895. Flickr: Beverly |
 |
| Jardins du Luxembourg 1895. Feuille d'Automne, at vintage-impressions.tumbler.com |
 |
| Flickr: antiekie |
 |
| Again, a bodice, not a shirtwaist, but it gives the general popular line. "Flirty". Flickr: crafty dogma. |
Hmm. Of course, because the years the photos cover are likely to cover a fairly wide duration, there is going to be variation. However, I think we can say:
- the shirtwaist or bodice does puff out over the bustline, but does not delineate its individual curves in the least.
- the pleats spread out over the bust, but then are drawn back in towards the waist, drawing the eye outwards, then inwards.
- the shirtwaist is not allowed, until the end of the period, to really blouse over the belt; it is pulled in towards the waist to emphasize a small waistline.
- the sleeves easily impinge on the bustline puffery, rather covering up the armscye.
- the waistline is at the natural point or even a bit higher.
- A wide-ish belt set at the natural waist and allowed to rise above it helps to control the fullness and delineate the waist
Shirtwaist Try-on and Re-Setting the Pleats, Again
It turns out that the pleats I had made at the shirtwaist bottom left the garment tent-like, given all the fabric I had added.
So, for crying out loud...out came the bottom pleats, again.
Then I tried on the garment and pleated it whilst wearing it. You know, this turned out to be the very best way to attain a really nice look. I doubt using a pattern would work as well, because the bottom pleats have to be set to your personal dimensions in both bust and waist, and only fiddling with the fabric yourself is going to allow you to set them to their best effect.
First step was pinning the center front of one side to my corset, while wearing the skirt so I knew where the skirt's waistband would sit.
Second was smoothing the side seam under one arm as well as the fabric over the bust to where the neck pleating started, and pinning it flat in that area. That way I had a bunch of free fabric hanging, ready to pleat.
Here is one side, in the process of me pleating it.
 |
| Jeepers, do I smell something nasty, or have I poked myself with a pin? Anyhow, You can see a double-row of pins marking the pleated front. Maybe if you enlarge the image you can see where I've smoothed and pinned the fabric from the side seam to near the bust. |
As soon as the pleats were placed, I left the garment on and rapidly sewed the pleats in place.
Then I repeated the process for the other side.
There was still a little excess of fabric, so on each side I found the excess at the neckline, slid it through my fingers down to the waistline, and made two small pleats of it. Then I removed the pins holding the shirtwaist to my corset, and smoothed the fabric again. By golly, there we were.
 |
| We have achieved a bouffant front! |
|
| Admiring the effect again. |
As hoped, the shirtwaist had the rounded front with its non-specific protrusion over the bustline, and the pulling in of the pleating towards the waist, which helps make the waist look a little smaller. There is still room to move and raise the arms.
After that, I sewed the pleats properly in place, added hooks and eyes for closure, and we're done with the shirtwaist in its plainest form.
Hooray!
Next steps:
- Making removable sleeve puffers of memory wire. Not necessary, but fun;
- Making a cute voile neckline bow, using German instructions;
- Making a voile-covered belt;
- Futzing with the skirt by using interior elastics to create pretty folds in the back -- again, instructions from my German magazine;
- More futzing, this time adding an interior ruffle at the skirt base to help it stand out further from the petticoat.
- Oh, and retrimming my old 1790s silk hat. Wait 'till you see the design for it...it's nutty.
Later, I'd like to whip up the voile plastron, to be worn as needed, and potentially, if I have the energy for it, recycle some of my old stiff silk shantung curtains for a new and improved petticoat with lots of frou-frou sound and froth. I've got the plans all written... Then there are a few more accessories...we'll see if I ever get to them, but it's fun to come up with ways to stretch the basic ensemble into different looks by varying elements and accessories. This was a perfect decade for doing so, because for all its boldness color and shape, it was a practical time. After all, I already have another shirtwaist to wear with this skirt. Without even one more item, I have two outfits!
3 comments:
So happy for you! Looks Lovely!
Yay! Love the 'bouffancy'! ;)
Best,
Quinn
I do, too. As with any era, the mind trains itself to appreciate the good points, and I've come to enjoy the boldness and the clean lines.
Post a Comment