
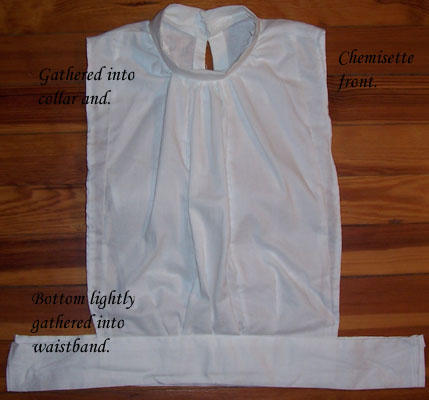
This chemisette, also known as a dickey, is a handy little item for wearing under a suit. They require little fabric to make, are easy to maintain and are cool. Back in the day, when women wore more underclothing, and fewer rooms were well or overheated, dickeys made a lot of sense. Today they still make sense, provided the weather, inside or outside, isn't too warm. That's because a dickey is nothing but a shirt front and back...there are no sides and no sleeves! Therefore, protect your good suit's lining they will not, and if you're wearing wool and it's a warm day, you're stuck with your suit all buttoned up.
Dickeys, I understand, started out in the 19th century, and maybe earlier, as economical fakes: shirt fronts that masqueraded as full shirts for men who lacked the money to purchase and maintain a full set of dress shirts.
Sometime along in there women caught on to dickeys, too. I have an Edwardian era dickey, mostly handsewn, in fine net and cotton, with a boned lace collar.
The dickey pattern at hand I made up for a Mystery Tea our Ladies' Tea Guild I attended this weekend. It took perhaps 5 hours to make, but that includes scaling up and adjusting the pattern, changing the collar style, and fitting it. As I am a slow seamstress, many of you could whip through the thing in no time flat. The material? Perhaps a half yard of white 45" muslin, in scraps!
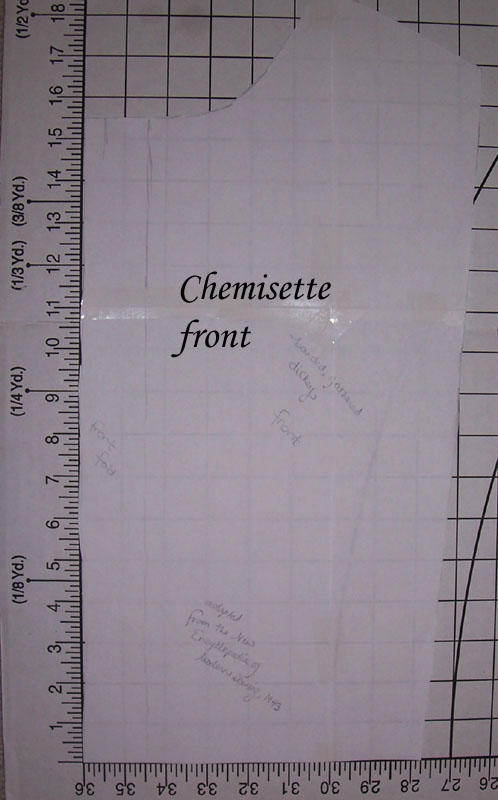
The following pattern was adapted from The New Encyclopedia of Modern Sewing, Frances Blondin, editor. Published in 1943, in the midst of WWII, and put out in a second edition in 1946, the book takes you back to the Make and Mend era, when war shortages had women remodeling their dresses year after year and sewing up outfits for themselves and duds for their children from Daddy's old suits.
The pattern I used didn't come with sizing, but I found that the dickey fit me pretty well: my measurements are 36" bust and 30" waist, on a 5'6" frame, of average proportions; I am neither long- nor short-waisted.
I chose the gathered band collar since it appeared frequently in fashion drawings from 1940 of women's suit outfits.
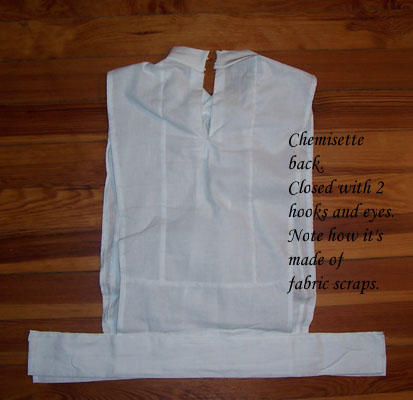
One more note before we begin: if you look at the pictures you'll notice a lot of vertical seams down the front, a couple down the back, and one across the lower back. Those aren't from the pattern! That's me using up narrow scraps of fabric by seaming them together before cutting out the pattern. I just made sure that I aligned the seams such that they appeared symmetrically on the front and back.
Here's how to make the dickey/chemisette:
1) Scale up the patterns. I placed the pattern pieces on a cutting board with 1" squares, bought from Hancock Fabrics. You could measure out a grid with 1" squares fashioned from paper bags or even newspaper. Then you can size up the patterns just as I did. I eyeballed where each pattern line fell in a given square and replicated that line on your 1" square grid. If you have a measured cardboard cutting board, you can place stick pins at all the corners of the pattern and then in key curves. Then connect the pinhole dots with pencil.
2) Pin the front and back pieces together and fit it over your shoulder. The seam line should sit right on the shoulder.
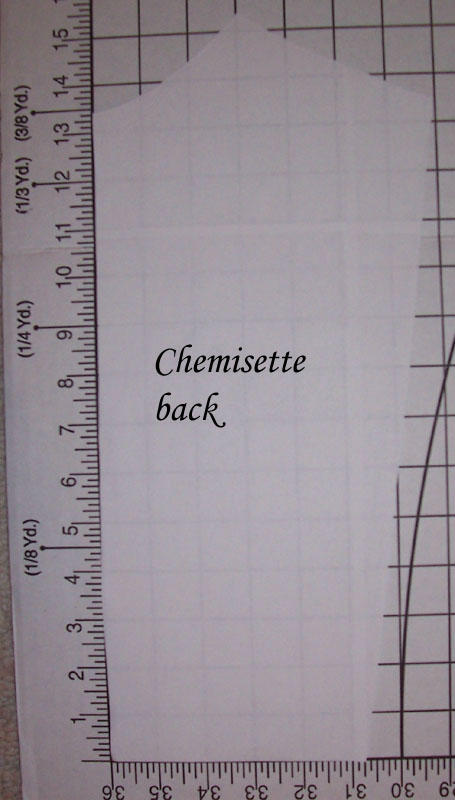 You'll probably find the back short: I did, and added 5 inches to the bottom.
3) Cut out the front and back. Both pattern pieces show one side: fold your fabric selvage to selvage and place left side of pattern on the fold.
4) Pin front and back together and try on again. If you're fussy, baste. Think the fabric isn't laying correctly on the shoulder? Pin the offending loose spots and after taking off the pieces, trim them and try on again.
5) Stitch front and back together only at the shoulder seams with a plain seam. If you like, finish the inside of the seam with a fake french seam.
6) Finish the side outer edges with a narrow double hem to prevent fraying.
7) Now you prepare the collar. Take a scrap of muslin the circumference of your neck plus enough for ease in wearing and about 1 inch for hems, and about 6 inches or so wide. I literally tried on a scrap around my neck until I felt it fit me well and was wide enough for taste. I folded the fabric not one, but 2 times, so that there is an inner layer that serves as interlining. I made sure I had about an inch (x2) extra on the bottom to seam to the front/back and to fold in.
8) Next, slash the back in the center down low enough to slide the chemisette over your head. If you're lazy, you can just fold back the vertical edges and hem them but naturally that will result in quite a little gap. I instead made a facing out of a scrap of fabric. Consult your favorite dressmaking book for facing neck or back openings...it's a bit much for me to explain here but actually goes really fast.
9) Gather the front neckline edge of the dickey almost from shoulder to shoulder. I made smallish gathers for a delicate effect. If you want big, full, gathers, use bigger gathering stitches.
10) Fit the collar to the neckline and seam it. You can encase the neckline edge with the folded over long sides of the collar: that hides the gathered eddge and keeps it from poking you. Me? I was in a hurry: I'd seamed the collar closed already and just seamed it to the dickey by sewing right side to right side. Not the best plan, as it resulted in all that gathered material, fine though it was, poking me when I wore it, but anything for speed when you're sewing under a deadline!
11) Finish off the ends of the collar with hems: make sure to leave enough on the ends to meet at the back of your neck and hook-and-eye it closed. Or you could leave one end longer than the other and overlap it? Much nicer effect, I'd think.
12) Prepare the waistband. I cut 2 pieces, each 7 inches by 17 inches. I turned under 1/2 inch on all sides for hems. Then I folded each piece in half lengthwise, and marked the centers. I finished off the ends with turned-in seams.
12) Affix waistband to front and back of dickey. I gathered the central section of the front with big soft gathers to taste. Then I took one of the band pieces, inserted the front into it, making sure the center of the band was at the center of the dickey front, and edge stitched the band closed. I seamed the back waistband in the same way, omitting the gathering. You will find such bands long enough to close easily with a button or (oh my!)(a safety pin) on each side.
13) Affix hook and eyes to collar.
That's what it took.
You can play with the design and add lace to the collar, add insertion lace down the front in vertical stripes or in patterns, add tucks, whatever pleases you.
The Encyclopedia states the following about dickey fabrics: "Since the charm of neckwear is its crisp freshness, the prime requisite for fabrics is that htey should launder well. Pique, handkerchief linen, dress linen, organdie, ginham, broadcloth, dress silks and rayons are suitable." (p. 170).
One last note: to get a sense for how a band collar worked when I wanted to change the original pattern, I consulted Harriet Pepin's Modern Pattern Design, another 40's work that is a really truly gem for understanding how clothes of that era were designed and constructed. You can find that book online, in full and illustrated, on VintageSewing.info.
Citation: The New Encyclopedia of Modern Sewing. Frances Blondin, editor. New York: WM H. WIse and Co., Inc. 1946.
No comments:
Post a Comment