Tuesday, April 10, 2012

1790s Sleeveless / Convertible Spencer: Neckline Modification

Last I wrote about this project, I'd just fit the toile. Since then the silk has been dyed lilac, and now is the time to cut out the garment. Yet I can't seem to confidently take scissors in hand to the lining fabric, to create the second toile that will then be the pattern for cutting the silk.

What's the barrier, besides mowing the lawn, polishing windows, weeding, weeding and more weeding, laundry and more laundry, work, childcare, and a happy trip to family and friends in Georgia to celebrate Easter?

It's the neckline. I'm just not happy with it. Here is the toile:


The blue marks show where the toile is cut now; the red ones show the up-to-now modifications. After all, I was going for this sort of front: very low, very open...really 18th century short bodice sans sleeves. (If you look at the endless string of posts on this project, you'll get the history.)


You see, this design might do well with a ruche in the back, like my fashion plate inspiration model below, but can you see the ruche working in the front? Of course not. It would look really silly to ruche narrow straps and then a broad expanse of low neckline. You see, in the effort to make the poor little garment do so many things, I initially thought to tack on the ruche and then remove it as desired, for a different look. Ditto the epaulettes.


I've been looking at ruched spencers since the project began: the Met has lots of them, but not until Sabine of Kleidung um 1800 finished her cotton variation on the theme this past week did I really focus on my own ruching plan...and decided that I'd better rethink the front.

The best plan, I thought, would be a low rounded neck, ruched, or better yet, a vee neck, ditto. Luckily, an extant comes easily to hand, from the Metropolitan Museum of Art, which has quite a selection of spencers, a good number of them featuring a ruched or plaited neckline. This one is perfect in cut for my purposes. It's center-front closing, cut very deeply in the neckline, and has a narrow ruching.

Black spencer, 1800-1830, Metropolitan
Museum of Art, number

C.I.38.100.10


The Met included a fascinating photograph from an exhibition long past showing the spencer on a dressed model.

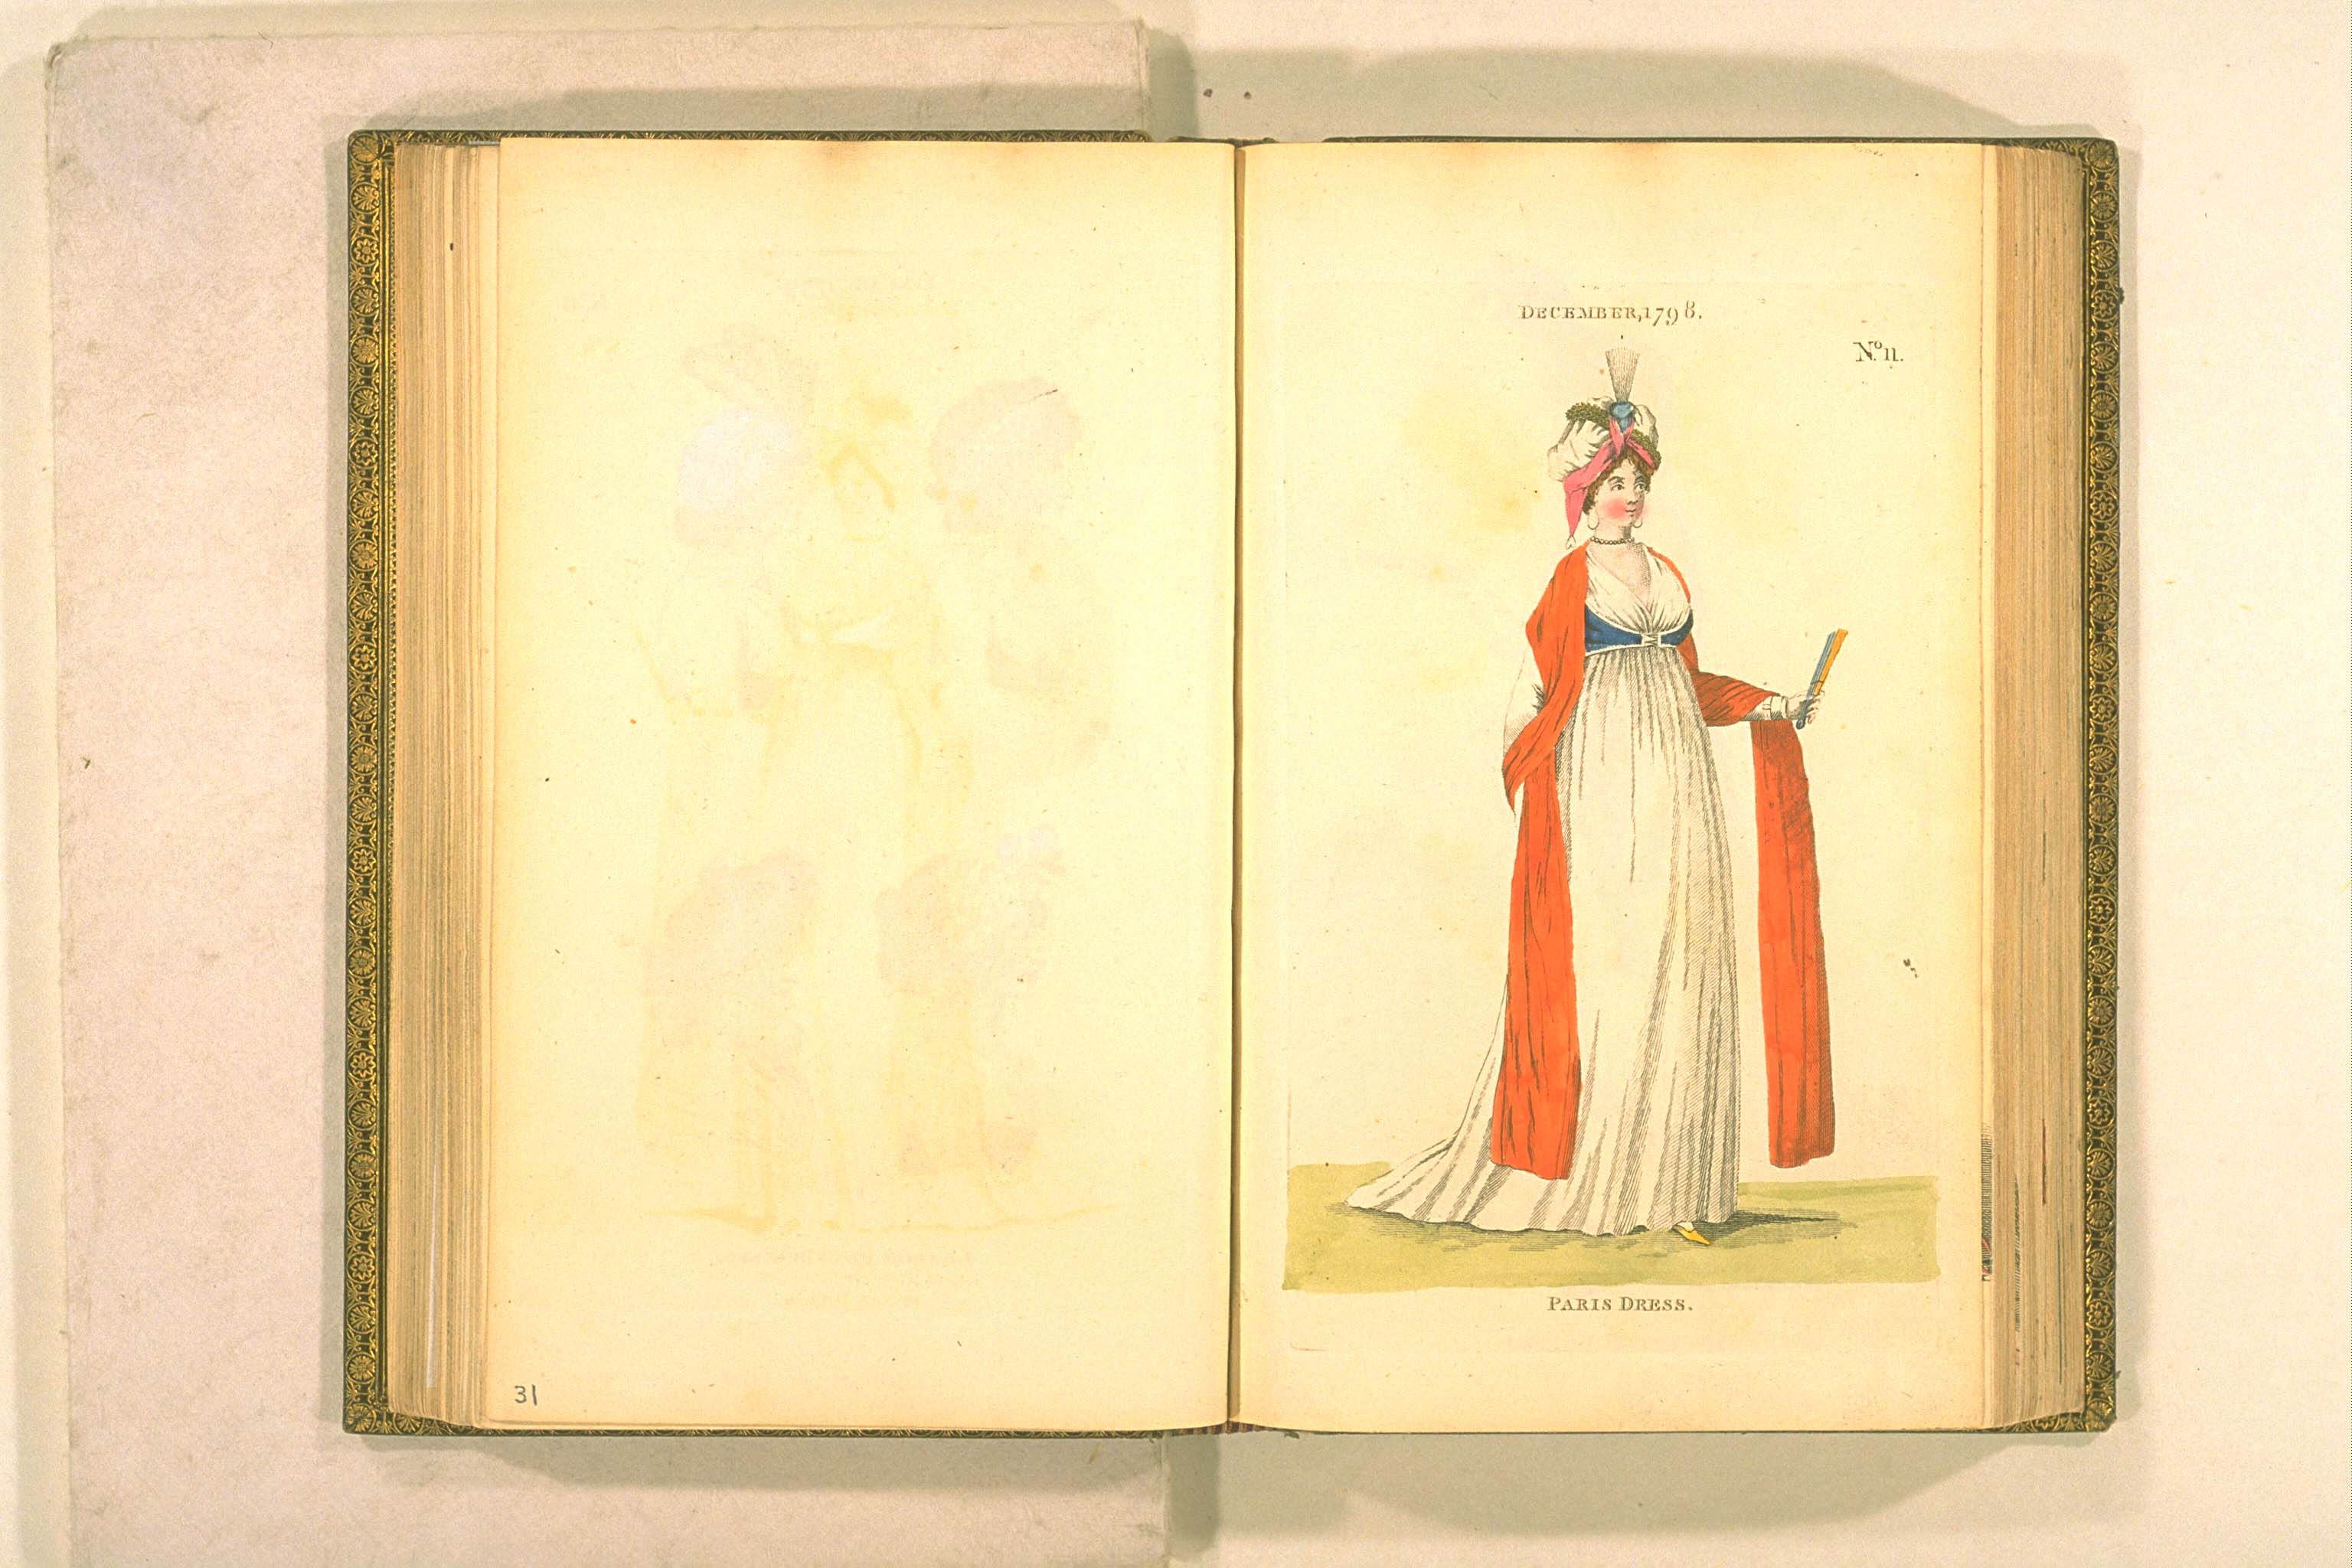
The Met gives a wide date range for the garment, and given the tiny diamond back, it is very unlikely to be 18th century, though the silk seems to be. No matter, the front cut is reminiscent of late 18th century fashion plates, such as this sleeveless spencer, or body, from 1799.
London and Paris Fashions, December 1799
(but appearing in the January1800 number)
Image Bunka Gakuen Library.
 The front works so much better with my wrap-front dress...


Just to show another favorite example. Here's a Met extant with the low round neck, a good bit lower, I might add, then some of the other specimens the Met has with the popular neckline treatment. Here, the ruching has become a careful pleated flat frill, sewn near the neckline, with a header.

Late 18th to early 19th century quilted blue
spencer, with pleated neckline frill. Metropolitan
Museum of Art, number

C.I.50.8.14.


Most of the other examples, and in fact my inspiration fashion plate, employ quite a wide ruche. Sabine did in her spencer, too. However, I think a wide ruche or plaiting, lovely as it is, would overwhelm my sleeveless spencer, so the narrow version in the black spencer above is more appropriate.

There, now I can rest easy tonight. Sometime later this week or next, as time allows, it will be time to cut the lining!

p.s. Ruched jackets were nothing new. The Victoria and Albert has this delightful printed and quilted jacket from France. Look at that neckline!

Printed and quilted linen jacket, France.
c 1785-1790. V&A, number

Wednesday, April 04, 2012

Lilac, Lilacs, and a New Look

The lilacs are in full bloom, and the sleeveless spencer and petticoat silk are lilac-colored!


The silk is true lilac color, although I suppose, since it matches my violets, it could be called that color, too. It was dyed (from the same stash of old cream silk almost slubless dupioni I've had for years) in the washing machine with Idye from Dharma Trading. Easy to use and entirely mess free. The color of the silk when wet was MUCH darker than this, more a royal purple, so when using Idye at least, one must trust that the color will come out well. I was worried it would be too dark and wondered whether I had left it in the dye too long (30 minutes, less than the 50-60 that Idye suggested); had I taken it out earlier it would have been too pastel colored. As it stands, it's nearly the exact shade needed.

From London and Paris Fashions, Bunka Gakuen Library
You can read more about this ensemble in Making the Wrap-Front Dress Do Double and Triple Duty.

At the Jane Austen Festival in Louisville in July, I will probably wear an afternoon variation of this ensemble one day with my wrap-front dress -- with the petticoat showing and a day hat -- and on the other day will wear the sleeveless spencer over the wrap-front dress, with no petticoat showing. A third choice is to wear the petticoat and the spencer together, and add muslin sleevelets to the spencer. Love all the choices!

Lilacs and a New Look

Here are the lilacs in our garden. No purple tint, but definitely a royal fragrance.


Now for the new look. It's an experiment. Because I am doing so much embroidery, with more in the works, it seemed appropriate to feature embroidery in the blog design. Am not entirely happy with it: the header needs centering and I chose the background from a copyright-free image uploaded to Wikimedia Commons from the Victoria and Albert: it's a detail of a mantua's petticoat. The petticoat is from decades previous to "my" decades, and it needs Photoshop work. There are other glitches...more edits over time.

Today I leave you with...

...a shot of the boys watering everything in reach, including themselves. We have had a highly irregular, extraordinary, Technicolor springtime. Everything in bloom at once. From the ground up: vivid green grass spangled with violets and spring beauties, above them nod tulips, azealeas in glory and shading the tulips, under the blow of crabapple and pear and cherry trees, blooming alongside redbuds, and even just over a week ago, forsythia, and over all, most of the trees in leaf, even our walnut. Only the daffodils and very early flowers have gone. I feel like I've walked into Elven territory, it's all so verdant, except that in my heart I know it's not natural and I fret at what summer will bring, if it's 80 degrees now...


Shorts and almost swimming on April 4.
Will Mother Nature shout "April Fools"?

Wednesday, March 28, 2012

1790s Goldwork-Embroidered Petticoat: The Swags Are Done!

Here debuts the new bottom-of-the-petticoat. The last stitches went into the goldworked swags last evening, and I sighed a long sigh. That was a pleasant, slow, mosey-speed project, handling tiny spangles and wriggles of purl, and wee gold beads that glowed and sparkled like caught rays of sunlight.

Completed goldwork swags of leaves, abstract flower elements, and bows.

The full petticoat as it stands -- lays -- now.

The full petticoat. It's embroidered all across the front panel,
50-plus inches.
Here's how it looks when hung up. A little more elegant than mashed out on the floor, eh?

The petticoat is meant to hang narrowly down the body.
The spangles, in particular, catch sunshine, and I hope, candlelight.

Checking to see what the elements do when caught by the sunshine.
 On a whim I took out the gown it was designed for and laid it in place. The gown is trained, so the petticoat sits up high in it, reminding me of a doll's dress.


Perhaps I'll do a photo shoot, perhaps...wouldn't it be neat to see how it looks on? I haven't tried it yet!

What's next on the horizon?  A breather from this project, I think. The next phase is to build out the swags with interwoven elements in silk chenille and flat silk (ovalle) thread.


The design is taking shape slowly, but it shouldn't be rushed. Probably a couple of thoughts will be sketched and then mulled and chewed on until one of them, or a combination of them, hits as being right. To help, I am gathering extant examples and designs on a Pinterest 18th Century Embroidered Garments board. [Note years later: I still haven't gotten to that project, and not sure it would be the right idea, anyhow. Too much mixing of colors and materials.]

Meantime, that little sleeveless spencer is calling!

Today I leave you with...


...our crabapple tree, in full blow. Unaccountably it reminds me of the petticoat. It isn't gold, and the blossoms aren't artificially swagged, yet, there is something the two share. A controlled palette? Out and out luxe?


A person can't stay on the philosophical heights too long. Here is a more appropriate ending. That round ball of mostly tummy is Blueberry Muffin, looking super-sized, rolling in joy, or is she just trying to scrape off that heavy fur?

Thursday, March 22, 2012

Sabine Has Made Pattens: Yes, Real Pattens!

A teaser: pattens' progress
Short post here. How can I tell the story of her patterns better than our Sabine? Go and read "Hoch Hinaus!" on Kleidung um 1800. In German and English.

Echt hoch hinaus!

Tuesday, March 20, 2012

1790s Sleeveless / Convertible Spencer: Fitting the Toile

Sleeveless spencer toile view from the front
So you thought I killed the sleeveless, convertible spencer project, did you? April Fools early, for not a bit of it; the project's alive and very well, thank you.

In fact, the little breeze of a garment is now toiled and fitted as of this morning, with the expert fitting help of my friend Jane. It is just SO much easier and more efficient to have someone help you...no wrinkles on the back, no strange puckers seen when your arms are at your side, caused by toiling with the toile with your arms up, trying awkwardly to pin! Thank you and bless you, Jane.

Besides, it was a delightful friendly morning full of excellent coffee, excellenter conversation and lunch, and a trip to admire the garden, where the asparagus is up, the spinach wintered over, the sweet peas putting out shoots, and the cut forsythia branches used as staking aids last fall have rooted and are blooming! Tough as nails is right, Jane!

A Refresher: The Design

Here below is the overall design I following. Remember it? The February 1796 Gallery of Fashion sleeveless spencer, or body, with epaulettes and chain in the back?

Add caption
Recall the pretty little inspiration sleeveless spencer from the Metropolitan Museum of Art (called by them "jacket (spencer)"?


Finally, the pattern I drew up? Have a look at the 1790s Convertible Spencer: The Actual Project Begins post. Gee, that was back in January.

Whoop! I forgot to report on how I draped the thing on a pillow dummy wearing my cross-front dress. Oh, phooey. Hope the images are still around; the old computer died, and they may have deleted. If they live still, will report in a non-chronological post.

Suffice it to say that I dressed a fat pillow, not having my dress form at hand, with my cross-front dress, and then draped the paper over it, first following the lines of the dress, seams, and then changing them to fit the lines of the Met spencer. Then I added wide seam allowances for fitting, and cut out the pattern pieces.

It felt very period to do so. I was taking the lines of a dress that I had, and adjusting them for a different style. As explained to Jane this morning, each period has its conventions in cut; the conventions are subject to endless variations, but once you learn them, you can adapt what fits you endlessly.

All right, so you are somewhat refreshed, I hope, and the fitting pictures will make more sense.

The Fitting

Swedish tracing paper has body, and is good for making toiles of fitted garments of firm fabrics, or so I have found. Plus it's easy to draw on and cut, and translucent, so it's easy to see seamlines and so on underneath.

It's also white, and I had donned a cream top this morning, and Jane's house is in neutrals. Mmm. Can you see, or shall you squint like I am right now?

Here is the back.


The back and side back seams needed no tweaking. The back fits smoothly. You can see my stays underneath (made by Sarah Jane Meister, and so comfortable!)

The back is meant to be wide and steeply angled...no tiny diamond here, more of a trapezoid.

Oh my, I just had a breathless, horrible moment, looking at that image. It appeared I had placed the straps incorrectly! Actually, while pinning everything together this morning, there was a dorky moment when I pinned the straps to the right and left of just the front pieces, and left the back hanging. Jane laughed when it wouldn't go on.However, those wide allowances for fitting are fooling the eyes. Let's look at a marked-up copy.


Hmm. Now that I look at it, I see a basic error. The garment edges are colored in blue. When pinning, I didn't fold back the armscye seam allowance. The edge of the toile is snug, but the garment line when sewn is way loose. Will have to take at least part of the seam allowance away and try the toile on again. Don't want too snug, but not this loose. Dress fabric is liable to blouse out of too-large armscyes.

Plus, while the Met spencer has very much of a squared neckline -- from an earlier garment iteration, perhaps? -- it's too boxy and too low. I like the curve of the fashion plate. Even the adjustments in red are wrong. The height is better, but I want to curve the neckline a little. Just a little, because the straps really are just rectangles, but just a wee. The plaiting of the lace trim will lend a curve.

The waistline looked too high, so I marked a lower one in red, but now am rethinking that. O Hive Mind, your thoughts?

Here is the front.


Here's another very basic error. Have a look at the pattern that I made, in the post linked above. Note how wide the fronts are. Why? I did the design so long ago the reason has escaped. Perhaps it was the fat pillow distorting the cut, perhaps it was me being generous with the double hem that I will need in the center front in which to insert a bone to each side and also lacing eyelets.

Whatever: we have TOO much fabric entirely. I have folded it in back like wings so it's pretty funny looking. In addition, am not sure whether to lace it up edge to edge or to leave a little room.

Do you think the garment would look goofy with dress showing through: this is, after all, the early Regency, not the Long 18th Century, or 1830. So I am going to lace edge to edge and if evidence shows the contrary, then eh, I take in some fabric.

Might fuss with the height of the front a bit. Imagine it without the seam allowance and it seems pretty nice...or is it?

The waistline needs shortening, just a little. Also, while my pattern includes the spencer skirts, or peplum as we would call it, the fashion plate lacks it and frankly, I think the spencer will look better without the little skirts, so I am leaving them off. Can reuse this pattern again later for a wool spencer, in which the peplum would make better sense.

Then too, two tiny vertical darts will need to be set in the chest area, as in the Met spencer, once I have donned the real dress and am working with the silk. Doing those darts now would be a study in failure.

Here are the adjustment marks:


The last image, the side view. All okay here. Didn't Sarah Jane do some pretty embroidery on those stays?


So, first fitting is done. A few tweaks, then it's on to dying the fabric lilac and cutting it out!

Sunday, March 18, 2012

What We've Been Up To


Christopher's bridge dance, on top of a
so-cold stream.
Not much costuming. After a late winter spell, springtime has arrived and everyone in this family, everyone in town, is outdoors as long as it's not actively raining. Sunshine's been aplenty, so hours outdoors are aplenty.

Yesterday the boys and I ventured a first real hike. Some miles out in the countryside, where the land lumps and bumps next to the Kentucky River, there's a sanctuary called Raven Run, that's life and protection to bobcats and deer, mink and muskrats, beavers and spring peeper frogs, wildflowers and moss, great trees and enormous vines.

There are springs, and homesites, tiny family cemetaries, some. like Mr. Moore's, of just one headstone, small streams and Raven Run itself, ruins of an overshot mill at that creek, and in one corner, palisades -- tall cliffs -- overhanging the Kentucky River at the bottom of a gorge.

They had first lessons in trailcraft: how to stay on the trail, and to lean into steep spots, how to find good footholds, and how to put one foot right in front of the other, Indian-wise, so as to be as quiet and make as little mark as possible.


At what the trail map called the water gate, where the foundations of the mill surrounded small cascades on flat-laid bedrock, we paused for a long while. Who can resist playing in silver shallows? Not me, certainly, who grew up next to what what was the most fascinating creek possible, loaded with dam possibilities, fallen logs, shallow cave-like recesses in low shale cliffs, fossils galore, overhanging hemlocks, and bloodroot and phlox and grapes.


Successfully negotiating the creek.

A moss forest clings to a miniature cliff.

Stone-stepping.
Several miles later we returned to the picnic grounds and had a second, much-needed picnic boost, and then Noah fell asleep on the ride home, while Christopher supported his head in one hand and dangled the other out the car window to enjoy the breeze. All sleep last night was deep and happy, despite a midnight thunder-boomer.

Future hikes? Undoubtably. They are already laying their plans.

Sunday, March 11, 2012

1790s Goldwork-Embroidered Petticoat: an Impromptu Embroidery Frame

Sophia, my impromptu embroidery frame
Last post I promised to show you how necessity prompted me to create an impromptu embroidery frame that supports itself, has a large working surface, and allows me to embroider with both hands at once. Here she is.

Meet Sophia*, a former footstool, now the perfect portable embroidery frame for light, loosely woven fabrics.

KEY NOTE: this will NOT work for stiff or tightly woven opaque silks, because every pin used to attach the work to the frame will leave a pinhole that is essentially permanent, unless somehow you can massage each back into place or hide them with trim.

*Named in honor of a friend's granddaughter.

Making the Frame

How is she made, you ask?

Let me show you.

Get yourself an old footstool. It should have no sharp edges anywhere, no scrapes or dings that can catch at fabric or embroidery. Take off the top so that you are left with just the frame. Then possess yourself of yards and yards of cotton tape (I get mine from William Booth, Draper), or tear up old fabric into long strips and make one continous strip of them.

Now, wrap all sides of the footstool in the tape. Wrap as tightly as you can, and wrap the stool in two layers. You want a tight-but-soft surface into which you can stick long pins to hold your work in place.

Tie the ends of the tape or fabric in place with half knots. Done!


Starting to wrap the footstool.
 How to Use the Frame

Stretch the fabric to be embroidered over the surface of the frame. Then at intervals of an inch or so, pin the fabric to the tape. Smooth and tighten as you go, repinning if neccessary, and yes, it's usually neccessary to tighten a few pins.

In the image below the white-headed pins have secured the work to the frame.


See the white-headed pins? That's where the work is
attached to the embroidery frame.
 Here is the frame at work. I am setting spangles with silk thread. One hand is beneath the frame; you can just see it through the fabric, which is very sheer. The right hand is on top.

In the top left corner I have set the spangles on a needlebook so that I can just pick them up one at a time with the needle. The cotton has a nap so that the spangles sit in place. Purl sits well there too. I'd like to make a velvet dish like goldwork embroiderers used to use, but haven't.

Using the embroidery frame.
I can work just about anywhere with this frame: at a table, with it set on my knees on a chair, or set on my legs when sitting on the floor. The rest of the petticoat just floats around the frame. I am careful to keep the area clean, and watch for affectionate cats who want to lie on my efforts!

Background

When I found the footstool years ago, it had a plywood top slapped on with brads, and a thin foam pad glued atop that, and the fabric cushion was missing. The footstool body was clearly handcarved and had a nice patina, and I was sure that some DIYer had put the skinny top on it, so I snapped it up at a garage sale price and brought it home, intending to recover it myself. Life intervened, and it lived for years holding books and sweaters in half-hidden locations.

Enter the goldwork petticoat project. You should know that had I wanted to embroider this petticoat from the get-go, I'd have embroidered the fabric panels before making up the petticoat. That was the usual MO, then and now. I'd have used a version of the classic rectangular embroidery frame, as seen below in Diderot's Encyclopedia. The broideress sitting in the right of the plate is working on a man's waistcoat. For those interested, you can read Diderot's description of the various types of embroidery in his encyclopedia entries.
Brodeur, plate from Diderot's Encyclopedia.
Image courtesy what appears to be an EU project;
cannot find About Us page on the site. 
You can get embroidery frames today, but they are very expensive, and as you can see in the plate, one has to stitch tapes to the edges of the fabric and stretch the fabric with cords into a drum-tight surface. Not going to do that with a finished petticoat, am I?

On this project I had first worked with an embroidery hoop, but such hoops limit your working area and will not work for continuous motifs like swags...you can't smash goldwork into the side of the hoop without utterly destroying it. No go there!

Then I used a square frame that Dad made me ages ago to make thread table mats with. I wrapped the sides with cotton tape, and pinned the petticoat to it. It worked okay...that's what you see in previous posts, but the work area was small and I couldn't get my hands underneath since one hand had to hold the frame. The frame didn't fit into my old floor stand with clamp, either, and besides that thing is ugly.

So, noodling about, I remembered master embroiderer Robert Haven telling me he made his own frames, and Norah from Nashville's antique hoop stand all wrapped in tape that I saw last fall at a tambour embroidery class, and I ached for something pretty, something with grace. And bethought me of the forlorn footstool. The rest is now history.

If you are interested in traditional embroidery frames, they are out there. There are all kinds at verying price points, but before buying, I'd be sure to read up on them, at length. Some work better than others, and many, I'd say most, are not meant for the large expanses of fabric costumers use. See Mary Corbet's Needle 'N Thread for details. She is my current favorite Web source for things embroidery and she does careful reviews.

Sunday, February 26, 2012

1790s Goldwork-Embroidered Petticoat: Progress and Candy Colors

Working with the afternoon sun behind me...before the
embroidery frame eureka moment.
Hack, bellow, cough, cough, couuuuggghhh, stoop down the hall to find another set of tissues, breathe hard and shallowly, feel elephant walking on the chest. Stop in the middle of the hall to rest. Ardently desire to sit down, no, to lay down, and remain prone all day. Call forth reserves from heaven knows where to attend to the boys and to do what must be done. Food unwanted, sleep fitful, memory hazy and task followthrough iffy...oh, I only filled the steamer halfway? Huh, I was sure it was full. Thank heaven for a loving husband and mother and kind family.

That's been life with viral pneumonia these last days, but now I am on the mend. So, such a pleasure it was, this afternoon, to sit and work embroidery once again. Curte was a sweetie and let me sleep today, taking the boys after church to his parents for the afternoon. They were treated with my pasta Bolognese upon their return as deep thanks.

At this point the goldwork swags across the bottom of the petticoat are halfway complete, and the design for the chenille and flat silk embroidery that will interweave with the gold is underway.

Then too, in a fit of make-do creativity, I invented an embroidery frame that allows me to work easily with both hands on each side of the work, so very helpful when couching purl and simply essential when laying silk ovale -- a filament silk thread with low twist that when satin-stitched, creates the incredible glow and glorious rich color of many an eighteenth century embroidered piece.


Progress Report

Ta-da! Here is what we have so far...okay, actually I've done an additional motif since.


This covers have of the front of the petticoat. It was common during the era to decorate just those areas which were to be seen. Gold and silk were expensive, for one thing: such a petticoat, executed in the types of gold then available (meltable for cash!) was a garment for the haut ton. Second, goldwork is in relief, and the tiny metal threads are easily disturbed and stretched or pulled: even couched well, tiny sharp ends of metal can catch at fabric and be pulled. Why subject precious embroidery to such treatment in the sides and back where it isn't even seen under the gown atop? Even so, I think I have some 55 inches to cover in total, so I am but 20-odd inches along.

The Next Step: Silk and Chenille Embroidered Swags to Interveave with the Gold

Yes, yes, some months ago I claimed that the next part of the embroidery process would wait for another year, buuuuut, this project is such fun that other plans -- excepting that spencer! -- puh, I blow them away until this treat is done. After all, I embroidered for years before ever realizing costuming existed. Working it is like a fun afternoon with an old friend.

So what's the design? Augh, I mustn't tell you yet; it's a surprise. Okay, so actually only the concept is clear: an interweaving of small floral swags into the goldwork swags. The central plan is a take-off from the man's waistcoat pocket that produced the goldwork swags, but filled out with ideas from drawn patterns kept at the Victoria and Albert for petticoats. The tone, the feeling? The lightness, airiness, spareness of the Neoclassical 1780s, which held into early 1790s, according to Eighteenth Century Embroidery Techniques, a few extant examples, and fashion plates.

Floral swags were popular in chenille and silk embroidery throughout much of the 18th century. Here's a sleeve from a mantua, 1775-85, from the Victoria and Albert.

Mantua sleeve 1775-85, Victoria and Albert

Luscious, rich, 3-D!

Here's a man's suit pocket, chenille mixed with goldwork, 1760-1769. A little heavier in style, but the best I can find for the hour available to spend on this particular post. My old computer died, taking with it a few months of collected images and research that I'd not had time to back to the cloud server. What a horror!


Man's suit pocket, Victoria and Albert
 Finally, a duck of a muff, 1785-1810, from Colonial Willilamsburg, in chenille, spangles, bullion (purl) and paint, on gauze. Here are sprigs swagged into a repeating pattern.

Muff, 1785-1810, Colonial Williamsburg, 1958-25. Historic
Threads exhibition

Tempting Candy Colors

Probably because it's Lent and sweets are off limits, some colors just make me dream of food, especially petits fours and Easter cookies. Feast your eyes on these and see if they make you hungry. Yes?


You are looking at Au Ver a Soie silk ovale from Hedgehog Handworks, on the left, and silk chenille thread (fine), from Hand-Dyed Fibers.


You can get an idea of how low twist, how glossy that filament silk is. It will form minute satin stitched blossoms. The chenille, which will be couched down, is very thin, the color rich, light-catching, and just bewitching. I want to pet it.

So there we are. Wait, you say, if you're not fatigued already, where's this fancy new embroidery frame?


That, my friends, is for next post. Sleep calls.