Saturday, November 21, 2009

Tutorial: Making Stroked Gathers on a Mid-Nineteenth Century Petticoat


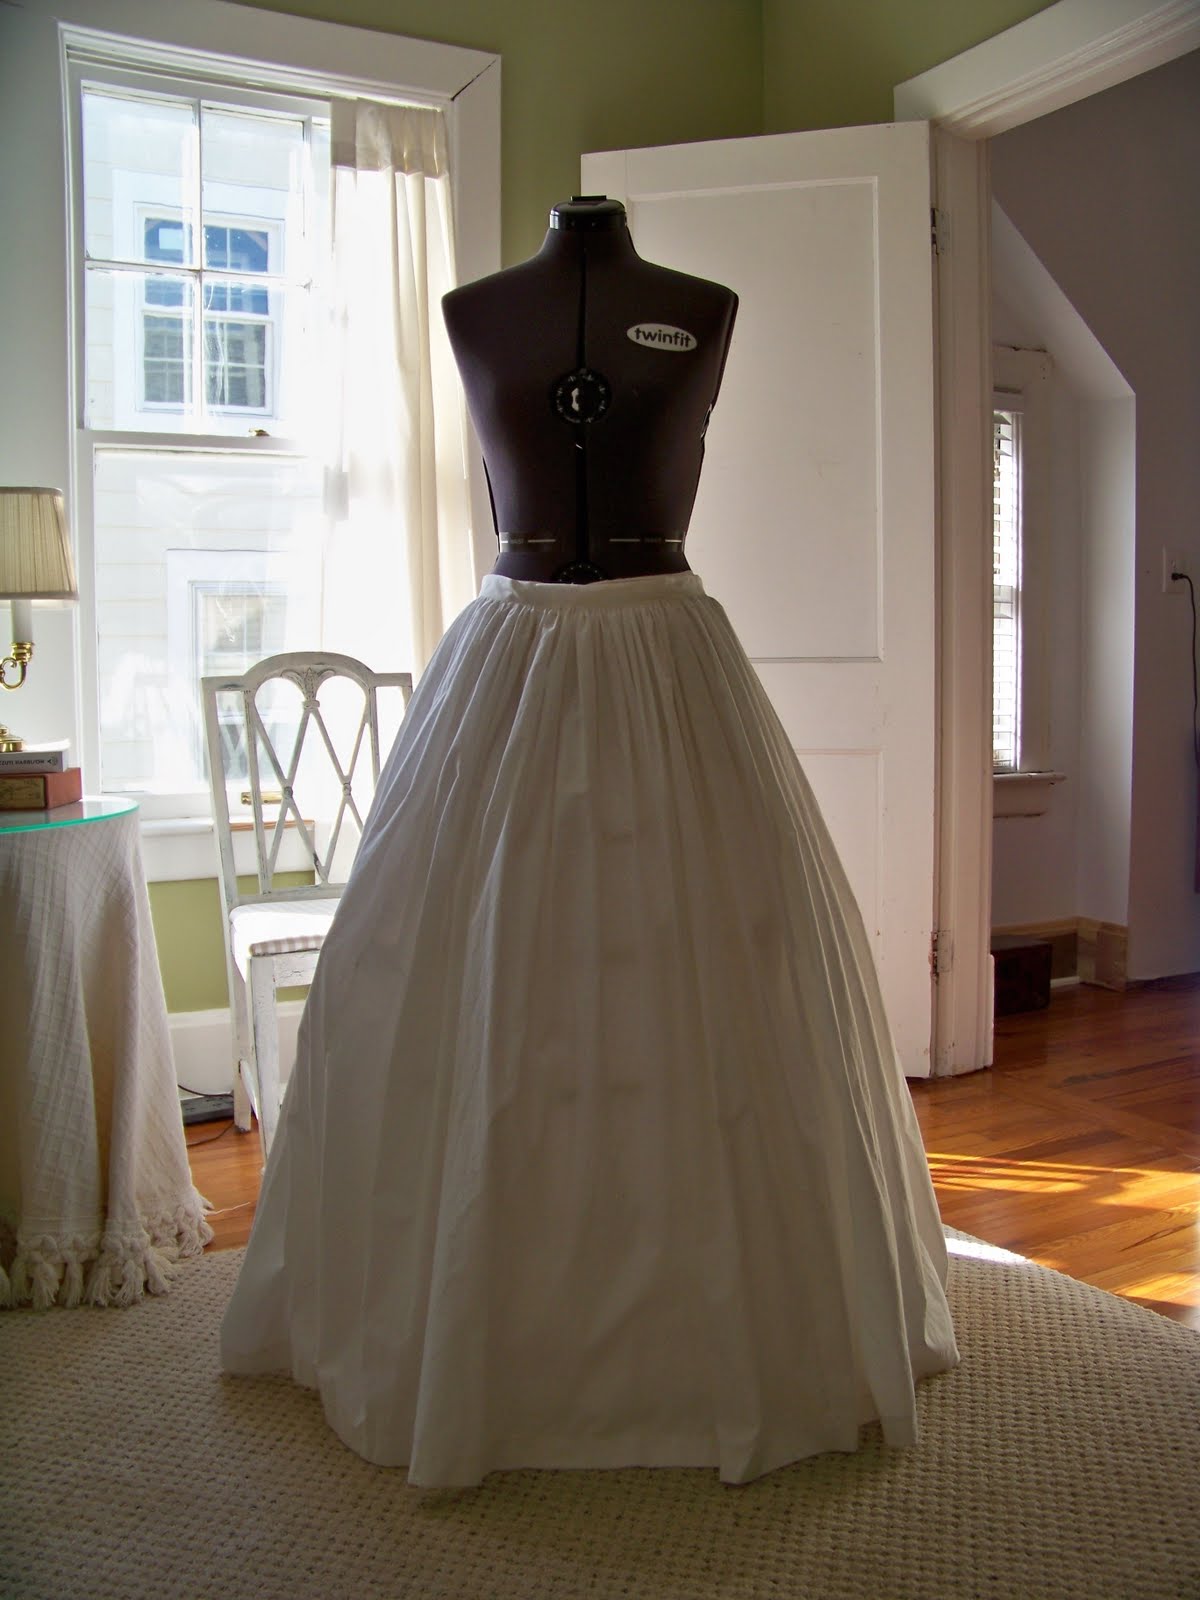
Yes, the petticoat needs shortening.
Edited October 29, 2020

As part of a mid-19th century dress project, I recently hand-sewed a muslin petticoat. When well starched, it fluffed the dress out quite well and hid the shape of the hoop steel in the hoop skirt beneath.

The petticoat serves as the top petticoat, and thus is designed sans tucks or flounces, which might mar the skirt surface above.

As always, click on the photos to see them full size.

A plain muslin petticoat does not sound like the most exciting garment, on first blush, and surely, with no whitework embroidery or period rick-rack lace treatment at the bottom, it looks severe. What it does have, however, is beautiful lines, created by the stroked gathers that are whipped to the waistband.

The stroking and process creates the prettiest eensy-weensy, teeny-tiny pleats imaginable, while the whipping process helps to reduce bulk in the waistband.

Photo: the completed petticoat. It's too long; I was making two petticoats and cut one long to add tucks to, to serve as a second, under-petticoat, and believe that I sewed that one up as the top petticoat by mistake.

Plain gathering, stroked gathering, gauging, and pleating are all methods that were used to take in the fullness of skirt panels to make them fit a waistband. The stroked gathering results in a tailored, clean look rather like gauging.

In the rest of this post I want to demonstrate, in pictures, how I made these stroked gathers and completed the waistband.

Photo: detail of the petticoat waistband, showing the stroked gathers whipped to the waistband.

Until recently, it wasn't terribly easy to find out how to do this. While there are descriptions of stroked gathers in a number of period sewing manuals, how they could then be set into a petticoat waistband was not clear at all. I ended up reading and rereading a series of threads on The Sewing Academy board run by Elizabeth Stewart Clark, as other people were having similar questions. Then, I made my petticoat, and checked with the board to see if the process I followed was accurate. Sure enough, some of the expert folks on the board replied that based on their research and examples in their collections, it was. Phew!

While I was making the garment, Elizabeth's rewritten manual, The Dressmaker's Guide: 1840-1865: Second Edition came out, and I ordered a copy. I had just finished my petticoat and found in the book, to my happiness, complete and clear directions, illustrated, for creating the same sort of waistband. The book also detailed several other methods of achieving a low-bulk waistband. Therefore, this little tutorial I consider as a sort of unofficial supplement to the method Elizabeth describes so much better than I can.

Bye the bye, I cannot recommend The Dressmaker's Guide enough. It is beautifully and good-humoredly written, the illustrations are incredibly clear and useful, and while it does not cover outerwear or millinery, it does instruct the reader, step by step, in drafting/draping and making undergarments, including corsets and cage crinolines, and dresses, with several options for each undergarment and a wide array of treatments for dresses. There is also a very long, very detailed section on hand-sewing construction techniques the way that the Original Cast, as she calls them, would have done them. The book has become a favorite adjunct to my sewing, not just for midcentury garments, but for period sewing in general.

The Tutorial: Stroked Gathers
A little background. I used Elizabeth Stewart Clark's free petticoat pattern at http://www.thesewingacademy.com/wp-content/uploads/2011/04/2010Petti.pdf (PDF file) to make up the basic petticoat. (In the new book, the petticoat section stretches from p. 153 to 184, and includes a myriad of details!) I seamed four 45" wide panels and hemmed the skirt, and got to the point of setting the gathers. The method described in the free pattern is the most basic one that was used, and does not produce stroked gathers.

Here begins the tutorial. 

Step 1
At this point, I measured the raw petticoat top into eight sections by folding it in half, then half again, then half again. I marked the divisions with pins. I decided that rather than try to run two very long gathering threads along 180 inches of fabric, I would take on the task in these eight sections. That way I would have less trouble handling long threads, and I could easily break up the task into parts to be completed over several days' or weeks' (as it proved) time. Elizabeth does the gathering in one step; this is where what I did varies from her method. The potential downside of my method is that you have to be very careful at the ends of sections to make them perfect so that one section's gatherings blend in with the next sections, with no obvious break.

So I ran a gathering thread a quarter inch below the raw top of the petticoat, through the first section, and eighth of the petticoat. I filled a needle with 4-6 little nips of fabric before pulling the thread through. I measured the first stitches with a hem gauge to make sure that they were about 1/8" long, and memorized what that length looked like on the needle.


Then I ran a second row of gathering stitches a quarter inch beneath the first row, matching the stitch length as exactly as I could. (You have to do this or your little gathers won't fold into even pleats.)

Then I ran similar gathering stitches through the rest of the panels. First rows always went fast, about 10 minutes per panel, but second rows were slower. Since I had memorized how much fabric to nip up each time on the needle, I let my muscles keep the stitching regular and regulated, but kept an eye on what I was doing and if the stitches in the second row stopped matching those above in length and position, I pulled them out.

I reckon that the whole gathering stitch process took a half hour per panel, times 8 panels.

Step 2
Next I prepared the waistband. Per the suggestions on the ESC board, I took the waistband fabric and turned up a half inch to one side. I basted it down so it would hold. When period sewing, I am usually far from an iron, so use finger pressing and basting and pins.

Then I measured and marked it into eight sections, leaving extra at the end for the closure per the original directions.

Step 3
Now it was time to attach the petticoat to the waistband. As with the gathering process, I handled this a single panel at a time. So for each panel, I pulled up both gathering threads together, and the material collapsed into even tiny pleats, as you see in the image.


Once the material for that panel was gathered, I pinned it to a section of the waistband, wrong side to wrong side. This means that the right side of the waistband, with the raw edge of the fabric turned under, faces you. The gathered fabric is put up underneath the waistband and pinned. Yes, I used a needle to pin it with: it was what was handy.


Then I fit the gathers in the petticoat to fill the space on the waistband. Almost invariably this resulted in very tightly packed gathers. In this photo below you are looking at the underside of the waistband and the underside of the gathers.


Then I stroked the gathers. I worked on the back, wrong, side of the waistband and gathered petticoat. I stroked the head of the needle in the little valley between each gather, dragging the needle head lightly downwards from the top of the petticoat towards the body of the skirt. Just to reiterate, I used the head of the needle, not the point. If you use the point, you could possibly damage the fabric a bit.

I noted that not every gather needed stroking, because most gathers fell into neat straightness by themselves. Only a few gathers were bent, or caught under another gather, or were poofing out instead of valleying in like they should.


I then turned the petticoat over so that the front of the waistband was on top (with the turned-under edge to the back: you can see the shadow of the edge through the fabric) and the gathers underneath. Not all gathers looked even from this side, but of course the top of all those gathers is underneath the waistband. I knew I needed to do some more stroking further down into the skirt. Yes, that is a needle serving as a pin.


Here I stroke each gather again from the front side. I am using a size 10 needle, which is very small and narrow, so it's hard to see, and the picture is blurry to boot because I was using the camera timer and holding the camera with my chin :) It may look like I am pushing the needle upwards, but no, I am drawing the needle head downwards.


Next I turned the petticoat so that the gathers and band were pretty much perpendicular to me, and started to stitch the VALLEY of each gather to the waistband. To do this I first caught a tiny bit of the fabric in the valley of the gather onto the needle, then pushed the needle through the top of the waistband down through it, bringing the needle up through the underside of the next gather's valley. I am left-handed, and for some reason couldn't manipulate the needle any other way.


I followed this process for all eight panels. It was time-consuming, but pleasant work.


Step 4
After attaching all of the panels, I turned over the waistband, and attached it to the other side with small (1/16" to 1/8"), even running stitches, again per the ESC board's advice. I could have achieved an even better result by repeating the whipping process on the back side of the petticoat, but I was out of time and needed the petticoat for an event.

Then it was time to add the closure, and I was done with the petticoat.

Once again, my great appreciation to the ESC board for their warmth and advice.

Silhouettes for Cards and Decorations for You: Part 3

Here is the last of the 1880s silhouettes for you to copy and use for cards or decorations. Someone cut this one, as they had the others, from a magazine long ago, and I thought you might enjoy it!

As always, click on the image to get it at full size.

Monday, November 09, 2009

Silhouettes for Cards and Decorations for You: Part 2

Here is a second set of 1880s silhouettes for you to copy and use for cards or decorations. Someone cut them from a magazine long ago, and I thought you might enjoy them!

Thursday, November 05, 2009

Silhouettes for Cards and Decorations for You: Part 1

A week or two ago I bought a series of small 1880s silhouettes that had been cut from a magazine. Thinking that copies of them would make pretty cards or small pictures, or even Christmas tree decorations, I photographed them, tried to clean them up a little and am posting them here for you to copy as you will. They are not under copyright as far as I can tell.

As always, please click on each image to get the larger version.

Here is set number 1.

Do enjoy!


Friday, October 30, 2009

On State Street in Ithaca New York: You Are There


Would you like to walk along State Street in Ithaca on a sunny day, and glance in the shop windows or admire the big homes up the hill? Would you like to nod hello to the two young men walking by you on the sidewalk? Would you like to do so in 1900?

Then visit this street-level view (on Wikimedia). The 8+ megabyte file will take some time to load, and you will have to click the image to get it to render full size. Then wander around in it...and admire the moxie, and maybe meet the eye of the handsome student, and make a mental note that you too should probably use a big rain umbrella to shade your skin from the sun.

Here is just a little, tiny detail to whet your appetite.

I wish there were more of these giant photos of my hometown to get lost in!

Wednesday, October 14, 2009

Regency Hand-Sewn Drawstring Dress: A Tour of Stitches, Part 3


We will continue our tour of the drawstring dress construction with the skirt, the last part of the my mockup dress to be sewn. See Part 1 and Part 2 of this series to find about why I am focusing on stitchery in this project.

AlohaAroha had asked that I provide better images of the full front and back of the dress so she could figure out where the detail photos were on the full dress. I've gone one better: here are two new photos of the back and the front, each labeled, by letter, with the seams being discussed in this series. I've gone back to the previous posts and added the photos there too.

Per usual, please click on the images to see much larger versions of them.

Photo: dress viewed inside out from the front, labeled with seams discussed in these posts

Skirt Seams
Costume Close-Up explained that skirts were seamed loosely; skirt seams had less stress on them, so the seams could be sewn with a running stitch, and besides, loose seams meant a skirt could be unpicked more easily to be renovated.

Jennie Chancey, in her Ask the Experts reply to my question about stitches, said that options included French seams (for very sheer fabrics), backstitched seams, flat-felled seams, and running-stitch seams.

I chose the last option, and made the skirt seams with a quarter-inch seam, sewn with a running stitch at 8-9 stitches per inch. To sew the running stitch, I would run the needle in and out of the fabric three or four times, picking up a little fabric each time, and then pulled the thread through, and following up afterwards with a backstitch to hold the stitches in place better. Then I'd repeat. This stitch is known as a combination stitch.

Why is the little intermittent backstitch important? Try an experiment, if you care to. Run several inches of running stitch into a folded piece of fabric. Pull the end of the thread. Puckers rather easily, doesn't it? Now run the same seam, but this time, sew the combination stitch like I did above. Now pull. Fewer puckers: it's a stronger stitch.

Photo: dress viewed inside out from the back, labeled with seams addressed in these posts.

Grimble's The Lady's Stratagem suggests attaching the fabric at your knee while you sit (pinning it to your skirt or slacks, for instance), so as to "work it [the seam] more comfortably" (p 305). I did so at times and at other times, held the fabric in tension with the aid of a sewing bird. In both cases, attaching the fabric to something allowed me to stretch out the fabric and thus put some tension upon it, and the seam would come out straighter this way. I found, also, that I could do something similar by holding the fabric in my right hand with my fingers stretched out while I sewed with my left hand. You sometimes see the stretched-finger position in old paintings of women sewing, and I always thought it just an artistic touch, until I found myself doing the same thing naturally.

I finished the skirt seams by overcasting them loosely, per examples I've seen on the Web and per Grimble (p 344).

Setting the Skirt on the Bodice
To attach the skirt to the waist, I used a single, backstitched seam for strength.

This is a variation of one of the methods Grimble's The Lady's Stratagem suggests, namely, to prick-stitch the skirt and the lined bodice together, with the prick stitching being done from the right side of the fabric. (See last section in this post for discussion of prick-stitching.)

The very center back of the drawstring dress is tightly gathered. I used stroked gathers, an effect quite common during the period. Costume in Detail shows many Regency dresses with beautifully stroked gathered backs (scattered through pp. 87-104 -- I am leaving out later Regency examples), and The Lady's Stratagem (p. 320) and The Workwoman's Guide (p. 2) both explain how to do them.

In my case, I did not do them as well as I would now, because at the time I wasn't understanding the directions I read very well. I backstitched them to the bodice, at the bodice seamline, but, did not make sure to backstitch each little pleat separately. As you can see, I got some no-no bunchiness in the pleats as a result. I am going to redo them.

Photo: the not-entirely-successful stroked gathers experiment.

Stroking gathers? In brief, the idea is to run two rows of very small, 1/8" long gathering stitches at the skirt seamline. Then, gather the fabric up, which as its strung on two rows of threads, will start of itself to form tiny pleats. Then, straighten each gather and line it up with its siblings by stroking the blunt end of a needle in between each gather, in effect training the fabric to lie a certain way. Then connect the gathers to the bodice. Here's where it gets tricky, and here is where you can easily mess up the gathers, as I did.

Grimble suggests to "fasten them, one by one, and very close together with one or two over-cast stitches. If hte skirt is set on by over-casting, continue to sew on the wrong side. If, on the contrary, you are using prick-stitches, turn the gown over to the right side, so that you may sew the folds from that side. " (p 320). This suggests two submethods to me.
  • The first would seem to be a very tiny version and variation on gauging (also known as cartridge pleating). When I had prepared the gathers, per Grimble (p. 319-320), I'd have turned in the top of the skirt to the seam line, then would have run my gathering stitches. Then I'd turn in the bottom of the bodice at the seamline, so I had a fold to whip to. Then I would have stroked and then whipped each pleat to the bodice. I know gauging itself was done during the period, because a late Regency skirt in Costume in Detail is treated with gauging, although the gauging results in larger pleats than do the tiny gathered pleats common with stroked gathers.
  • The second would be to use a method explained on the Elizabeth Stewart Clark board and which I have used to wonderful effect on a mid-century petticoat. It involves a version of overcasting or whipping (which term is correct, if any?) in which the skirt top for the gathered portion is not turned down, the gathers are made at the seam line and just below it, and stroked into place, and tiny overcast stitches are made from the valley of each pleat to the turned-in bodice bottom (that is, two layers of fabric). The bodice is caught only to the depth of about a 1/16th of an inch. I know for sure that results in tiny, perfectly tightly, gorgeous gathers, and there is no bulk from gathering through two layers of fabric. See photo.
Photo: stroked gathers on a mid-century petticoat I have underway. In this image I have already set the gathers, and now am attaching the waistband to the otherside, using 1/16" running stitches with the smallest sized needle I own. Much better results, here!

By the way, for those who are interested, I have a tutorial on -- successful -- stroked gathering. See Tutorial: Making Stroked Gathers on a Mid-Nineteenth Century Petticoat.

I have seen photos of a dress that appears to illustrate attaching the bodice and dress with overcast stitches as as I have quoted from Grimble. A cranberry-colored silk faille dress, circa 1800-1810, at Vintage Textile seems to display this treatment, as shown in the photos below. Look carefully (you'll have to click on the images to see the larger sizes for sure, this time), and notice that the stitches pretty much run vertically, not horizontally. That's why I think it's overcast stitching, although it's hard to tell from the interior shot. I am writing the owner of Vintage Textile for information and for (belated) permission to use her photos.


The front of the dress.


The back of the dress.


The dress interior. It is very hard indeed from this angle to tell how the skirt and bodice are connected.

Skirt Interior Drawstring Casing
There is not much to report here: all I did was to backstitch the casing down.

Skirt Hem
Costume Close Up explains that with fabric so expensive, hems were generally quite shallow...a quarter inch or less. My other resources, including Grimble, basically agree. So, I made a quarter-inch hem and running-stitched it, at about 10 stitches per inch. Again, why waste effort with a fancy hem when it would get dirty, need to be repaired often, and be unpicked anyhow when the skirt was renovated?

Additional Thoughts on Stitches

What other stitch options might I have for an unlined dress?

When I wrote to the Ask the Experts column on Your Wardrobe Unlock'd, Jennie Chancey of Sense and Sensibility gave some wonderful tips. Among them:
"One of the most eye-opening revelations to me when I began studying extant garments from this time period was how "un-standard" the seam finishes were!
With all the careful, intricate embroidery on the outsides, I'd often turn to the inside of the gown to be shocked by what looked like really sloppy hand sewing -- long running stitches, raw edges left unbound, odd shortcuts taken. But, even on sheer gowns, I realized that, once you backed away six to twelve inches, you just couldn't tell. The hand work blends in to the whole.
Over ten years into my research, I can tell you there isn't one "right" seam finish for the Regency era! All of the finishes you mentioned--backstitching with felled seams, lapped seams, running stitches, overcast seams--are kosher. I've seen incredibly tiny French seams so well made they resemble piping inside the gown, and I've seen long running stitches that don't look like they'd hold the dress together. One gown I viewed in the Valentine Museum (Richmond, Virginia, USA) had incredibly fine hand-stitching everywhere except the hem -- and that was done with a rather uneven running stitch (perhaps it was hastily rehemmed later for a shorter woman?). But, again, when you backed off a single pace to view the gown, you couldn't see the hem stitching at all. It just disappeared into the fabric. So you are on the right track with all of your seam finishes."
Doesn' t the above make you feel free? It does me!

I often wonder if prick-stitching might be among the options for sewing the bodice seams on an unlined dress? When Grimble explains prick-stitching (pp. 311-312, and scattered thereafter), she is assuming that the dress bodice will be lined. Prick-stitching, I take it from her, is a form of back stitching. It's always sewn on the right side of the fabric. To paraphrase her description, you make a fold of the fabric at the seam line, and place it down right side out over the fabric it's to be joined to, which is also right side out. The one piece will be lapped over other. The two pieces are basted together to hold them, and then the pieces are carefully backstitched together from the right side (either classic back stitch with one stitch beginning in the hole left by the last, or with a tiny space between each stitch). Often a second row of back stitches is added for strength.

So, if the dress was unlined, one would have to make the lapped seam in one of two ways:
  • turn under the top piece at the seam line and sew it to the bottom piece at the seam line on the bottom piece, but the edge of that left raw on the interior
  • or turn under the top piece on the seam line and sew it to the bottom piece, which has been turned inwards at its seam line. In this way the raw edges are sandwiched.
I wonder if this is an option because in so many pictures in Costume in Detail and elsewhere the back seams and side seams show neat back-stitches, often two rows' worth, just as Grimble describes. I just haven't seen any detailed photos of actual garments shown inside and out that show this method. Oh, for the chance to visit a collection and see for myself!

A final note: Anna Kristine over at The Art of Clothes also has sewn a striking Regency day gown in red with black trim. She has documented the process too, especially the slashed sleeves. If you visit the Regency posts in her blog and scroll around, you will find all the posts.

Thus endeth the tour. I hope it has been useful to you.

Tuesday, October 06, 2009

Regency Hand-Sewn Drawstring Dress: A Tour of Stitches, Part 2


Let us start our tour with the bodice, the first part of the my mockup dress to be sewn. If you haven't read Part 1 of this series of posts, have a gander to find about what I am doing and the sources I used.

As always, please click on the images to see much larger versions of them.

Photo: front of dress, viewed inside out

Back Seams
When I started the dress, the first thing I did was to seam up the back piece with the two side back pieces. Since the back of the bodice would get a great deal of stress, I used a two-part seam, called the flat-fell seam, that was used during the period for women's garments that took great stress. Most of us who have done period sewing are familiar with this seam, as it's endlessly useful, and I found it made sense for this area of the bodice.

First, I attached a side back piece to the back piece, right sides together, and backstitched the seam with a half-inch seam allowance (per Sense and Sensibility pattern instructions). Each backstitch measures between 1/16" and 1/8" long. Guided by Frances Grimble's translation of period French sewing manuals in The Lady's Stratagem (p. 311), I basted the pieces first, to hold them steady, then drew the seam line with pencil, and then stitched. It is exceedingly difficult to backstitch a perfectly straight line without such helps.

Photo: back of dress, viewed inside out

Then I trimmed off one seam allowance to 1/8". On the wrong side of the fabric, bit by bit I finger-pressed down the remaining seam allowance 1/4" to cover the trimmed raw seam allowance, and bit by bit, hemmed it down, each stitch about 1/16" from the next. I kept the stitches as small and even as possible so that the dress, which would be considered a plain wash dress, would wear well and so the seam would sit smoothly. Because of the curve of the seam, I had to ease this hem in, but in hand-sewing that's easy to do because when you make small stitches, your fingers can manipulate the fabric into place. As I hoped, from the outside the double seam stands out just a wee bet and gives a faint shadow line, the curving in of the seam making the back look small. (See the photo above, plus the photo of the neckline interior for seam details.)

Photo: back of dress. If you look at large version of image you can see the bodice back seams. Note that I am not happy with the gathering of the back of the dress...the stroked gathers is discussed in the post after this one.

I did the same for the other back piece.

Notes:
  • I have seen pictures of no unlined dresses that show interior stitching, and none of my written sources helped in this area, since they assumed the dress bodice would be lined, so I guessed on the applicability of the seam treatment. However Jennie Chancey suggested that this treatment was fine, along with all other seam methods I chose, except one (see below), when I asked for seam information on the Your Wardrobe Unlock'd Ask the Experts column.
  • Grimble's sources say that backstitches are never used for flat seams...by which I assume in the context of the text means flat-felled seams. And in fact, by mid-century you have run-and-fell seams, in which the initial seam is simply running stitched before the hemming is done. However, Janet Arnold shows neatly backstitched back bodice seams in her drawings, and The Workwoman's Guide (p. 105) says that all bodies should be backstitched together, although those might be on lined dresses, in which lapped seams were used. Perhaps the French manuals' authors were opinionated, or French and English methods differed, or I am misunderstanding something. Probably the last. The more I think about it, why waste backstitching on a seam that is sewn twice...the second time with a close hem, which is really durable, by the way?
Photo: dress shown inside out, and displaying the interior flaps.

Front Dress Panel

The drawstring dress is constructed with the exterior fabric gathered into a drawstring, but inside, there are also two separate flaps, sewn to the side seams and the shoulder seams, that when the dress is donned, lay across the bust, each lapping the other, and pinned shut. These flaps help the exterior look smooth and help hide stay lines from showing through flimsy fabric.

Photo: detail of running stitch used on interior modesty flaps.

Because Regency seamstresses were as practical as their forebears in finishing raw edges, I forewent hemming the raw edges of these panels an instead, making a tiny 1/8 hem, running stitched it. Stitches measure 1/8" to 1/16" long. To keep the running stitch from catching on anything or puckering, for every 4-6 stitches, I inserted a back-stitch. This was easy to do, as I ran my needle through the fabrics and loaded it on to the needle for those 4-6 stitches, then pulled the thread through, and right after, made the backstitch. Then repeated. It created an easy rhythm.

Next I basted the interior panels to the front piece at the shoulders, and attached it to the side-back pieces, flat-felling the final seam, including the interior panel fabric in with the front piece.

The side seams were treated the same way.

Photo: side seams: flat-fell seam constructed of backstitch, one allowance trimmed and the other hemmed down over it. Armscye is also visible, with the basting stitches still left in it. Underneath those stitches you can see the back-stitching...the backside of backstitches look like continuous overlapped stitches.

Neckline
The Sense and Sensibility pattern called for a front facing to be cut on the bias, seamed to the raw edge of the neckline, and then turned in and hemmed down. The result would not only finish the neckline but also serve as a channel for the neck drawstring.

Having read Costume Close Up, and knowing this dress design dated to 1795, not long after the garments examined for Costume Close Up, I assumed that the makers would probably not cut the facing on the bias, but on the straight grain, as bias cuts waste fabric. As Linda Baumgarten had written, "[c]ertainly th extreme waste of material that results from cutting bias binding would have been unacceptable in the 1700s. In fact, it may not have occurred to eighteenth century seamstresses and tailors to try it." (p. 7)

Photo: neckline facing from the interior. View the large version and note the hemming stitches: it's important to keep the hemming stitch very close indeed to the fabric being hemmed down, or it may pull on the fabric it's being hemmed to, creating tiny holes, as it does at intervals here. You can also see the interior of the flat-fell work on the back seams.

So that's what I did. Easing the facing round the sometimes steep curves of the dress was not easy, but again, because I was going stitch by stitch by hand, I could vary the tension on the fabric and manipulate it into place. Nevertheless, there are 2-3 places where there is a pucker.

What to my surprise to learn from Jennie Chancey through Your Wardrobe Unlock'd, that the original dresses she has seen have facings cut on the bias! There went my theory, pouf.

Jennie said that certainly some dressmakers might have cut straight of grain, so my method was conceivable, but even by 1795 folks were cutting bias...I am guessing that they saw just how much of a pain it was to ease the facing around the curves, and then try to gather the dress, and found that bias worked better. Oh, for a scholarly treatment of this change, for it portended great changes in dress cutting down the road!

Sleeves and Armscyes
Each sleeve is backstitched together for strength, the seam allowances overcast to stop fraying, then the sleeve is basted into the armscye and backstitched together, again for strength. The edges are left raw...you can see this over and over in extant Regency gowns.

The sleeve ends are hemmed with a very narrow hem, each stitch about 1/16" apart for durability. You can see this easily in extant dresses. Before I set the hem, I basted it together, and left in the basting stitches.

Photo: sleeve seam and sleeve edge hem. You can see the basting stitches left in the hem, and the overcast stitch used to finish the sleeve seam is also clear.

So there we have the bodice. Next up, the skirt portion of the dress.

Other Regency Garment Documentation
Before I leave you, here's more information on where you can get useful documentation on specific stitches used in Regency garments. Gloria, author of In the Long Run ("Empire Waists? Nothing better!") blog, has documented the stitches she has used on her black velvet spencer and red open robe.

She notes, among other things, that Past Patterns'
"Circa 1796-1806 Lewis & Clark Era: Empire Gown" has excellent documentation. I have got to get that pattern. Saundra Ros Altman's patterns are superb. The dress that pattern is taken from is a simple day dress and so the documentation would be very useful. Although, like any individual dress, it has its quirks, like the back construction.

Friday, September 25, 2009

Regency Hand-Sewn Drawstring Dress: A Tour of Stitches, Part 1


Over the springtime and summertime I engaged in hand-sewing a Regency-style drawstring day dress in a cotton.

The project was a sort of giant, fully sewn toile, a grand mockup, for I was less interested in having the perfect dress for events than I was in understanding what it might feel like to construct a day dress by hand. What stitches might have been used during the period, and how would the sewing process feel in the hands? What would the results look like? How would they wear?

I am indeed pleased with the results, a plain, untrimmed day dress in a inexpensive cotton print, which still manages to project some grace in its cut and in the texture the stitching imparts to the seams.

If you look at the Sense and Sensibility site, the Dress Diaries Livejournal site, visit the Regency portion of Katherine's Dress Site or do a simple search, you will find lots of information and numbers of dress diaries covering making this dress, so I will not reprise that here.

Photo: dress front

Instead, in the following posts I will lead a tour of the dress, discussing its construction and what I learned during the stitching process.

As always, click on the images to see a -- much -- larger view.

Photo: dress back

First, a grateful nod to my inspiration: the 18th century wardrobe handsewn by brocade goddess for her master's degree and museum exhibition, which was heavily documented on her blog, Rockin' the Rococco, and which I reviewed last fall.

Research

I used several sources during the project, and uncovered additional details...some of which blew my ideas away...later. In all the research I tried to stick to formally published secondary resources or primary resources. Here is a resource list.

Printed Resources
  • Costume Close-Up: Clothing Construction and Pattern, 1750-1790. Baumgarten, Linda and John Watson. Williamsburg, VA: The Colonial Williamsburg Foundation, 1999.
  • Costume in Detail: 1730-1930. New edition. Bradfield, Nancy. Barming, England: Eric Dobby Publishing, 1968.
  • English Women's Clothing in the Nineteenth Century. Cunningham, C. Willett. New York: Dover Publications, 1990. Reprint of 1937 edition.
  • Everyday Dress of Rural America, 1783-1800: With Instructions and Patterns. Wright, Meredith. New York: Dover Publications, 1990.
  • Lady's Guide to Plain Sewing, The. Kannik, Kathleen. Springfield, OH: Kannik's Korner, 1993.
  • Lady's Stratagem, The: A Repository of 1820s Directions for the Toilet, Mantua-Making, Stay-Making, Millinery, and Etiquette. Grimble, Frances, trans. San Francisco, CA: Lavolta Press, 2009.
  • Nineteenth-Century Costume in Detail. Johnston, Lucy. London: V&A Publishing, 2009.
  • Period Costume for Stage and Screen: Patterns for Women's Dress, 1800-1909. Hunnisett, Jean. Studio City, CA: Players Press, Inc., 1991.
  • Workwoman's Guide, The. By a Lady. Second edition. 1840. Accessed on Google Books.
Primary-ish Resources
I say "primary-ish" because I have no access currently to actual period garments. I drew instead on photographs and notation of garments for sale from well-known dealers, and comments from well-known costuming experts online.
I hope you'll find the tour as interesting as I found the construction process!

Friday, September 04, 2009

Three History Blogs to Put Fashion in Context


I certainly wish I knew her name instead of just her initials, BWS. I know she used to teach, and I know she desires that primary-source historical documents and art be made available to everyone. She has created four bloggy doors for us that open into the eyes and ears of the past:
In the three blogs about American women, the author writes about how their lives changed over the centuries. She pulls from paintings, prints, drawings, daguerrotypes, photographs, maps, logs, letters, advertisements, journals, interviews.... She considers the lives of the wealthy, such as Martha Washington, and of escaped or former slaves, groups portraits by period or artist, talks of mantua makers and seamstresses, mothers and their children, publishers and postmistresses.

Photo: 1771 John Singleton Copley (1738-1815). Portrait of a Lady. Los Angeles County Museum, California. (Reproduction at 1st-art-gallery.com. Contact the museum for an accurate image.)

Some of the sources she uses are easily available, but many are not, and the way they are grouped is immensely valuable for putting period fashion and clothing and how people lived in their clothing into context. The blogs focusing on the 17th and 18th centuries are heavier on the writing than the blog about the 19th century.

Photo: a midcentury seamstress and her sewing machine. Photo from 19th Century American Women: A Museum in a Blog.

In the garden blog, we walk through the gardens they walked through, understand their planning and growth and have a sniff at the flowers.

Friday, August 21, 2009

Hairstyle Tutorial: A 1909 Edwardian Coiffure

At long last, a tutorial showing you how to create a popular 1909 hairstyle, a sort of modified "Grecian" look.

As always, please click on the images for larger-size versions

This coiffure's front silhouette is wide, with large-ish puffs to each side, rather flat on top. From the side it looks large too, because the back hair is gathered into a big coiled bun. The style came into being, so newspapers of the day reported, in response to the ever-increasing dimensions of fashionable hats. The wide, flat coiffure was necessary to balance the contraption on the top of one's head. The Pompadour hairstyle of the earlier Edwardian era simply didn't have the width needed, and the high top would be squashed by the hat.

Photo: the circa 1909 coiffure I wore to this summer's Edwardian picnic; focus on the hair, not my silly expression.

Below I offer both a tutorial for creating the hairstyle on your own, and afterwards some historical background on Edwardian hair trends, and leads to period articles that describe how to put this sort of coiffure-- and other popular styles -- together!


A Tutorial: Creating the Coiffure

I have bobbed hair with a bit of a shag cut and a few bangs on one side, so this tutorial assumes that you do not have lots of hair to work with. If you do, you can make your own coil of hair for the back section of the coiffure rather than use a hairpiece, and if you do not want too much puffiness at the sides, you will have enough hair to create the look without resorting to hair rats to hold out the sides. If you want a fuller style, long hair or not, you will need a pair of rats. Details on those below.

Photo: my model style, a very restrained version of the popular coiffure. From the Photo Detective site.

Materials
  • Your hair, preferably at least a day after its last wash
  • 25+ hairpins of the loose type, not the tightly closed type
  • a pair of hair rats (how to make covered below)
  • a clip-on ponytail (about a foot long) hairpiece in as close to your hair color as you can get
  • 1-2 hair bands to hold a ponytail
  • Tight-hold hairspray
  • comb
  • brush
Make the Hair Rats

Hair rats are pads over which the hair is smoothed and which give it a puffed-out silhouette. Rats have been used for ages; and were very popular during the Edwardian period, having been extensively used to make variations of the Pompadour coiffure.

Rats seem to look, typically, like a long sausage or a slightly flattened sausage.

You can make a rat with a hairnet into which you stuff pieces of stockings, but the more accurate method is to stuff the hairnet with well-washed combings from your own hair. Victorian and Edwardian women kept hair-receiver containers just for this purpose. It took me several months to get past the (to me, considerable) ick factor, until I realized that many hairpieces are made with real hair, and that this hair is mine, and well washed. After that, it took me about 4 months to save enough hair from my brush to make the ratts.

When you have collected three good hanks of hair the size of your fist or so, divide the amount in half, wash it very well, and dry it.

Then wad one half up and stuff it into a hairnet, wrapping the hairnet opening around it until it's all held tightly and won't fall out. Shape it into a slightly flattened sausage; mine came out about 6 inches long. Do the same with the other half of the hair. Voila: a pair of rats.

Assembling the Coiffure

Here below is an overview of the steps you will take to create the look:


So, here we go.

First, comb out your hair.


Then, pin one rat to the side of your head as in the image above. You will need five to eight pins: pin through the rat and deep into your hair, pinning all four sides of the rat with at least one pin each. Pin well, because you do not want the rat to slip.


Above is the rat pinned in place.


Pin your bangs or front-most hair towards the other side of your head to keep it out of the way.

You will next smooth sections of your side hair up and over the rat, tucking the ends into the top back of the rat. Take a section, as in the image above, and smooth it around and over the rat. Tuck the ends under the rat as well as you are above. Pin right there at the tuck to hold it; you may need more than one pin if your hair is slippery.


The image above shows two sections of hair that have been smoothed and pinned into place. You can see that the back of the rat has yet to be covered.

Spray a little hairspray on the results if you are happy with them, and if your hair seems to need it.


The image above shows one rat completely covered; over my forehead is the front hair pinned out of the way.


The image above shows the side hair tucked under the rat. You may have to look closely to see some of the pins.


Next, take the front hair that has been pinned out of the way, and coil it or tuck it as best you can into a sort of smooth puff that integrates with the rat. This is not necessarily easy on first try.

Now, place the second rat on the other side of your head, and repeat the process.


The above shows the resulting effect. Depending on how you set the rats, you can get a much wider effect. Here, I set them fairly far back, so the side puffs are quite restrained. For the picnic, I set them closer to the front and so had a much wider effect.


Now for the back hair. You may not have much left. I did not. I combed it and gathered it into a small ponytail on the back of my head and secured it with a hairband. This little lump will hold the ponytail hairpiece.


Comb out your ponytail hairpiece.

Open the jaw clip and clip it to your own ponytail. The hairpieces I have seen have great big, long jaws, so they create quite a large lump. This is good.

Then, coil the hairpiece ponytail around the jaw into a large bun, and pin. It may take five plus pins to do this, and that is fine. You want a good hold.

Next time I make this hairstyle, I will pin create my own ponytail farther up the back of the head and set the hairpiece farther up too, since most Grecian coiffures featured the bun set almost parallel with the back crown of the head...a better hat support.


Above you see the bun pinned in place.


Spray with hairspray to hold the coiffure in place.

Above you see the final coiffure from the side. Again, I would have set the bun up quite a bit higher, and on the day I went to the picnic, it WAS up higher. The image below shows how the more correct coiffure looked after a day at the picnic. A little messy, but intact!


1909 Coiffures: Some Historical Background and Leads to Period Styling Articles

"New Coiffure Is Flatter", read a Sunday headline in the New York Sun, in December, 1909. "The Exaggerated Pompadour No Longer Modish". This and similar headlines all year long all announced a great change in ladies hairstyles after the relatively long reign of the tall, poufy Gibson Girl pompadour with which we nowadays often associate most of the era. That coiffure and its variations were created by smoothing the hair over sausage-like rolls, rats or specialized supports made of wire or other materials.

Photo: The offending early Edwardian pompadour could actually be a sweet hairstyle, as this happy young lady shows. Do click the source link to see the full set of portraits of this delightful young person. (Hugh Mangum photographs: N489.)

Here is how the Sun put it in that somewhat snarkily penned article:

"[T]he average woman...is having much to try her patience, for a coiffure revolution has been sweeping over fashion's world, and last year's false hair is languishing in the bureau drawer or being made over at the hairdressers. For one blessing women may give thanks. The exaggerated pompadour and the innumerable boldly false puffs which have distorted the feminine head in recent seasons and have been raised to the nth degree by the type of girl or woman prone to extremes are likely to disappear from the horizon." The article goes on, "The sides are flattened, the top is flattened, and any protuberance that asserts itself is at the back..." ("New Coiffure is Flatter". The Sun, December 12, 1909.)

Newspapers agreed that new hats revolutionized -- and that is the term that was thrown about -- revolutionized the hair landscape.

"The new fashions are partly the result of the semiclassic influences in the present modes and partly a response to the demands of the new millinery. The mass of hair extending out from the back of the head above the neck is to fill in that great cavern which exists under the brims of many of the new hats.

The pompadour in a modified form still holds its popularity. It is much lower now in front than of old and very broad from side to side. The hats are also responsible for this development.

For faces of a certain type the hair is parted in the middle and brought back in a softly waving mass on each side to the heavy puffed rolls behind. The style is new and very popular..." (
"Fashion's Commands in Coiffures"; San Francisco Sunday Call, 1909.)

In general, it appears most 1909 styles (other than the modified pompadour, seem based on a pompadour that has been squashed and split. The hair is now parted, as described above, in the middle, "Madonna" style, and sometimes the side, and is waved out from the sides of the head, while the back hair is arranged in a large mass or masses, nearly parallel with the crown of the head.

Photo: a typical sample of the middle-parted style, which the site Photo Dectective, out of Britain, calls the "Hatpin hairstyle".

Some newspaper articles averred that rats or hair cushions to hold out the sides were quite out, replaced by freshly washed, fuzzy, hair backcombed to give the width, and wisps smoothed over for a finished look. Other articles suggested the familiar rats.

As one might expect, within the broad outlines of this silhouette, there were lots of variations. Articles commonly noted that ancient Greece provided the ultimate fashion source, and at this time high waists, slimming lines, and Greek decorative patterns were indeed high fashion. Styles with names like the Psyche knot featured bandeaux wrapped around the head and Grecian-styled combs and hair jewelry seemed quite popular.

Photo: "Greek Coiffure in Vogue", published in The Sun, describes modish new styles.

There were coiffures described as a "turban", constructed usually of long hairpiece switches that were wound round and round the head and in and out of combs, for a sleek wrapped result.

Other modish, fancy styles required the "flat as a pancake" top and wide sides, with a fall of puffs at the back, achieved sometimes with small pre-puffed hairpieces, sometimes with a woman's own hair waved using the Marcel process or "water-waved". Read about the latter, uncomfortable-sounding process on in the very fine article "The New 'Unstudied' Coiffure", from the The Morning Examiner, Utah, Sunday, April 4, 1909. Yet other styles, like the Billie Burke, were named for celebrities.

Particularly style-conscious writers tended to deride the old fashion, as fashionistas so often tend to do, while articles tuned more, dare I say, to reality, suggested modified styles. These articles are particularly fascinating as they address the needs of readers of all ages and features, suggesting options and using ordinary-looking women as models, something we rarely see today in the popular press, except in Good Housekeeping type magazines, perhaps, or articles specially self-consciously focusing on real women.

Photo: An illustrated article from The San Francisco Sunday Call showing modified styles for all kinds of women.

Resources

For this article I have focused mainly on two resources: daily newspapers and portraits. The articles in particular are lots of fun to read and some are tutorials for making particular styles! I also referred to a costume text for some sense of trends.

"Arranging the Hair: Widely Different Effects Produced by Different Coiffures"
New York Tribune (New York, NY), April 25, 1909.
Terrific article showing how different styles affect the look of the same model.

"Coiffure Styles Show Great Changes".
The Paducah Evening Sun, march 17, 1909.
Good overview.

Costume in Detail: 1730-1930. By Nancy Bradfield. Great Britain, Eric Dobby Pulishing, 1968.
In this book Nancy includes sketches from photos and newspapers and you can watch trends in clothing and hairstyles go by.

"Fashion's Commands in Coiffures".
The San Francisco Call, March 28, 1909.
Excellent article describes modified styles for all ages and features, with tips on achieving them.

"Greek Coiffure in Vogue"
The Sun. (New York, NY), February 21, 1909

Hugh Mangum Photographs, (ca. 1890)-1922.
Duke University.
Portrait proofs, group portraits, and a few landscapes. Terrific resource for understanding small-town America as represented in North Carolina. However, the photos aren't dated, so you have to work with the costume details and hairstyle details to get a good sense.

"New Coiffure is Flatter"
The Sun (New York, NY), December 12, 1909.
A treat to read, if snarky.


"The New 'Unstudied' Coiffure", from the The Morning Examiner, Utah, Sunday, April 4, 1909.
The Morning Examiner (Ogden, UT), April 4, 1909.
Unstudied? It takes trip to the hairdresser to do most of this work...

"A Plain Coiffure"
The Citizen, (Berea, KY), December 2, 1909
A tutorial for a coiffure thatis quite doable!

Photo Detective: Facts from British family Photographs, 1901 to 1953.
British website. Helpful for photo dating. It is unclear whether the names the author gave the hairstyles are his own names or were current in Britain at the time.

"Psyche Coiffure"
The Citizen (Berea, KY), October 28, 1909.
A tutorial! You will need hair rats and so on, but what a nice effect!

Edited to add, 01/20/2014
From a year earlier, and a French magazine, but clearly showing the trends to come Stateside:
"Nouveau Genres de Coiffure". Le Miroir des Modes, 1908.  Translated from French. English title New Types of Coiffures for Ladies and Young Girls. On the blog A Most Beguiling Accomplishment, by Cassidy.