Tuesday, November 08, 2005

Anatomy of an Antique, Probably 19-teens Petticoat

A few weeks ago a vintage white cotton petticoat came into my possession. Don't ask me how old it is...I am still trying to figure that out! However, it's likely that the skirt is late Edwardian or early teens, given the approximately 2-yard sweep. It's not very full at all. 

How it is constructed is really interesting and some things about it I find puzzling, although they probably would be crystal clear to a real expert. If anyone can set me straight on a couple of points, it would be most appreciated. 

 How It's Constructed

This is a 5-gore petticoat. Three gores up front, and two in the back. When worn, at the top the front gores at the edges rather wrap to the back a bit. Perhaps the way the gores are set will help date it? The gores in front are very scantly gathered; those in back more so but these gathers are tiny, fine and stroked, not chunky. 

 At the back a gusset in two pieces has been inserted. See the picture below.

The petticoat is scalloped at the bottom. The scallops are set in a nice, complex rising and falling pattern. I can't entirely tell if the scallops were handmade or not: if they were machine made, they were not the most perfectly done. If they were machine made, the fabric was sold such that it was long enough widthwise to make a full-length skirt without piecing on the scallop pieces. I cannot tell the lengthwise grain on the fabric so that doesn't help: it's a plain tabby weave. Were such fabrics sold in such wide widths...kind of a la disposition

The skirt is set on a narrow waistband and the placket in back closes with extraordinarily long tape ties. Surely these wrapped around the waist once or twice before being tied, else, whoops, the lady treads on a tie and she goes head over heels or flat on her face. 

The Measurements

Waist, by gore measures at the top:
  • left front=5 3/4" I measured several times :}
  • center front=6"
  • right front=6"
  • left back=5"
  • right back=5"

Sweep (bottom gore width) measures:

Approximate sweep is 76", or just over 2 yards. That is quite narrow, but when worn feels roomy and does not constrict movement.

  • left front=12.5"
  • center front=12.5"
  • right front=12.5"
  • left back=17.5"
  • left back width to top of gusset=17"
  • right back=17.5"
  • right back width to top of gusset=17"

Length of skirt, top to bottom=38" (highest point of scallops), 39" (lowest point of scallops)

Waistband=1/2" wide

Placket=5/8 " wide, 9" long, not including waistband.

Tie tapes are each 40" long!

Handmade, and Not Always Neatly! 

All you hurried seamstresses out there can relax; it'd appear that what we'd call semi-sloppy seam finish work was definitely out there. Now the Williamsburg Foundation book, titled something like "What People Wore", says that 18th century clothes were often ill-finished on the interiors. Having to be completely hand sewn, and often reused and retooled until the poor garment fell apart, there was little point in finishing each seam. I understand from Elizabeth Stewart's excellent board, The Sewing Academy at Home, (see http://www.elizabethstewartclarkandcompany.com/Forum/index.php) that simply overcasting the edges of seams was a quick and effective and common way to finish seams at the mid nineteenth century. The sewing machine's wide adoption may have helped to make neat finishes not only more common, but more a social standard, or at least that's my personal suspicion. By the time a lot of teaching texts roll around at the turn of the 2oth century, nice, even fancy seam finishes were expected. However, as with ettiquette and cooking and fashion sense, what was expected was probably far less than universal on handmade clothes.

On my petticoat? No fancy finishes there! The interior seams are simply overcast, and loosely at that, with not terribly even stitches in a fine thread. I was shocked, shocked! Rather hard to see on the picture of the interior of a back gusset at left, but you could try... 

Look at the way the waistband is sewn on, too. Nice tiny machine stitches, but look up close and you see, what's this? Edge stitching that wanders a bit and falls off the edge of the band? Quel horreur!

What It's Like to Wear This Petticoat

The petticoat is surprisingly roomy. You'll laugh but we have no full-length mirror that doesn't suffer from an advanced case of silvering. So the only shot I have is taken in front of a small mirror propped on the staircase landing, and shows only my feet. You'll note the roominess and how nice those scallops look.

Monday, November 07, 2005

An Edwardian 1911 Flounced Petticoat Dress Diary, Part 2: A Puzzle of Proportions

Currently I am drafting a 5-gore underskirt or petticoat, with dust ruffle and flounce, according to instructions in the 1911 textbook, Textbook on Domestic Art

It has been an interesting process. The instructions rely on sizing up or sizing down a draft based on proportions taken from a model skirt. Since my body no longer follows the suggested proportions of a waist 15" smaller than the hips, whoops, well, something interesting happened to the results, and I am still mulling over my solution and whether it was the right one. 

Instructions for drafting and then making up the skirt appear on pages 74-85. You can find the original source materials, in full, on the Cornell University Home Economics Archive (Hearth), at http://hearth.library.cornell.edu/. By the way, the text bases a street skirt on the same draft...you learn how to do variations to make a pattern endlessly useful. 

Drafting the Petticoat

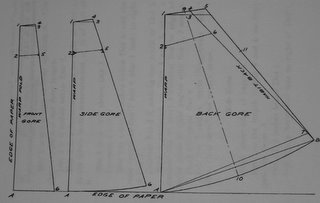
Here is the skirt draft illustration.

I found the instructions to be clear and simple. First, the textbook discusses the proportions necessary. From these, if you like, you can calculate the waist measure for each gore, the hip measure, and the length to the skirt bottom (minus the dust ruffle). 

However, you don't have to do this: the step-by-step drafting instructions have you make these measurements as you draft up your pattern on paper. I laid long lengths of freezer paper on my big Hancock's measuring and pinning board and drew the drafting dots and lines with pencil and ruler. 

The Proportions Problem Appears

When I finished the back gore, it looked too narrow compared to the model drawing, which had quite a flare on it. 

What was going on? 

Remember that the draft is based on proportions, right? Well, oh dear, I have a thicker waist of 30" compared to the model's 24". So when I drew the oblique line from waist to skirt bottom that forms the back of the gore, I got less of an angle than a woman with a smaller waist would have. What to do? The text states on p. 76 that "(t)he average width of an underskirt on lower edge, before dust ruffle is attached, is between 2 1/2 and 3 yards, for the average person, unless very wide skirts are in vogue". For the model that's 90" inches of "sweep", as the term has it. Well, I bet mine wasn't any 90". It didn't have the right flare at all, and I had checked my math, I hoped. 

 What Textbook on Domestic Arts Suggests Doing

The textbook writer knew that some girls would have thicker or thinner waists. So on pp. 83-84 it says,

"If more fullness is desired at bottom of skirt, increase width of each gore by starting 1/3 of its length below the waist line, on each bias side. [If you read Harriet Pepin's Modern Pattern Design on http://www.VintageSewing.info, you'll see this mode of splitting the angle of the gore into two parts in action.] For less fulness, decrease....(T)he width around bottom should be in good proportion to the height and size of hips of each individual, even when extreme fashions are in vogue." 

Aha! So I was supposed to add inches to the sweep by adding width at the bottom of each gore. Okay, how to do it?

Solving the Proportions Problem...With Algebra?

So I rummaged in the brain and remembered the simple algebra formula for coming up with a proportion. The model waist of 24 is to model sweep of 90", as my waist of 30" is to X. I solved for X and it said I needed 112" of sweep, distributed around each side gore and the back gore. By the way, that comes to the 3 yards circumference maximum suggested by the book. 

I measured the bottom width of the side gores and the back gores with a ruler...but didn't know how to distribute the inches needed to make up 112". That's when I had a, perhaps, bright idea. Using the proportion formula again, I calculated the waist/sweep proportion of the model back gore, and compared it to my waist/sweep proportion. 

Aha: I was 4 inches short on my back sweep measurement. Surely the side gore would have the same problem, but it didn't. The results were the same, no matter how many times I redid my math. Further, the four inches I needed in back, when added to the sweep of the other gores, added up to the ideal 90"! 

So, suspecting I had drawn my lines wrong on the gores, I redrafted them. (Oh, how boring that was.) But no! I had done it right. 

 When That Doesn't Work Perfectly, a Middling Solution

Frankly, I don't know what error I made or what principle of geometry is in effect that causes the bottom width of a gore to come out differently when you do it by math versus drawing it out. But I did decide what to do. I kept that 90" sweep, as being befittingly narrow for 1911. Then I distributed 2 inches of extra to the back gore and 1" each to the side gore. If when I build it in muslin it makes me look dumpy, well then I'll redo it with a 112" sweep, and I will have learned how proportions affect the line of a dress in a visceral way. 

I'll see how it turns out! Oh, by the way, had someone back in high school applied algebra and geometry to something interesting like sewing instead of to endless drills, I might actually have liked math class. [Note as of September 17, 2021: our twin sons have had algebra and these days, their teachers have them work out problems based on all kinds of applicable situations. Nor more plain drills. Yay!

An Edwardian 1911 Flounced Petticoat Dress Diary, Part 1: Neat Tips on How They Were Worn

My cool 1911 textbook Textbook on Domestic Art has given me some key knowledge into how people fitted and wore their underthings. In reference to what they call an underskirt and I call a petticoat, did you know:
  • "An underskirt should be 1" shorter than the outside skirt, as well as narrower, except the flounce."
  • The outer skirt length for the high-school girl audience was set at 4 inches above the floor...that comes to right about instep. The petti would be one inch shorter than this.
  • "The flounce is added for flaring as well as beauty." Note that the flounce was a second layer to the petticoat added towards the bottom: the text's model has a 12" flounce set on such that its bottom is even with bottom of the dust ruffle.
  • "A dust ruffle about 4" deep is generally put on to prevent wear."
  • (The) "width around the bottom (of an underskirt) should be in good proportion to the height and the size of hips of each individual, even when extreme fashions are in vogue."
  • A petticoat could have a gathered back, a pleated back, or a "habit" or straight back. The text recommends a fuller back, as opposed to the habit back, for those whose "figure" needed it to sit well.

By 1913, the situation was a little different. Garment Construction in Schools (also available on the HEARTH site) writes:

  • "(The) petticoat is intended to fit closely around the hip, and is narrow at the lower edge also (2 yards)."
  • "The fulness at the lower edge is supplied by a scanty frill of material..."
  • Embroidery is suggested as being a pretty and effective alternative to a frill. Naturally it wouldn't pouf out the skirt either, in this time of severely vertical skirt lines.
  • The top was faced with a "false hem" cut on the bias, in calico for a cotton petti, and sateen or calico for a woollen one.

Both texts recommend quite a variety of materials. Petticoats could be cotton, either plain or in colored prints with "a deep frill of material", or in flannel. Wincey (a type of wool) was used for summer wear, at least in England.

Friday, November 04, 2005

A Glimpse of the Antique Treadle Machines I Use

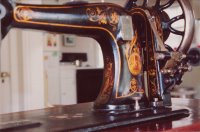
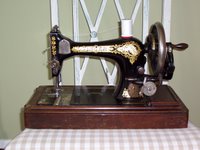
Part of the fun of sewing period- or vintage-style clothing is making up the pieces using vintage sewing treadle machines. At least it is for me. I find antique machines pretty to look at. My boxy, modern Bernina with its single bland pink and blue decal is a visual yawn compared to my Warwick, with its romantic hand-painted tendrils and mother-of-pearl decor on the bed, or to the elegant classicism of the legs, or "irons" that support the Willcox and Gibbs.

That's just a start, though. Most antique treadles were designed to take on a wide variety of materials, some of them very heavy and dense. They power through heavy-duty tasks that will wear out a motor on an electric machine. They won't whine if you want to go one-slow-stitch-at-a-time-in-a-really-delicate-spot. 

Granted that this is not a vintage sewing example, but I am proud to write that when I constructed floor length silk curtains recently, the Willcox managed sewing through four layers of silk and cotton lining, all together, and topped off by sticky, heavy commercial curtain header tape, without an issue. I turned to it after the Bernina refused to operate on such a heavy load. Silly me. Should have started with a treadle. 

 Then too, a vintage machine will produce vintage effects. My handcrank Singer 28k is a whiz at setting up gathers in heavy materials...it was built to do it. The Willcox (mine dates to 1911) will produce stitches so fine you can barely see them. A chainstitch machine, it was popular for making underclothing, among other things. As one contemporary guide explained, the stitches have more stretch and give than do lockstitches. You can produce simple chain stitch embroidery with it too, or sew on soutache braid just as such braid was originally meant to be attached. The "tuckmarker" produces perfectly aligned tucks of all sizes. 

There are many of us out there who love these machines, who conserve them and rescue them from being broken up for lampstands or other uses. Some of us collect them, others of us collect and use them, too. Most all of us feel that we are custodians of an important part of sewing history.

Where To Learn More If you have the least bit of interest in learning more, try these sites.

  • TreadleOn, "headquarters for a group of almost a thousand people who collect and sew with 
  • antique sewing machines". See http://www.treadleon.net/. This is a truly amazing group of folks from all over the world.
  • The NeedleBar, "A reference site for collectors of antique and vintage sewing machines". See http://www.needlebar.com/
  • ISMACS. "The International Sewing Machine Collectors Society caters to those interested in collecting and learning about full size and toy sewing machines". See http://www.ismacs.net/
  • Photos of the vintage machines in my possession, at http://community.webshots.com/user/inkspot106. My collection is very small. There are many sites across the Web belonging to folks who have collected and conserved dozens and dozens of machines.

How 1910-1911 Clothes Really Looked When Worn

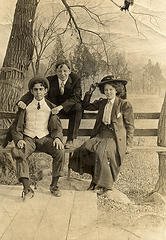
I've stumbled upon a truly fascinating series of photos of a young woman and her friends and family, circa 1910-1911. A number of them are snapshots as opposed to posed shots, of this young woman, Pauline, and her friends on a park bench, or mugging for a photographer, or Pauline posing thoughtfully in a meadow.

Formal posed pictures can show you someone's outfit at its best; a snapshot shows the outfit as it actually lived on the person...lapels awry, buttons straining fabric, hat flapping in a smart breeze. Then too there are the intangibles: in Pauline's photos you glimpse how people walked and sat or lolled in their clothes, and how they felt in them.

If you look carefully at these particular photos, you will see a long coat that Pauline favored, for instance, and didn't mind wearing out to play in. You'll see exactly how she wore it, sometimes with a hat, but no gloves in evidence. You'll see a handsome suit she sported one fall or winter day, and in one special snap of Pauline and her classmates, you'll see how a group of women all differently approached dressing for an occasion. How they wore sashes, or whether they choose plain skirts or ones with buttons or pleats, what neckline treatments, and how they did their hair to complement their outfits, is all crisp and clear.

See the Pauline set, maintained by BigBrownHouse, on Flickr, at http://www.flickr.com/photos/93468869@N00/sets/807535/. With kind thanks to BigBrownHouse for those shown here.

Tuesday, October 25, 2005

Patterns for a 1911 Wardrobe Online

The Textbook on Domestic Art, published in 1911 for use in high schools, teaches readers how to draft patterns for and then make up, step by step, pretty much a complete wardrobe, excepting a proper corset. What a treasure! Pretend you're a high-school student at that time, and you're off...

You will want to know the basics of sewing, such as how to do a running seam, but many concepts are actually covered pretty well. The patterns are basic ones lacking fancy trimmings other than ruffles: you add trimmings as you like. The patterns can be easily altered for an adult woman, I believe. Drafts and some photos are included.

Basic pattern drafts include:

For cotton materials:

  • Drawers.
  • Five gored underskirt (petticoat) with dust ruffle and flounce.
  • From this you also move on to make a plain five gored dress skirt, kilted or pleated skirt, underskirt with bias flounces; circular upper made from five gored skirt draft.
  • Shirt waist draft without sleeve. From this basic draft you make also (a) Corset cover, (b) Chemise. (c) Night gown with sleeve.
  • Plain tailored shirt waist.
  • French (bodice) lining draft.

For woolen materials:

  • Seven gored skirt.
  • Nine gored skirt.
  • Designed waist on shirt waist pattern.
  • Coat.

The book also describes the tools and types of fabrics you need (there is also a decent glossary of period fabric terms near the book's end), how to insert boning (!), the basics of ironing, and so on.

Therefore, if you're looking to build a Titanic-era wardrobe, this is probably a pretty good place to begin.

How To Get the Textbook

Visit Hearth: The Home Economics Archive at Cornell University, at http://hearth.library.cornell.edu/. Choose Browse from the left nav bar, then browse for the book. You view and download the items page by page as text, page images, or PDF files. You can search the full text to find the pages you need. The pattern making starts around page 64. Before that you learn essential stitches, detailed handling of buttonholes and buttons, and so forth.

More about the Hearth Archive

It's a slow process digging through everything, but the archive contains literally hundreds of books about everything from sewing to childrearing to women’s wages. All with their original formatting and illustrations. Go Cornell and Ithaca, my hometown!

What if You Want to Produce Something Fancier? More Sources

  • Try the Thornton’s cutting guide (1912) on the Costumer’s Manifesto, in the 1911-1920 pages at http://www.costumes.org/history/100pages/1910links.htm. Drafts for peg-top skirts, Magyar blouses, Norfolk jackets, they’re all there. You won’t find a teaching guide for making them up, however.
  • VintageSewing.info has the 1917 book American Dressmaking Step by Step, at http://vintagesewing.info/1910s.html. I love this book because it teaches you, with plenty of photos, how to make about any period seam imaginable, apply the fanciest of ruffles and insertion and trimmings. I frankly do not think that such techniques had changed that much since 1911, although skirt and bodice construction had certainly morphed more than a bit.
  • La Couturiere Parisienne, at http://www.marquise.de/, that marvelous site, offers pattern drafts of clothes in this period, plus some instructions for making up, and often a photo of the result. They also have a translation, from German, of portions of a book on period sewing technique, dating to 1908. Since clothes of that period were considerably poufier and fluffier and fuller, some of the instructions will not apply to 1911-1912.
  • Fashion drawings and photos of actual pieces are all over the Web. Sources for these that come immediately to mind: Among the Hedgerows, Demode, Costumer’s Manifesto, Sense and Sensibility, Fashion-Era.com. I’ve also run searches in Flickr using the tag “1911” and have come up with delightful period photos of people, often in more relaxed attitudes, with their friends, than what you’d find in a portrait-style shot. You see the clothes as they were worn in action, all stretched and mussed up.

    Happy sewing!

Sunday, October 23, 2005

And Now, Said Chemisette Pattern


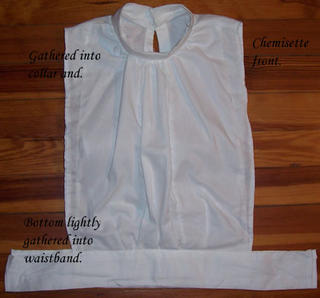
This chemisette, also known as a dickey, is a handy little item for wearing under a suit. They require little fabric to make, are easy to maintain and are cool. Back in the day, when women wore more underclothing, and fewer rooms were well or overheated, dickeys made a lot of sense. Today they still make sense, provided the weather, inside or outside, isn't too warm. That's because a dickey is nothing but a shirt front and back...there are no sides and no sleeves! Therefore, protect your good suit's lining they will not, and if you're wearing wool and it's a warm day, you're stuck with your suit all buttoned up.
Dickeys, I understand, started out in the 19th century, and maybe earlier, as economical fakes: shirt fronts that masqueraded as full shirts for men who lacked the money to purchase and maintain a full set of dress shirts.

Sometime along in there women caught on to dickeys, too. I have an Edwardian era dickey, mostly handsewn, in fine net and cotton, with a boned lace collar.

The dickey pattern at hand I made up for a Mystery Tea our Ladies' Tea Guild I attended this weekend. It took perhaps 5 hours to make, but that includes scaling up and adjusting the pattern, changing the collar style, and fitting it. As I am a slow seamstress, many of you could whip through the thing in no time flat. The material? Perhaps a half yard of white 45" muslin, in scraps!

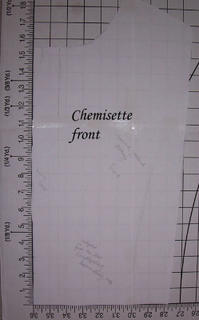
The following pattern was adapted from The New Encyclopedia of Modern Sewing, Frances Blondin, editor. Published in 1943, in the midst of WWII, and put out in a second edition in 1946, the book takes you back to the Make and Mend era, when war shortages had women remodeling their dresses year after year and sewing up outfits for themselves and duds for their children from Daddy's old suits.

The pattern I used didn't come with sizing, but I found that the dickey fit me pretty well: my measurements are 36" bust and 30" waist, on a 5'6" frame, of average proportions; I am neither long- nor short-waisted.

I chose the gathered band collar since it appeared frequently in fashion drawings from 1940 of women's suit outfits.
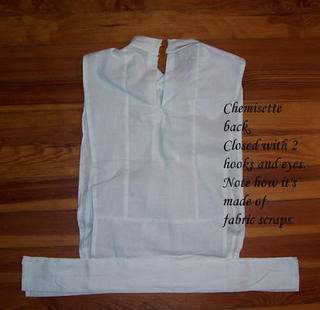
One more note before we begin: if you look at the pictures you'll notice a lot of vertical seams down the front, a couple down the back, and one across the lower back. Those aren't from the pattern! That's me using up narrow scraps of fabric by seaming them together before cutting out the pattern. I just made sure that I aligned the seams such that they appeared symmetrically on the front and back.

Here's how to make the dickey/chemisette:
1) Scale up the patterns. I placed the pattern pieces on a cutting board with 1" squares, bought from Hancock Fabrics. You could measure out a grid with 1" squares fashioned from paper bags or even newspaper. Then you can size up the patterns just as I did. I eyeballed where each pattern line fell in a given square and replicated that line on your 1" square grid. If you have a measured cardboard cutting board, you can place stick pins at all the corners of the pattern and then in key curves. Then connect the pinhole dots with pencil.

2) Pin the front and back pieces together and fit it over your shoulder. The seam line should sit right on the shoulder. You'll probably find the back short: I did, and added 5 inches to the bottom.

3) Cut out the front and back. Both pattern pieces show one side: fold your fabric selvage to selvage and place left side of pattern on the fold.

4) Pin front and back together and try on again. If you're fussy, baste. Think the fabric isn't laying correctly on the shoulder? Pin the offending loose spots and after taking off the pieces, trim them and try on again.

5) Stitch front and back together only at the shoulder seams with a plain seam. If you like, finish the inside of the seam with a fake french seam.

6) Finish the side outer edges with a narrow double hem to prevent fraying.

7) Now you prepare the collar. Take a scrap of muslin the circumference of your neck plus enough for ease in wearing and about 1 inch for hems, and about 6 inches or so wide. I literally tried on a scrap around my neck until I felt it fit me well and was wide enough for taste. I folded the fabric not one, but 2 times, so that there is an inner layer that serves as interlining. I made sure I had about an inch (x2) extra on the bottom to seam to the front/back and to fold in.

8) Next, slash the back in the center down low enough to slide the chemisette over your head. If you're lazy, you can just fold back the vertical edges and hem them but naturally that will result in quite a little gap. I instead made a facing out of a scrap of fabric. Consult your favorite dressmaking book for facing neck or back openings...it's a bit much for me to explain here but actually goes really fast.

9) Gather the front neckline edge of the dickey almost from shoulder to shoulder. I made smallish gathers for a delicate effect. If you want big, full, gathers, use bigger gathering stitches.

10) Fit the collar to the neckline and seam it. You can encase the neckline edge with the folded over long sides of the collar: that hides the gathered eddge and keeps it from poking you. Me? I was in a hurry: I'd seamed the collar closed already and just seamed it to the dickey by sewing right side to right side. Not the best plan, as it resulted in all that gathered material, fine though it was, poking me when I wore it, but anything for speed when you're sewing under a deadline!

11) Finish off the ends of the collar with hems: make sure to leave enough on the ends to meet at the back of your neck and hook-and-eye it closed. Or you could leave one end longer than the other and overlap it? Much nicer effect, I'd think.

12) Prepare the waistband. I cut 2 pieces, each 7 inches by 17 inches. I turned under 1/2 inch on all sides for hems. Then I folded each piece in half lengthwise, and marked the centers. I finished off the ends with turned-in seams.

12) Affix waistband to front and back of dickey. I gathered the central section of the front with big soft gathers to taste. Then I took one of the band pieces, inserted the front into it, making sure the center of the band was at the center of the dickey front, and edge stitched the band closed. I seamed the back waistband in the same way, omitting the gathering. You will find such bands long enough to close easily with a button or (oh my!)(a safety pin) on each side.

13) Affix hook and eyes to collar.

That's what it took.

You can play with the design and add lace to the collar, add insertion lace down the front in vertical stripes or in patterns, add tucks, whatever pleases you.

The Encyclopedia states the following about dickey fabrics: "Since the charm of neckwear is its crisp freshness, the prime requisite for fabrics is that htey should launder well. Pique, handkerchief linen, dress linen, organdie, ginham, broadcloth, dress silks and rayons are suitable." (p. 170).

One last note: to get a sense for how a band collar worked when I wanted to change the original pattern, I consulted Harriet Pepin's Modern Pattern Design, another 40's work that is a really truly gem for understanding how clothes of that era were designed and constructed. You can find that book online, in full and illustrated, on VintageSewing.info.

Citation: The New Encyclopedia of Modern Sewing. Frances Blondin, editor. New York: WM H. WIse and Co., Inc. 1946.