Tuesday, March 31, 2009

Springtime and a Christening in Atlanta

On a chilly spring Sunday morning my little nephew Tommy was christened in Atlanta. He was quite sunny about it, what with smiling family and church members all about him. After the happy event we all trooped back to his house for an indoor picnic. Who cares if the air smelled like snow? The boys still wanted to run about the front yard in their shirtsleeves.

Our dear friend Debbie, also a professional photographer, captured the day.

Tommy is christened.

Noah points at his cousins and friends, who are running about just beyond the camera lens.

Tommy leads Noah out to play.

Christopher being Christopher.

Wednesday, March 11, 2009

About Hobble Skirts


Those of us who love Edwardian fashion are often curious about hobble skirts. Their cut seems so modern and so antiquely confining at the same time.

The blog Edwardian Promenade has written up a fine, brief history titled, no surprise here, The Hobble Skirt.

Photo: La Soiree Toscane: Robe d'apres-midi de Doueille. 1913. NYPL image no. 824734.

After reading the article, I made my way to a favorite research resource, The New York Times site, and entered "hobble skirt" into its search engine. Turns out, the paper and the public were fascinated by the fad, too:

"'THE HOBBLE 'IS THE LATEST FREAK IN WOMAN'S FASHIONS; Skirts Are So Tight Around the Ankle That Locomotion Is Seriously Impeded and Speed Is Impossible" read one headline on June 12, 1910.

Freakish accidents and falls soon followed:

"INJURED IN "HOBBLE" SKIRT.; Mrs. E. Van Cutzen, While Alighting from Runabout, Falls on Pavement." August 5, 1910. Mrs. Van Cutzen belonged to the fashionable set, apparently, for she fell out of her electric runabout car in front of the casino in Newport, Rhode Island. Troubles continued: "Hobble skirt caused her death" read another headline, dated September 1, 1911.

There were those writers who praised the skirts as a method of instilling grace into what the writer considered the undignified striding about of American women."Walking in Hobble Skirts", published in 1912, reads more like a polemic than anything else.

The Parisian fashion world's claim that the fashion was American, and not their own design? Read this article by a non-plussed reporter: "HOBBLE SKIRT IS AMERICAN.; So Paris Man Dressmakers Declare After It Breaks Parislenne's Leg." August 14, 1910.

Photo: "Mother, you stand like last year." 1912. NYPL image no. 817969. In this image, two willowy daughters posing in the fashionable, willowy stance tease their mother, whose posture reflects the straight-front corset of previous years, which pushed out the chest and derriere at once, creating a "walking into the wind" sort of look.

Oh, and there's much more, if you continue the search: articles about women in Washington winning a fight to get trams they can climb into without tripping; the Pennsylvania Railroad barring them; Queen Mary's war on the fashion appearing at court, hobble skirt races, an actual bill introduced to regulate the width of the skirts, claims that the fashion hurt trade, and report after report of accidents.

And then the fad faded away, like the Dolly Varden dress, and so many fads before it and since then, and the editors went on to fresh and more important news...World War I.

Are You Looking for Hobble Skirt/Titanic Era Patterns?

There are many free sources online for skirt and dress patterns of this era. Here are a few of them:

Tuesday, March 03, 2009

Constructing 18th Century Dress: Detailed Blog

Do you want to understand how to construct 18th century clothing from the inside out? Do you want to get close-up shots of cutting, stitching, and trimming details, photographed as the garment is created? Do you want to see an entire museum exhibition in its development phase? Then you might want to visit the "Rockin' the Rococo" blog. It's an oddly bouffant, pouffant name for a seriously researched project, but it fits.

The author is keeping her blog as part of her Master of Arts and thesis work. She is constructing a series of clothes that a middle-class woman might have worn during the period between 1750 and 1770, and will build a museum exhibit around them.

To prepare for her project, she examined garments in the deeps of the Museum of London for several months. She has constructed everything from stays and a breathtaking sack dress to a riding habit. To make the project even more fascinating, she is constructing them by hand, in costume herself, by daylight or candlelight.

Photo: the Rockin' the Rococo blog author at work.

Yet let me let her speak at some length, for she writes better firsthand than I ever could secondhand:

The next part is object-based research, most of which took place over the summer during my time in England. I spent 3-5 days per week
over the months of July and August in the Museum of London’s costume stores examining extant garments one after another. I spent an average of 1 hour with each garment taking notes according to a template I drew up for myself and shooting an average of 10-12 photographs of the construction details of each artifact.

The third component is this project, including the exhibition that will be on display on-campus at the University of Alberta over March and April 2009.

This reproduction project represents experiential research and data collection. In addition to reproducing garments I am also replicating certain aspects of an early modern seamstress’s working experience. The garments are made from historically appropriate materials, and constructed using equally appropriate techniques and processes.

Beyond this, I do the work all by either natural or candlelight in order to get some idea of a pre-electricity experience of time and working conditions.

[Photo: a sample of her crewel embroidery in progress in an embroidery hoop.]

I also (and I know this is going to sound a little hokey) dress up in an outfit that is somewhat appropriate for a fairly successful seamstress of the time. While planning the project, I realized that being “corseted” would be important to the experience, as nearly all women of the period wore stays under their clothing (even the very poor). I also happened to have a costume/reproduction dress on hand that I had made (just for fun!) several years ago. The pattern for this dress was taken from Janet Arnold’s Patterns of Fashion, and so derives from an actual artifact garment. I also wear 2 cotton petticoats, a neckerchief, stockings and a pair of period reminiscent shoes (ok, they’re really pretty and I just like them). I had inteded to make a linen cap to cover my not-so-period hair, but have just never managed the time for it.

For working I sit on an uncushioned wooden kitchen chair. And at the risk of sounding….uncouth(?) I don’t bathe on my sewing days - on purpose.

I work 10-12hrs/per day, 3 or 4 days/week, and am keeping a log/journal of the specs of the project along with thoughts, impressions, and questions that arise from the experience.

Navigating the Blog

The top portion of the left navigation bar, labeled "Pages", contains blog pages devoted to each garment, and to overviews of the project and the author's background.

The "Archives" pages contain more journalesque information.

Do have at least one visit, and marvel.

Photo: detail of sack dress the Rockin' the Rococo blog author constructed.

Thursday, February 12, 2009

Happy Valentine's Day!


To all mamas and daddies from their sweet little tots,
To all family and friends, from their little buddies,
With love.

Photo: Christopher at bedtime.

Tuesday, February 10, 2009

Small-but-Interesting Acquisitions

First, hairpins! They appear to be made of a sort of plastic, but they vary a good deal in color and pattern, which I am not used to plastic tortiseshell pieces doing. The box, labeled "Imperial", isn't much help either. I have no idea how old they are but thought them fascinating. Photo: six tortiseshell-patterned hairpins from a box of eight. Second, a length of black bauble trim! It's fun to hold, as the cord is silky and the baubles, which are shaped like tiny short cylinders, bang around in a satisfying way. Again, no idea how old this is. Photo: length of black silky bauble trim.

Tuesday, February 03, 2009

Designing a Dolly Varden Dress


Note: As June 2012, this project has been on hold for some years, since Regency projects intervened, but I may take it up again.

Having the proper corset ready, courtesy Originals by Kay (Kay Gnagey), and having made the proper bustle with the Truly Victorian Grand Bustle pattern (TV 108), the next step in the Dolly Varden ensemble project to design the dress.

I've been playing around with various designs and every little while have examined fashion plates and photos anew to refresh and check the design ideas. It is quite apparent that there is no one Dolly Varden design...the term was bandied about loosely. Most dresses presented a vaguely eighteenth century look, featuring a polonaise or polonaise-style overskirt and brightly colored fabrics or sometimes striped fabric. Most dresses lacked a train, but some had them. See A Brief History of the Dolly Varden Dress Craze in this blog for details.

Photo 1: A Dolly Varden dress design...not the final one.

Design Options

Two basic design options emerged.

Design Option 1

The first design, which currently pleases me most, is dominated by a poufy overskirt. Have a look at the figure on the right in photo number 2.

Photo 2: pannier overskirt designs from Peterson's, January, 1869. Image courtesy La Couturiere Parisienne.

The pattern would be a variation of one published in January, 1869 and titled Pannier Overskirt, featuring a split front with a nice little updrawing just to either side of the hips, recalling panniers, and much poufing in the back.

The overskirt would be trimmed with bows. Bows highlighting updrawn side panels were popular in 1872, says Cunnington's English Women's Clothing in the Nineteenth Century. Again, following Cunnington, the back of the overskirt would be covered by a large bow with short tails, the bow attached to a belt.

The pattern published with the plate is actually for the figure on the left. Here are the original instructions (thanks to Couturiere Parisienne, again):

... made of claret cashmere, and trimmed with frills of the same and satin piping to match.
The tablier front is to be cut double, and without a seam down the center; a notch will be
found o one side of it, and a corresponding notch on one side of the rounded side breadth,
showing how these two pieces are to be joined together. The back breadth and side breadth
are joined by the corresponding notches. Both sides of the panier are alike; when the
breadths are all joined, the edge of the side breadth is to be laid in plaits from notch
to notch; there are in all five plaits... and a satin rosette added at the side where the
first (top) two plaits are arranged. A crinoline bustle should always be worn beneath this
kind of skirt.
Yet I can alter the panel to make the figure on the right! Take the front panel and split it down the center, and then extend the side panels across the back. Examine the two figures and you can see that this can be done, yes? Here's how I'd toile it, anyway:
  • The side piece has tucks taken in it and then is seamed into the front piece, which itself is flat-ish. You can see this is true in both pictures.
  • On the figure on the right, the front, instead of being doubled, is cut as is.
  • The front piece appears to have just a little tuck made in it, too, so that it's drawn up a wee bit before it joins the side piece. This makes for a pretty drape as well as a tiny wrinkle, which the artist has rendered below the rosette.
  • The placement of the rosette at the seamline on both figures I bet highlights the related nature of both costume designs.
  • Otherwise, there is no real difference in the overskirt designs.
Google has placed the 1869 Peterson's volume online, so the pannier overskirt pattern is available. See page 77.

The underskirt in the pictured design is lovely but doesn't really suit the floofiness of many Dolly Varden originals: it's too severe. Therefore, I would probably include headered puffings with bias band trims (see the second design option below), which were so popular during the period.
I also like the way the bodice in the right-most figure is treated, although by 1872 the waistline had fallen a bit. It's rather clever: the bodice lines form a vee shape, reflected in the upside-down vee shape of the overskirt. Also, can you see the reference to an 18th century neckerchief in the wide falling bodice collar? I can. With some care, I could I would probably try to alter a Truly Victorian pattern to make the bodice. If I chickened out? Just change the bodice design to the ubiquitous square-necked design offered by Truly Victorian (TV 400).


For fabric, bodice and overskirt would be made in a an eighteenth century-ish beflowered pattern, while the underskirt and trimmings would appear in a plain French blue. Since a Dolly Varden dress is usually meant to be simple and informal, I am doing a first version in an inexpensive cotton waiting in the stash, flat-lined in more cotton to give it more body. I know that it will likely not give the drape that the original wool would give it.After all, wool drapes crazily beautifully, or a crisp silk, which drapes ditto, only crisperly, would do that too. I can only hope that making it up that with the cotton won't be depressing. Grrr.

Design Option 2
The second design of interest is more my own, and includes elements common generally that year, with only the fabric and the slightly bell sleeves with eighteenth-century style sleeve flouncing to mark it specifically as a Dolly Varden design. Have a look at photo number 1. Frankly, it's probably better for the cotton I have, being simpler and less reliant on drape, darn it. It would also look super in a flowered lawn or voile.

In this version, the bodice is a basic square-necked look(again, TV 400), trimmed at neck edge with a tiny tightly gathered lace or voile frill. The overskirt is the common apron-front design, gathered up at the sides and then falling in a fluffy, polonaise-y pouf in back. Both bodice and overskirt would be made of the flowered fabric; again the underskirt and trim would appear in the plain fabric.

Photo 3: Truly Victorian's TV 400 1871 day bodice pattern. I'd choose the view at top right.

Besides the apron and pouf, the main elements are the trimmings. Trim was what distinguished so many dresses in this period. It's been surmised that now-common sewing machine made making trims easier, so dresses began to be loaded with them.

In this dress, the trims are all variations on puffings. The neckline features a narrow puffing with a header on each side; in the center front, about the button closure, there is a small bow. The overskirt is edged with a wider puffing, the stitching on either side of the puffing covered with a blue bias band. Above the scantily flounced underskirt bottom is a similar puffing, even a bit wider.

Photo 4: An example of a large puffing applied to a sheer skirt. The puffing itself is the gathered puffy band in the center. To either side a band of insertion has been sewn to hide the puffing stitching. At the top edge is a gathered header; at the bottom is a very scantily gathered lace ruffle. Detail of photograph of a Mrs. Davidson, Montreal, Quebec, 1870-1871. McCord Museum.

Because puffings might get in the way, the sleeve cuff area features a simple gathered ruche, the stitching covered with the blue bias banding. The sleeve ends are flounced like they might be in the 18th century, with scalloping, and inside are faux undersleeves in white voile, similarly scalloped.

I've found a good overskirt pattern that has a fullish apron front, a nice lift up the sides (with tapes), and plenty of pouf and length in the back. The overskirt pattern in Jean Hunnisett's Period Costumes for Stage and Screen (plate 19, view F) will work, reports Heather McNaughton of Truly Victorian patterns.

Petticoat Patterns

I plan to set a fluffy, highly flounced petticoat over the bustle. I'll use the Truly Victorian skirt pattern TV201 as a base pattern, but trim it as lavishly as I can. De Gracieuse has several plates focused on petticoats. Here are two examples of trained petticoats from 1872. I like the version on the left with the pretty ruche with bias band applied to the center, but not having time at present to attempt a knife bottom flounce, would
replace it with the gathered flounce at the right, edged at bottom with Valenciennes lace.

Photo 5: 1872 petticoats from De Gracieuse. Memory of the Netherlands site, the Gemeentemuseum Den Haag collection.

Monday, February 02, 2009

Harper's Bazar Nineteenth Century Fashion: All Online


A red-letter day! Cornell University's HEARTH site put much of Harper's Bazar online...from the magazine's inception in 1867, in fact, until 1900. I am enchanted.

One of the sources for high-style fashion news in America, the magazine's engravings are superb, and the text is full of fashion news, sewing and needlework instructions, fashion plates, articles and poetry, and in every other issue, a full set of patterns, too. Sadly, Cornell has no plans to post the pattern supplements. I wrote to ask them about it and they replied the same day.

Here is a sample of text describing the carriage dresses featured on the July 18, 1868 cover:

1. Dress of blue silk, with tablier simulated by a puffing of the same, edged with narrow black lace, which begins at the waist, and sloping on each side borders the entire bottom of the dress, excepting the front breadth. Two similar rows of puffing, separated by black lace, are set above this on the bottom of the skirt. A row of silk bows, composed of four loops without ends, are set down the middle of the front breadth, in the manner of buttons. Large carriage mantle, with "full slashed sleeves, of black cashmere, lined with rose-colored silk, and trimmed with gold fringe and galloon. Black lace bonnet, with gilt diadem, and red rose and leaves at the side.
Fig. 2. Dress of changeable silk (gorge de pigeon) trimmed with a box-pleated flounce. Black lace mantelet attached to the bonnet. Corsage half low, with white muslin chemise Russe. Sleeves tight, trimmed with three silk folds. Belt edged with a bias fold of silk. Half long gloves of peau de Suede; changeable silk parasol, to match the dress, lined with white gros de Naples, with wide changeable fringe.

You see? Incredible detail.

Some of the plates and patterns in Harper's Bazar are the same as those in De Gracieuse of the Netherlands, and the supplements for that magazine are available online (see my Fashion Plate and Photo Sources list for details). Why are the patterns the same, you might ask? Because Harper's Bazar took much of its content from Die Modenwelt in Berlin, which in turn seems to have copied Paris fashions.* America still leaned heavily on Europe for fashion instruction in those days.

The posted pages are fairly well scanned, although many seem a little dark, and the text is fully searchable, a real boon.

See the magazine index.

* The book Producing Fashion: Commerce, Culture, and Consumers, by Regina Lee Blaszczyk (University of Pennsylvania Press, 2007) states that Die Modenwelt was published across Europe, using the same fashion plates, in some 13 languages. De Gracieuse, I surmise, was one of these.

Thursday, January 29, 2009

A Favorite Kitty, Happily Adopted


Several weeks ago my friend Polly told me about Sophie, a four-year-old cat up for adoption from the Scott County Animal Shelter. Polly had met her at Petsmart and thought she'd be a lovely companion for our kitty Ladybug. Sophie, she said, was sweet-natured and purry and pretty...and liked children! Inexplicably left by a family when they'd moved, she'd spent over four months without a home already.

I'd been so hoping for another kitty, and so I visited her page on Petfinder. Without ado, I fell in love. She's a dilute calico, long-haired, gentle-eyed. She wants to be cradled. She wants to remain close to her people all day. She needs love. We have plenty and more to give, I thought.

Photo: Sophie's sweet, soft face. Courtesy Petfinder.

We couldn't adopt her: family life here is so short on sleep and long on work due to the twins that my husband couldn't see adding another member just yet, so with regret, he nixed the idea.

I scrambled to see if a friend or friend of friend could take her in, not the first time I've done something like this. So many little kitties I've fostered, fed, socialized, found homes for with family, with friends. In recent years tiny striped Piper, named for his big voice, sat on the car armrest between my husband and I from Kentucky to Asheville to meet my parents, and then lapsat his way to Wilmington, North Carolina, to be their kitty. A year or so before that sweet-natured, floppy, sprawl-all-over-you Dixie flew with me to Atlanta in his own carrier to live with a colleague. And there have been others. I hoped to help Sophie, too.

Sophie Finds a Home...with Natalie

This morning I spoke with Polly, and what a funny thing, Providence heard me, for Polly saw her adopted. She'd been back to Petsmart with two kittens she's trying to place, and sitting there in the adoption corner, she watched a little girl and her parents arrive. They found Sophie's cage. They had it opened, the little girl picked her up, and fluffy Sophie settled in her arms. The girl had vision problems, Polly said, and looked like she very much wanted a friend to love. The little kitty, it was clear, wanted a friend too, and cuddled with the girl. And so she was adopted, and off they went. The little girl's name? The same as mine: Natalie.

Photo: Fluffy fur and diluted colors, and a playful paw, and that happy tail, like a flag.

Coincidence, say you? Hmmm. As my mother said, her Natalie (me) so wanted to save a kitty but couldn't, and already has Ladybug to love. This little Natalie wanted and needed a kitty friend, but didn't have a kitty, so the right Natalie for the kitty was found.

Monday, January 26, 2009

Last Saturday Sewing Circle: Materials for The Inaugural Meeting


We've done it! A group of us are trying out a period sewing circle, to meet on the last Saturday of every other month. At this inaugural meeting, we'll talk about the varied nature of period sewing, think about what each of us would like to make, and I will show a portion of my antique clothing and period-inspired and period reproduction pieces.

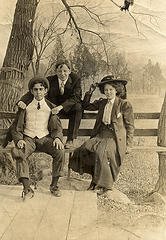
Photo: Pauline in her walking skirt, circa 1911. Photo courtesy Big Brown House.


Period-Inspired Skirts: A Fun Starting Project

Because many period-style skirts need fitting only at waist and sometimes hips, and because they're often made with straight seams, they make a good starting project. Fashionable and wearable they can be, too. Who doesn't like a little swish around the ankles?
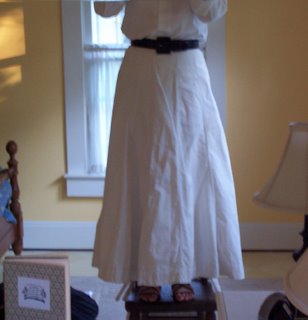
Without getting too deeply into fashion history, I can tell you that in years past the term "walking skirt" meant a skirt that was easy to wear for, well, walks and rambles, shopping and informal occasions like snipping flowers. Walking length skirts were normal for working clothes, too, when you expected to become grubby and needed to climb or kneel without the pretty appendage of a tail -- a train -- trailing behind you.

Photo: Dame Nellie Melba, 1909, in a skirt with quite a tail...er, train. From State Library of Queensland, Australia, uploaded to Flickr.

Here's a video from 1904 with many shots of women in skirts of walking length: see how they move! (See also the post on Edwardian Promenade about the clip.)


Here's an original walking skirt with felled seams. Functional and pretty! See the blog post "Anatomy of a 1900-1911 Vintage White Heavy Cotton Skirt".

Some Skirt Options for Our Circle

Sense and Sensibility Patterns carries a pattern called the Beatrix skirt, that was inspired by the skirts that Beatrix Potter lived in on her farm. The style dates to 1909 and depending on the fabric used and how you cut the waist and hem, and how you sew the seams can go from outdoorsy and functional to the elegant clinging line of that year, complete with a small train. The skirt is fullish, but is not meant to flare out. Like most skirts of that year, it's composed of multiple gored panels: 9, in this case. The panels help shape the skirt around the body for a smoother line.
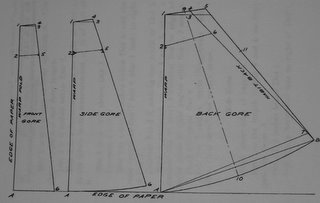
Photo: Outdoorsy version of the Beatrix skirt. Photo courtesy Sense and Sensibility patterns.

I've made this skirt several times and have helped friends to make it too, and each time it's a fun process. There was the dressy version, for instance, and now the version that will be incorporated into a lingerie dress. For our purposes, the pattern is especially helpful because Jennie Chancey, the pattern designer, has posted illustrated directions. What I can show is how the pattern can be altered and period techniques used to create different effects.

A 1911 Skirt That Flares More
You might also be interested in a plain five-gore dress skirt from 1911. That year skirts flared out around the feet a bit more...the last year long skirts would do so. This pattern for this one comes from a high school textbook of the era called Textbook on Domestic Art and must be drafted. You can download the entire book from Google and print out the pages you need.

The drafting directions are clear, and the process requires little more than large sheets of Kraft paper or newspaper, a yardstick, a pencil and eraser, and the ability to add and subtract. Detailed drafting directions for skirts as a whole, based on a five-gore underskirt (petticoat), start on page 74, with directions specific to the skirt itself starting on page 119. Now, since these patterns are based on proportions, we may have to fiddle with the initial draft a bit if you aren't proportioned like ladies of the era, and most women aren't: the textbook expected this. See my blog post on drafting and using algebra to get the right sweep on an underskirt from a pattern in the same textbook, for instance. It all ended well...

An Narrow 1912 Skirt

If you're willing to read teeny-tiny print and do some drafting, you can draft a narrow skirt, from 1912 from Thornton's International System of Ladies' Garment Cutting, available on the Costumer's Manifesto site. I made a skirt for my friend Denise using one of these patterns, called the "New Style Costume Skirt" and it turned out very nicely. Construction was easy since the skirt was only in two pieces, but if you decide to make this skirt, we'll need to cut the fabric somewhat large and carefully fit it to you because it is snug around the hips.

For directions, see page five in the series of scans and look for the New Style Costume Skirt image and its directions page .

If you wish to try another Thornton's pattern, or any other Edwardian pattern, for that matter, that will be fun too, but since I'll not have made those skirts, we will have to do some fiddling and thinking things out, especially if the pattern is to be drafted.

After We Meet, What Next?

If you use a commercial pattern, you'll obtain the pattern, and if you want to draft one, you can either try it yourself or we can meet and do at least part of it together...if you don't mind small children underfoot.

Then, it's on to cutting out and fitting, and basting...so in my next Sewing Circle post, I'll write about period manuals that I think cover these issues most clearly, along with some superb dress diaries, fully illustrated, that show all this in action!

See you soon, ladies!

Saturday, January 10, 2009

Edwardian "Lingerie" Dress Diary: Part 5


It's been awhile since I've had much to report on the Edwardian tea dress that I started, goodness, last spring! You know how it goes...you get sidetracked with other projects.

Anyhow, I've gone back to it in as much earnest as I can muster, and have gotten the sleeve cuffs mostly added. This doesn't sound like much, but the cuffs are entirely of period lace, and I had so little of that lace that one cuff wasn't long enough to go around my wrist.

Old Sewing Stitches Make a New Cuff

So I had to take a tiny remaining lace fragment, and attach it to one end. I did not seam it the way you might with two pieces of fabric, but used as closely as I could an old method described in Frances' Grimble's The Ladies' Stratagem -- I laid one end of the lace over the other end, hoping that the pattern would match up decently, and then very carefully overcast and sewed the two pieces together with as invisible stitches as I could do, following the curves of the lace pattern.

Photo: the cuff in progress: the ends are being overcast together. Click the image to see how the pieces of lace are joined.

What this did was to blend the fragment in with the rest of the lace...if you look carefully you can see the join, of course, but it's not only less visible than a regular seam would be, but uses less lace so was able to eke out what I needed to go 'round my wrist.

I still had 'nary enough lace to seam up the lace into a cuff, soooo...I am in the process of overcast stitching the two ends together, with tiny, very close stitches. Again, this is an old method.

One last thing. One cuff makes use of an existing period machine-stitched hem to create the cuff hem. The piece of lace for the other hem -- the too-short one, natch -- lacks this premade hem.

Soooo, once again I turned to an old hand-sewing method. I turned the hem double like normal, but then "stitched", and this is the formal term, down the hem. To make a line of stitching, you 1) pull the needle up through the fabric for your first stitch, then 2) carry the thread back behind where it came up a few threads, push the needle through to create a stitch, then pull it up in front of the stitch the same number of threads forward as you did backwards, then 3) carry the thread back and place it in the hole made by the previous stitch. Do this over and over again. You will create what looks like machine stitching, but with only one thread.

This stitch is time-consuming, and I am not yet very good at it at all, but the result does look enough like the machine stitching on the other cuff to take casual observation. See the picture above.

I took a tip from Elizabeth Stewart Clark's board and attached the work to my knee with a pin. The tension created on the fabric helps you to make a straight line. Other sources suggest you draw or base a line to follow, so your stitching line won't wander: I'd forgotten that when I did this hem and you can see the line wander a little.


Photo: the bodice to date

Next Steps

After I get the other cuff attached, and bind the raw inside edges with voile, then I finish the back of the bodice with hooks and eyes, and sew down endlets of lace back there, then attach the bodice to the skirt, oh, and add period lace insertion to about a foot above the skirt hem.

Cheri Owned Fabric of the Same Pattern: Did It Come from the Same Dress?


I wrote about doing up the cuffs on the Sense and Sensibility board, and what an usual surprise, Cheri wrote to say: "Oh I wish now that I would have waited to sell some fabric that I just sold. ::sighs:: Did yours look anything like this: http://www.etsy.com/view_transaction.php?transaction_id=12920645 Why is it when I get rid of something or sell something, it's afterwards that I wish I hadn't?!"

Photo: Cheri's piece of fabric. Photo courtesy Cheri.

Oh, my goodness, it's the same pattern! Plus, she bought it from an Ebay dealer too: I'd gotten mine from a dealer in Maine, but she cannot remember where hers came from. We wonder...was it the same person?

Tuesday, January 06, 2009

New Boots!


New boots, new boots, nothing like the love for new boots.

These are darlings, besides being so comfortable, as so many boots definitely are not. They're what a friend called paddock boots, from Bob Mickler's, a tack shop here in town, and their shape and the snap button boots on the side recall the button boot style that I love so well.

Made by Ariat, they're sturdy as anything, constructed of strong leather that still manages to be supple, and the sole not only has a shank as almost as wide as three fingers held together, but also one of those air package thingies inside. I can easily wear them all day.

What an unexpected Christmas gift from my husband! We'd agreed to exchange only a book apiece, but there was this lovely treat, a big box under the Christmas tree, and was I happy! I've been without boots. Had wanted badly to purchase the Fugawee Victoria balmoral-style boots, which the Ariat boots hint at, but since whatever boots I found needed to be worn with everything, indoors and out, period or not, these were so practical. Hooray for practicality with a traditional, vintage touch.


Right boot, right side

Ditto, left side

Left side

Sunday, January 04, 2009

Split Seconds: A Cookie with Warm Memories

Split Seconds are simplicity itself to make. Do not let the title fool you into thinking that they're "partly homemade" baked things. No, these are butter cookies dotted on top with your favorite jam or preserve and they are delicious in the way only butter cookies can be.

Because my husband and I have a bet on that we will leave desserts alone for an entire six months (I make exceptions for ladies' teas and Easter), today I wave goodbye to baking and sweets for awhile by baking these cookies, and filling the house with a favorite aroma and even nicer memories.

Cooking Collections of Memory

Back in the 1980s I started what became a series of recipe collections, each contained in a bound artist's sketch book, on nice thick paper. Each book was filled over several years and each reflects, by accident, my favorite dishes and menus during that time. Because many of the recipes are accompanied by notes, the results are also an imperfect history: old beaux, sisters, friends, dinners and parties get their time, and later there is a recounting of the evening my husband and I became engaged, and a long account written during September 11.

What I wrote about this recipe, back in book number 1: known oddly enough as Second Cookbook, 1987:

One of my earliest cookie memories. Mom used to make these pretty often, and sometimes I think I can remember her first kitchen, or the one in the first house she and Daddy ever owned. it had red counters, and lots of windows, and red and white checked curtains. One of the counters was like a bar and you could sit on one side, the breakfast nook side, and watch mom cook -- especially I remember helping her bake (i.e., eat dough, pat it or cut it out or lick batter from spoons). [Today's note: I wrote this in the eighties, when being a child wasn't so far back. Now that kitchen, circa 1963-1968, would be a spot I would ooh over as a friendly retro kitchen, with those handmade cafe curtains and linoleum -- Mom, correct me if I am wrong! -- counters with aluminum edging, and half-windowed back door out into a sunny yard with flower beds, and a white picket fence that closed with a chain and cannon-ball weight.]

Now, you can make these into long ropes which you cut into bars, or you can make them into little rounds. Red jam is best -- it looks like rubies.

Mom made them while we lived in Germany, too (when I was around five or six years old).

The cookies, attributed to a Mrs. Karen M. Fellows, come from "Fun-Filled Butter Cookie Cookbook", by Pillsbury.

The Recipe

[Note: My cooking notes are in brackets. The rest is in Mom's words.]

Bake at 350 degree F for 125-20 min.
Makes about 4 dozen cookies.

Sift together

2 c flour [all-purpose white flour; I use unbleached local flour from Wiesenberger Mills]
1/2 tsp baking powder (double acting) [note that this recipe dates to a time when single-acting powder was commonly on store shelves, too]
2/3 cups sugar

Blend in

3/4 cups soft butter
1 unbeaten egg
2 tsp vanilla

to make a dough.

Place on a greased cookie sheet, either in long rolls [which you have rolled in your hands like play dough] or in little flattened rounds.

Make a depression 1/4-1/3" deep, either in the rounds, or [down] the middle of the rolls. Fill depressions with red jam or jelly. Strawberry, or especially rasberry, is best. [Since then I have used other types of jam and today, in fact, I am using a peach jam from Renfro Valley, Kentucky.]

Bake until light golden brown. [Again, about 15-20 minutes, but watch carefully, because butter makes cookies that are a light golden brown move to dark burned brown in what seems like a heartbeat.]

While warm, if in bars [Mom probably meant to write "long rolls"], cut [cookies] into squares. [We always cut them into narrow oblongs, so that they are not so big.]

This evening I will add pictures!

Tuesday, December 30, 2008

Completed: Wool Christmas Skirt with Ruche


This skirt was supposed to debut at Thanksgiving, but because I sew in short spaces between work, babycare and household tasks, it was only Christmas Eve, early in the morning, that the last ruching was completed. I wore it to Christmas Eve service and then to a dinner date at Jonathan's on Saturday, and now again to a lunch date.

Photo: the skirt debuts

The skirt panels (there are only two!) and side placket closure are copied from a plain denim skirt my mother owns and that I have always admired the fit of, but the rest is my design: I used no waistband, facing the interior instead, and sandwiching a full-length lining there; I also faced the bottom with a 2-inch hem for better hang, and of course, adding the ruche :}


The ruche idea originated as I was reading Frances Grimble's The Lady's Stratagem: so many skirts of the late 1820s focus attention on the skirt hem, and the general lightly A-line cut with slim hips was popular too. I thought, ooh, ruches are popular this year, and wouldn't it be fun to see a little ruche flutter near my feet!

Photo: skirt front

Construction

I made the skirt using, excepting the bag lining, generally period methods...from herringboning hems to placket construction to the hand-gathered and feathered ruche. The extra care makes the skirt sturdier and certainly makes the interior feel more finished. :}

The skirt panels: traced and cut

The skirt is constructed of only two panels, front and back. They are shaped with a curve at the hips on the side seams and a slight A-line cut. There is no need for darts at the waistline, at least in my case. To copy the panels from my mother's skirt, I laid the lining fabric out on one of those fold-up cardboard boards marked with inches that Hancock's sells, pinned the skirt as flat on top as I could, and traced around the edge with tailors chalk. First I made sure that back and front were the same cut... Jennie Chancey has instructions, titled How to Make a Pattern from a Favorite Garment for copying a pattern on her Sense and Sensibility Patterns site.

After pinning the lining together and trying it on to test fit it, I cut out the fashion fabric by using the lining piece as a pattern. At the same time, I traced the bottom curve of the skirt over scrap fabric and cut out a two-inch hem facing (with extra for seam and hem allowances), then repeated the process at the waistline for a waist facing.

Seaming

Next I pinned, basted and stitched up the side seams, and left them raw since the wool doesn't ravel badly and there is a lining to protect it. I left one side with a nine or so inch unsewed space at the top for the placket.

Then I pinned, basted and stitched the lining's side seams, again leaving room for a placket and machine-hemmed the lining bottom.

Attaching the lining: a sandwich effort

Then it was time to attach the lining to the skirt. I made a "sandwich": the raw top of the waist facing and raw top of the skirt right sides together, with the raw top edge of the lining in between. I pinned, basted and stitched it. I then trimmed the seam allowances very close to the stitching to reduce bulk, turned the facing inwards, and voila, the lining was attached and the seam hidden. To prevent the facing from rolling towards the outside when the skirt was worn, I carefully edge-stitched the skirt top from the outside.

I feel very fortunate to use a Willcox and Gibbs chainstitch machine: the presser foot is very narrow indeed, has a super grip on the feed dogs, which are also placed close together, and I use an extremely sharp needle. This helps me to sew neatly (usually) very, very close to the edge of the fabric: a wider presser foot would make it harder to see what I was doing, and the wider-set feed dogs would have a harder time gripping the fabric, because only one side would probably be gripped. Here are some shots of the machine from an 2006 post.

The skirt placket

Next, the placket. I made both underlap and overlap pieces for this skirt, as the wool is thin and needs some extra body. The original skirt just had an underlap, but that skirt was denim. Instructions on making this sort of placket are covered in a previous post, titled Edwardian and Victorian Skirt Plackets: Where to Find How Tos.

One nice little touch: Chapter XV of Frances Grimble's The Lady's Strategem, titled "The Art of the Mantua Maker or Cutter of Gowns", covers what was then called "plain sewing" in quite a bit of detail, as she has translated sewing manuals from French. At that time seamstresses made quite a bit of use of tight overcasting to finish edges of fabric, and to seam two pieces of fabric together!

Since I didn't want to create unnecessary bulk where the underlap and overlap are joined at the bottom, I pinned the two pieces together and tightly overcasted them, placing the stitches very close together, to prevent ravelling of the raw edges, and the stitches just far enough back from the raw edge to hold the seam securely. This method probably would not work on seams that get a lot of stress or with ravelly fabric. Here, however, it prevented me from having to hem or otherwise finish the bottom of the placket and so doing, create extra bulk.

Interior finishes, fasteners, and facings


Next, interior finishes at the waistline and lining placket: I roll-hemmed the edges of the lining at the placket opening, and carefully herringbone stitched the lower edge of the waist facing down onto the lining (not catching the real skirt fabric, however). Herringbone stitches have give to them, so they can take a little pulling, and they look neat! You see them used in the linings of older nicely tailored coats, for instance. If you've never used a herringbone stitch before, check the manuals at http://www.VintageSewing.info.

Photo: interior finishes at the placket. If you click on the image to see the large version, you'll probably spot the place where my vaunted neat edge stitching wavered a bit!

Let's see, after that, I attached the hem facing at the skirt bottom...same method as the waist facing, but without sandwiching the lining, as the lining hangs free. I hemmed it to the inside of the skirt carefully with what the Regency era called "side stitches" and later eras called a hemming stitch.

Then it was on to attaching hooks and eyes and snaps. I do not like zippers, as a matter of taste. As for using both hooks and eyes and snaps, some Edwardian manuals suggest putting a few hooks and eyes up top, then snaps lower down, where there is less stress. So that is what I did.

Photo: herringbone stitches attach the waistline facine to the lining. You may note that there is an incipient wrinkle in the facing: I gained a little weight at Christmas and gracious, if it isn't stressing the skirt! I had it fitting very closely, you see. Hmmm.

The ruche

At last, the ruche. I used fabric on the straight of grain rather than the bias, since I like the body of it. I cut it three inches wide (I wanted a bold effect!), cutting two lengths twice the length of my skirt hem circumference. After seaming them into one long length, I sewed a tight stitch straight down each long side about a half inch from the raw edge to try to control excessive fraying.

After this, I ruched. All this means is that I took a longish needle, threaded it, and sewed basting stitches down the longways middle of the fabric. I pushed several little gathers of fabric onto the needle before drawing the thread through; this helped the stitches be of even length and speeded the sewing. Every six inches or so I gathered the fabric and sewed a backstitch or two to hold that section so it wouldn't "ungather", then repeated the process.

By the way, 2x the skirt circumference was not long enough for a full ruche. I ended up having to cut another length, to ruche that, and to, carefully as I could, hand-seam it to the other pieces without showing. It worked pretty well. That's what can happen when you work by guess and by golly, no?

After that? I "feathered" the edges of the fabric by laboriously pulling threads until I had a narrow fringe.

Photo: the ruche. Note the line of stitching near each feathered edge, to, I hope, control raveling a bit

The final step: I tacked the ruche down at precisely the level where the skirt facing was hemmed inside the skirt: this hides any showthrough of those hemming stitches :}

There you have it. I used lots of handwork for just a simply two-panel skirt, but I enjoy handwork, and the result is, I think, pleasing.

A thought about the fabric: it's a very lightweight wool plaid, in cocoa with blue and pink bars, so soft as to barely be seen and I believe the fabric is a worsted...I am not over-familiar yet with wools. It's from Hancock Fabrics, which each year seems to carry at least one very nice wool. Anyhow, the wool has a marvelous drape, but unlike heavier wools, is apt to wrinkle if sat upon long. I see some wrinkles in the front caused, I am sure, by holding warm little Christopher for almost an hour in the pew box...he'd act like a warm iron :}

Friday, December 26, 2008

Merry Christmas!

From our family to yours, a very merry Christmas. The creche you see belonged to my mother's family, and battered as the figurines are, I couldn't imagine unwrapping and setting out any others. Displaying them, I see the Christmas miracle, but also memories.

Tuesday, December 23, 2008

The Christmas Skirt...Almost There


Wouldn't you know that the eve before Christmas Eve I'd be sitting on the floor, under a blanket, as close to the fire as I can get without scorching, ruching madly and then equally madly tacking the ruche to the Christmas skirt that was supposed to debut at Thanksgiving.

While we're using the word "mad", let me say I was rather mad to find that the estimate of 2 times the skirt circumference for the ruche was by just 6 inches not enough, and so I have to cut more fabric, ruche it, and then stitch it to the rest and try to hide the seams. And have until 4:30 tomorrow, when we leave for Christmas Eve service, to do it...in between work, baby care, cookie baking and pasta sauce making. Oh, and laundry. Umm hmmm. Typical.

Photo: a peek at the Christmas skirt with its ruche set at top of the hem. Don't ruches remind you of fancy cake decorations?

Monday, December 22, 2008

From Fall to Winter...But Lengthening Days


Yesterday marked the winter solstice, the darkest, shortest day of the year. This morning it already feels brighter to me, for now, each day, there will be a little more light, and then a little more, and a little more, until it is spring again.

Photo: Noah behind the potted oregano-cum-geranium, which is jammed next to a Chinese fan palm.


Meanwhile, we'll appreciate how the barren tree branches are sketches in the sky, how the sun reflects from the occasional snows, how the winter birds sing on the random warmish afternoon, when there is a hint of earth smell in the air.

Indoors, we will create a little springtime of our own, in the back guestroom, where morning and afternoon, it is always bright.

Photo: Christopher inspects the same plants, the geranium bravely blooming. Outside, rain patters on the window.

Friday, December 19, 2008

On Virtue


"That virtue which requires to be ever guarded is scarce worth the centinel."
Oliver Goldsmith
The Vicar of Wakefield


For some reason, The Vicar of Wakefield, an old copy of which I picked up at the International Book Project, is resonating, lines and scenes from the book interrupting mundane tasks today like making bean soup and dishwashing.

Virtue comes from within, I agree, and if it's set deeply enough, if it's normal to you, you'll respond less to invitations to act inappropriately, yes?

But Oliver, don't forget about the influence of the people around you!

It appears -- the book is as yet half unread -- that our Wakefield family is about to find that norms from without are going to have a hard time balancing with the norms within.

Oh, my baby boys, what we have ahead of us, too...

Sigh.

Tuesday, December 16, 2008

Memories of a Fall Photo Shoot


Fall is long gone, say the snow-trimmed trees, fall is far away, say the blackened walnut hulls lurking underneath their cold white blanket.

Yet this fall and two happy twin boys romping during our late October photo shoot will remain fresh and green in my memory so long as I live.

Photos, right and below: Noah in Ashland's walled garden; Christopher holds a black walnut.


Thursday, November 27, 2008

Thanksgiving for Everything


...My cup runneth over.

23rd psalm

...Our cup runneth over...

May your Thanksgiving run over with thankfulness too.

Wednesday, November 26, 2008

An Edwardian Hairstyle: Four-Part Video Tutorial


Here is a fascinating, four-part video tutorial on creating a very pretty Edwardian hairstyle. It's not a Gibson-girl pompadour, but more complex, more sculpted, as video author Wildilocks explains. Ms. Wildilocks is a professional hairstylist, and the style she creates is not for the faint of heart, and could not be done by onesself.

Photo: the completed hairstyle

Nevertheless, for those of us sans friends or family who can style our hair, there are still techniques that we can learn.

Worth watching!

Part 1
In which we learn how to part the hair, start the several ponytails that form the bases of the hairstyle, and start creating rolls and puffs.


Part 2
In which we focus first on the top rolls and puffs, and then on the back hair, teasing the ponytail there to create puffs.


Part 3
In which we create a roll on the side.


Part 4
The completed hairstyle. Lots of puffs, rolls and sculpting, especially on the back and sides.