Sunday, February 26, 2012

1790s Goldwork-Embroidered Petticoat: Progress and Candy Colors

Working with the afternoon sun behind me...before the
embroidery frame eureka moment.
Hack, bellow, cough, cough, couuuuggghhh, stoop down the hall to find another set of tissues, breathe hard and shallowly, feel elephant walking on the chest. Stop in the middle of the hall to rest. Ardently desire to sit down, no, to lay down, and remain prone all day. Call forth reserves from heaven knows where to attend to the boys and to do what must be done. Food unwanted, sleep fitful, memory hazy and task followthrough iffy...oh, I only filled the steamer halfway? Huh, I was sure it was full. Thank heaven for a loving husband and mother and kind family.

That's been life with viral pneumonia these last days, but now I am on the mend. So, such a pleasure it was, this afternoon, to sit and work embroidery once again. Curte was a sweetie and let me sleep today, taking the boys after church to his parents for the afternoon. They were treated with my pasta Bolognese upon their return as deep thanks.

At this point the goldwork swags across the bottom of the petticoat are halfway complete, and the design for the chenille and flat silk embroidery that will interweave with the gold is underway.

Then too, in a fit of make-do creativity, I invented an embroidery frame that allows me to work easily with both hands on each side of the work, so very helpful when couching purl and simply essential when laying silk ovale -- a filament silk thread with low twist that when satin-stitched, creates the incredible glow and glorious rich color of many an eighteenth century embroidered piece.


Progress Report

Ta-da! Here is what we have so far...okay, actually I've done an additional motif since.


This covers have of the front of the petticoat. It was common during the era to decorate just those areas which were to be seen. Gold and silk were expensive, for one thing: such a petticoat, executed in the types of gold then available (meltable for cash!) was a garment for the haut ton. Second, goldwork is in relief, and the tiny metal threads are easily disturbed and stretched or pulled: even couched well, tiny sharp ends of metal can catch at fabric and be pulled. Why subject precious embroidery to such treatment in the sides and back where it isn't even seen under the gown atop? Even so, I think I have some 55 inches to cover in total, so I am but 20-odd inches along.

The Next Step: Silk and Chenille Embroidered Swags to Interveave with the Gold

Yes, yes, some months ago I claimed that the next part of the embroidery process would wait for another year, buuuuut, this project is such fun that other plans -- excepting that spencer! -- puh, I blow them away until this treat is done. After all, I embroidered for years before ever realizing costuming existed. Working it is like a fun afternoon with an old friend.

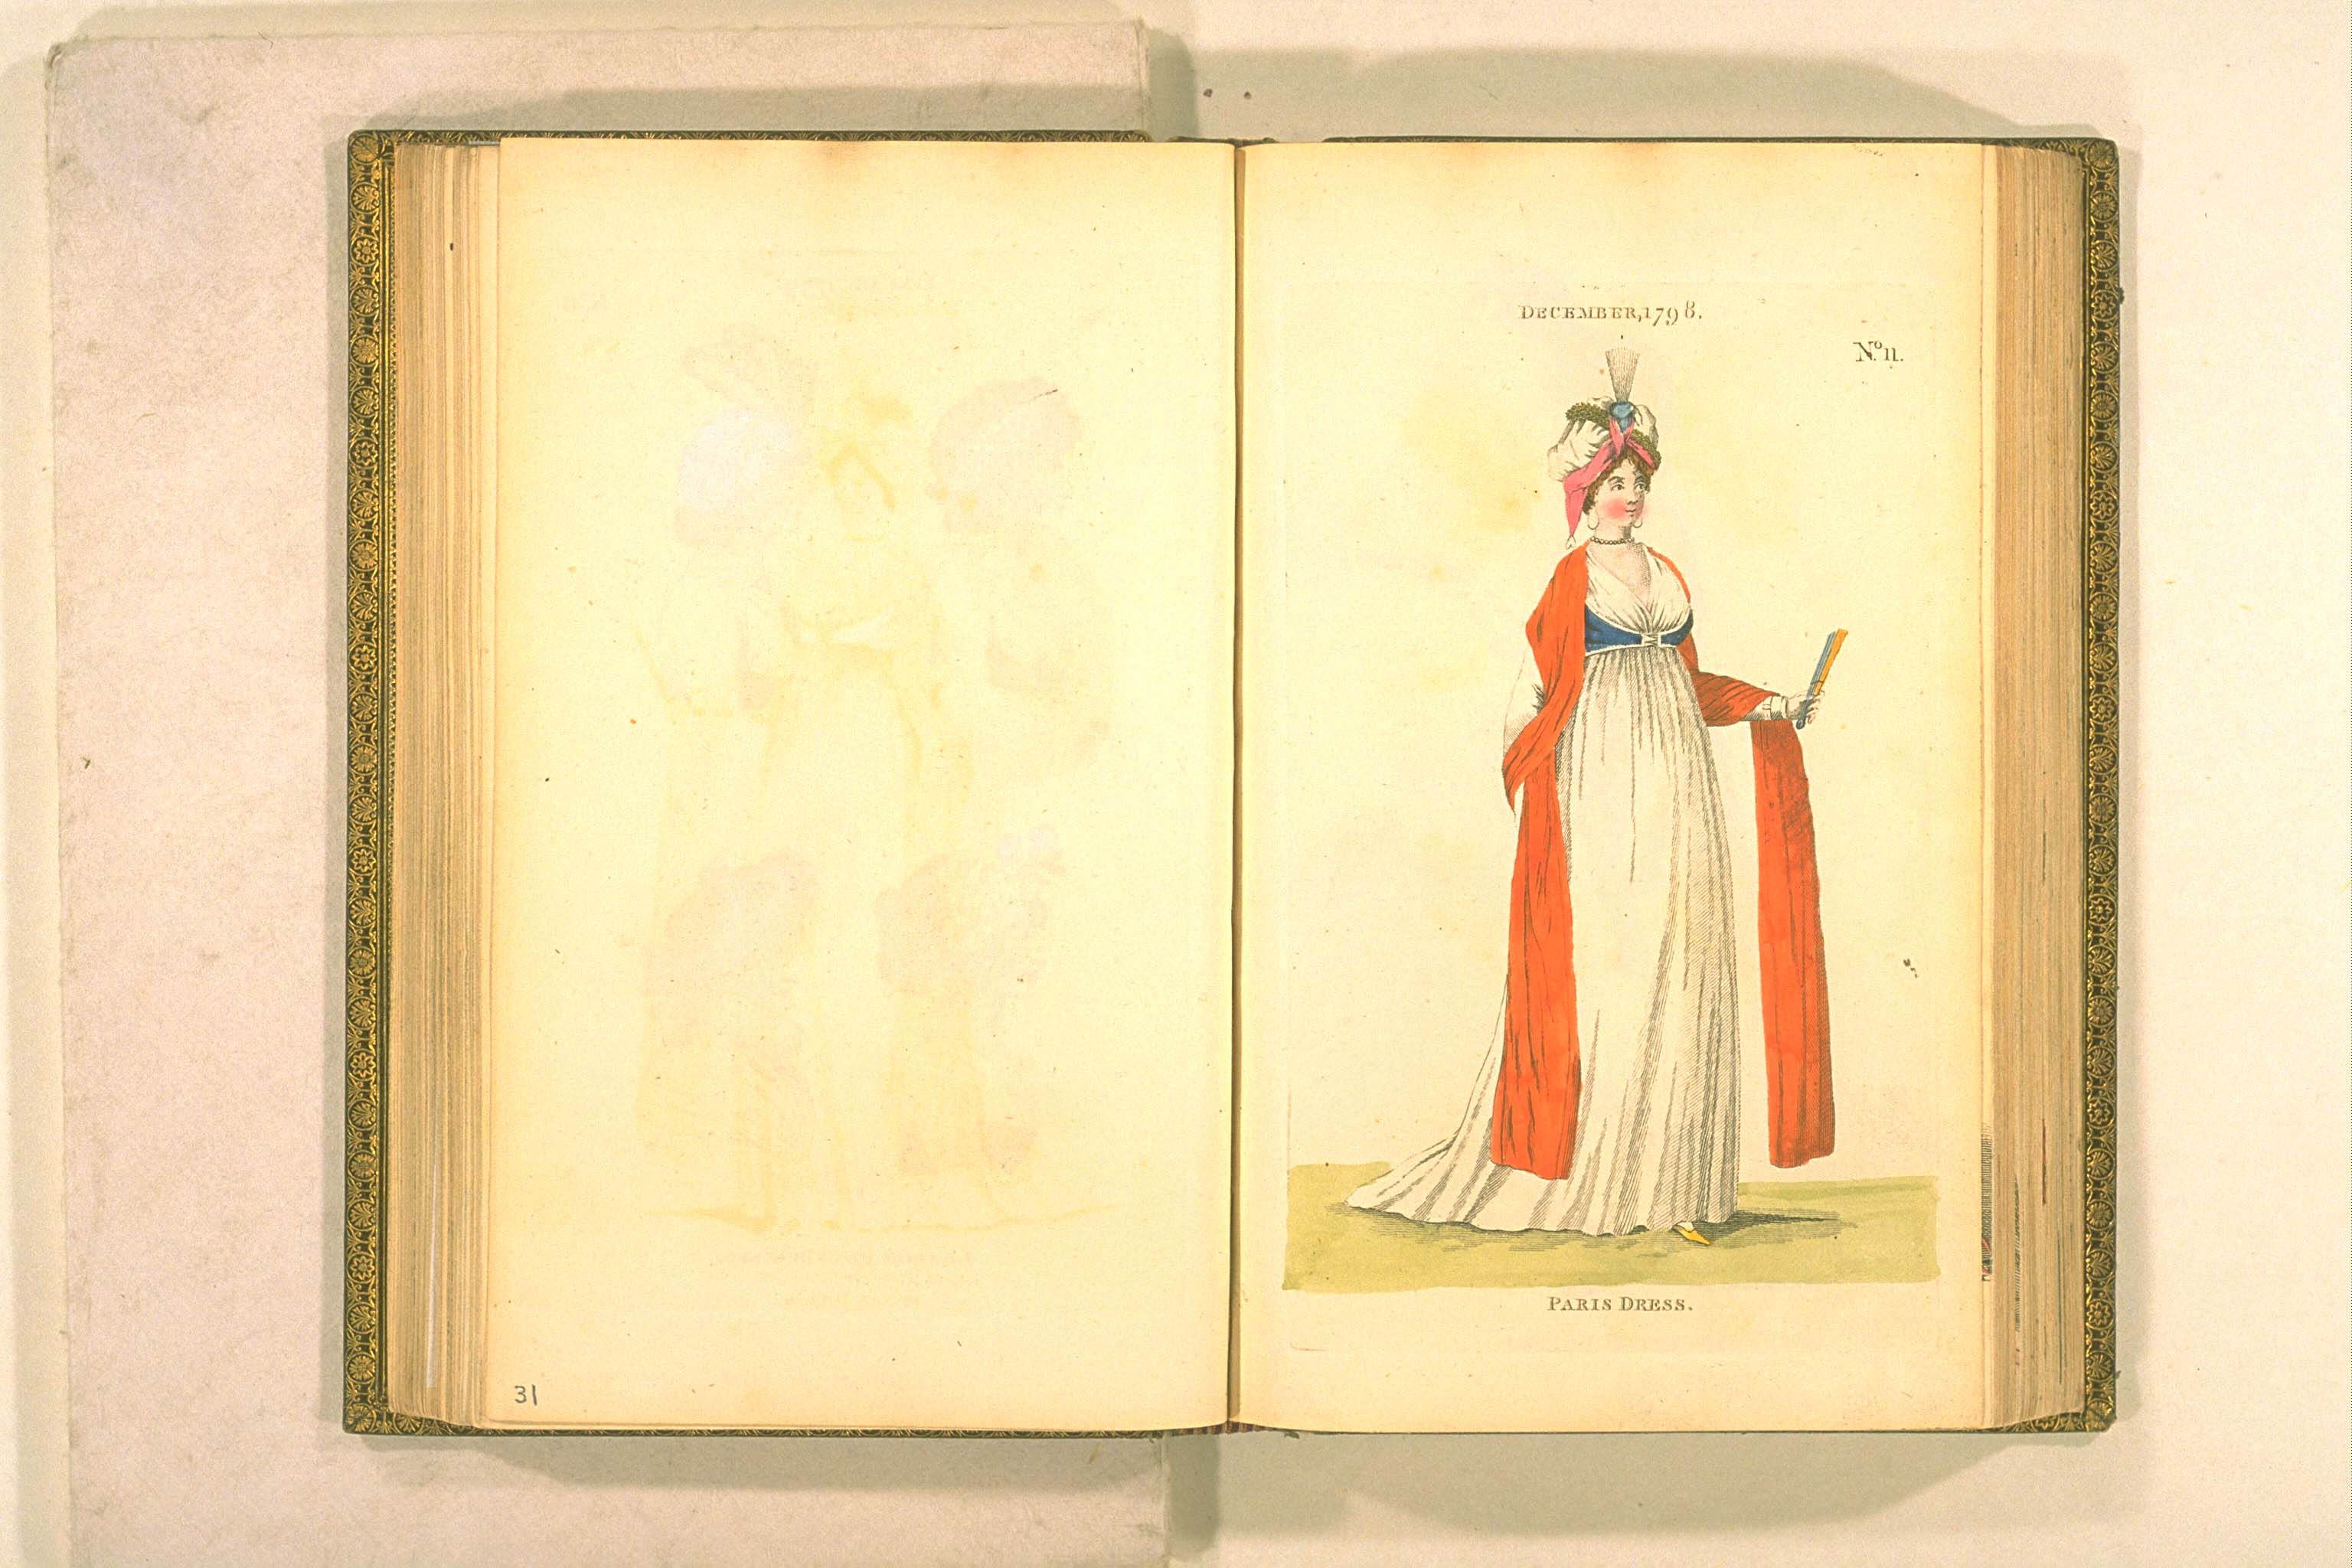
So what's the design? Augh, I mustn't tell you yet; it's a surprise. Okay, so actually only the concept is clear: an interweaving of small floral swags into the goldwork swags. The central plan is a take-off from the man's waistcoat pocket that produced the goldwork swags, but filled out with ideas from drawn patterns kept at the Victoria and Albert for petticoats. The tone, the feeling? The lightness, airiness, spareness of the Neoclassical 1780s, which held into early 1790s, according to Eighteenth Century Embroidery Techniques, a few extant examples, and fashion plates.

Floral swags were popular in chenille and silk embroidery throughout much of the 18th century. Here's a sleeve from a mantua, 1775-85, from the Victoria and Albert.

Mantua sleeve 1775-85, Victoria and Albert

Luscious, rich, 3-D!

Here's a man's suit pocket, chenille mixed with goldwork, 1760-1769. A little heavier in style, but the best I can find for the hour available to spend on this particular post. My old computer died, taking with it a few months of collected images and research that I'd not had time to back to the cloud server. What a horror!


Man's suit pocket, Victoria and Albert
 Finally, a duck of a muff, 1785-1810, from Colonial Willilamsburg, in chenille, spangles, bullion (purl) and paint, on gauze. Here are sprigs swagged into a repeating pattern.

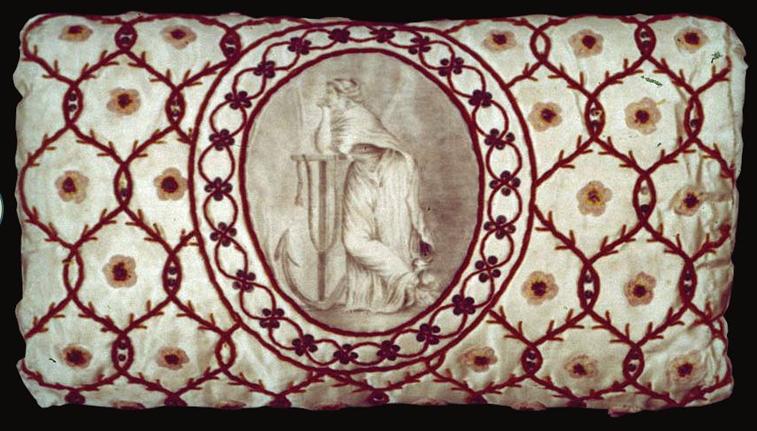
Muff, 1785-1810, Colonial Williamsburg, 1958-25. Historic
Threads exhibition

Tempting Candy Colors

Probably because it's Lent and sweets are off limits, some colors just make me dream of food, especially petits fours and Easter cookies. Feast your eyes on these and see if they make you hungry. Yes?


You are looking at Au Ver a Soie silk ovale from Hedgehog Handworks, on the left, and silk chenille thread (fine), from Hand-Dyed Fibers.


You can get an idea of how low twist, how glossy that filament silk is. It will form minute satin stitched blossoms. The chenille, which will be couched down, is very thin, the color rich, light-catching, and just bewitching. I want to pet it.

So there we are. Wait, you say, if you're not fatigued already, where's this fancy new embroidery frame?


That, my friends, is for next post. Sleep calls.

Wednesday, February 01, 2012

1790s Goldwork-Embroidered Petticoat: Progress Report


Slow but sure progress has been made on the goldwork-embroidered petticoat. A quick look.

I've added two more complete swags in check purl, flat spangles for the bows, and cupped spangles with a tiny transparent gold-colored glass seed bead nested into each one. Beads were used, if not copiously, at this period, for a little extra color. In the original there is a cupped spangle with a tiny piece of purl nested into it: I went for the gold beads instead for a change.

You will see I've made progress in learning to backstitch down spangles on the bows. The leftmost bow at the top of the first swag was improperly done, while the second and third were done as they should be. A properly backstitched spangle shows the thread on both sides of the spangle, so it's held down on two sides. That means the spangle is flat...it doesn't flutter like the spangles on the leftmost bow do. Less shine, but sturdier. It was popular to either add a length of purl to the backstitch to hide these threads or to couch passing thread down atop the threads, but many pieces do not show this extra step, and I have opted here for the simpler effect.


Today I leave you with something silly. Christopher and I folded laundry Monday morning. After folding some pants and napkins on his own, the boy hit on a new way to get the laundry out of the basket.


Whoops-on-purpose!

Saturday, January 28, 2012

An Unseasonable Moment: Disturbing or Welcome?

Our snowdrops

Blooming on the eastward-facing front of our house. Blooming now, when they should wait a few more weeks. No snow this year, either, other than a sugar dusting a few weeks ago, and flurries in December.

What is your weather report?

Wednesday, January 25, 2012

1790s Convertible Spencer: More Research on How "Bodies" Were Worn

London and Paris Fashions, May 1799
The sleeveless sort of spencer thingie was known, as mentioned in previous posts, by such names as the "body" and the "corset", and "sleeveless spencer". I start to see it popping up in 1796 and by the end of the decade it's pretty common in fashion plates.


In looking for documentation to go along with the sample Metropolitan spencer, I'd been all over Gallery of Fashion, hoping to find information on what sorts of garments were worn beneath, in words, not just plates. I wanted to make sure that my wearing this sort of thing over a dress was done.


It was discouraging to find that Gallery of Fashion, in 1796 anyhow, the date of my inspiration example, called for these items to be worn with petticoats and "sleeves". So it is for my inspiration garment, anyhow, and for other examples I reviewed.

Was this saying that the sleeves were actually attached to the body, and worn with a petticoat? Usually Gallery of Fashion tells us when a plate depicts a round gown (bodice+skirt together) or a robe+petticoat. Yet was this a new combination of clever little pieces? Or just imprecise wording naming the piece parts of the ensemble without attempting to tell what was attached to what. I do not know.

However, another subscription magazine, The Fashions of London and Paris, of which the Japanese Bunka Gakuen library has a copy, comes to our aid. It tends to tell us when items are dresses and when something else...expect in the cases of Parisian fashion, when often they give plates sans text. Ah well, something is better than nothing.

In May of 1799, in a page describing the latest in Paris headdresses (see illustration above), here is as much of the original description as applies:

Paris dresses.
Fig. 1. [not included here, since it only describes the headdress]
Fig. 2. Velvet toque, (cap) trimmed with lace, worked in gold. -- This is an imitation of the costume of a Venetian actress. Among the elegantes who brought it out, it is always worn with the Swiss, or half corset, of which the most common are white satin, trimmed with deep red velvet.
Fig. 3. [not included here, since it only describes the headdress]
Fig. 4. [not included here, since it only describes the headdress]
...
General Observations Relative to the Paris Dresses...White is the prevailing color,  the finest Indian muslins plain embroidered obtain the preference with those rich females denominated elegantes over all other manufactures.

The Espindor, which ladies of the above-mentioned class have lately shewn such partiality for, is a kind of spencer; of a deep color, not turned back, and with short sleeves; it is crossed in before, and edged with narrow slips of lace in gold and silver".


Note figures 3 and 4 are wearing little overgarments as well. From this image and description we learn that there were a variety of little garments (no surprise) and that they could have fanciful names (again no surprise). There is no image of the Espindor, but, remember the German crossed front, short-sleeved, pink spencer? Mmmm?


Plate 10.
Luxus und
der Moden.
April 1796.

Below, for August 1799, the description of figure 2, "...jacket and train of white muslin". Under General Observations, "The Jacket described in no. 2, is generally worn..."  No mention of anything under the jacket. I think this one is like the 18th century jacket, worn with a petticoat. I have never been certain what distinguishes a jacket from a spencer in contemporary texts. Danske dragter: moden 1790-1840 by E. Anderson, says that a feature of the spencer was that it was cut straight off at the waist, rather than allowed to have tails like the 18th century jacket. (p. 230.) Merriam-Webster defines the spencer as a "short, waist-length jacket".  However, many museums, the Metropolitan Museum of Art included, include tailed specimens under the name "spencer". I wonder if jackets were worn, as they had been in the 18th century, with nothing under them (unless as riding dress), while spencers usually had dresses under them? If anyone is sure, please let me know.

London and Paris Fashions, August 1799.

In December 1799 after describing quite a number of dresses and their accessories in full, they write under General Observations:


Silk pelices are more prevalent than ever. Habits are much worn in the morning. Black velvet spencers or corsets; plain black velvet cloaks, and black velvet handkerchiefs, are general favorites...

Then, in the January number, they illustrate a Paris fashion (dated December 1799 because it could take a bit for the fashions to cross the channel), and they write:

Paris Figure (from the Costume Parisien)
Pointed turban, ornamented with an aigrette, or plume, and a myrtle garland. Spencer without sleeves, of purple satin or velvet, trimmed round with silver, and clasped in front. Scarlet shawl. Silver necklace and earrings.
London and Paris Fashions, December 1799
(but appearing in the January1800 number)
Image Bunka Gakuen Library.

So here we have a variety of interesting evidence, including the sleeveless spencer, so named, over a dress, described in print...we don't know if this is a full dress ensemble although given the fan, and the style of headdress, it's at least afternoon dress.


This small set of examples is a start and probably enough for me, who am not attempting to build a persona per se, but a costume.

Tuesday, January 24, 2012

1790s Convertible Spencer: The Actual Project Begins

The shape.
Last fall I decided I needed a new spencer. Do you recall this series of posts? At the end, with your help, I decided on a simple "body" spencer, to which sleeves and different collars might be added or removed at will.

The Look

To the right you see the back of the design, from February 1796, Gallery of Fashion. The original description:

Afternoon dress
...Muslin petticoat, trimmed at the bottom with blue satin in vandyke scallops; short full sleeves of muslin, trimmed with blonde. Body of blue satin, trimmed round the neck with a double plaiting of blonde, and on the back with a chain; epaulettes of the same, looped with a spring chain and tassels of gold.

I will pleat net lace on to the body in lieu of a collar, and make the removeable epauletes to hold up the dress sleeves. However, I will also add a peplum.

I will wear this body in July, to this year's Jane Austen Festival at Locust Grove, as an afternoon ensemble. Hence no sleeves. It can be so hot there at that season! It will go over my existing wrapfront dress. I'd had difficulties with putting something round over something vee-necked, but think it now not an issue, as the spencer is low-necked and I can play with the dress closure.

The Extant Evidence: Inspiration Spencer from the Met

1970.281.1
Recall this funny little garment, an apparent loving hands at home renovation of an earlier umlined garment, now at the Met? She's my inspiration garment, sans collar.

Creating the Cutting Diagram

I had already long figured out many of the details of little Met spencer's basic construction, but had not drawn myself a general diagram.

This morning I had two sunny hours, a doctor's appointment over, the boys at school, and after weeks of sickness and duties of all kinds, thought to play a little, and now was the perfect moment to make that diagram. Here they are.

Here is everything but the peplum.


I am not terribly good with a pencil, but perhaps you see how it is going. I used the original garment photos, looking at both the exterior and what I could make out of the interior to come up with the shapes. They are very simple indeed, except for that peplum.

The peplum caused some muddling around, looking in Costume Close Up for earlier jackets and how they patterned peplums, and a look through all the spencers in the Met's online collection. I came up with two scenarios for how the peplum might be constructed, and decided on the second, simpler version, based on the closest examination of that original that I could manage. My peplum is in two pieces, with points front and back, and in back, a small pleat at the side back seam to give it some puff.


The next step? To drape it in Swedish tracing paper, right over my actual dress so that I get the fitting right. Don't hold your breath: I may not get to that for a bit.

The scene of the planning. It was a pleasure.


Today I leave you with yesterday's news: the boys and I had an alphabet treasure hunt on a walk up the street. Every time we spotted something or some concept that agreed with the letter we were on, either boy or I photographed it. Here we are on "L": they are standing at the edge of a "lake" and floating a leaf boat in it. Two "L"s in one!


Very best to you all!

Friday, January 20, 2012

If I Were To Make This Titanic Tea Dress, Here's How I'd Do It

If I were to make a Titanic tea dress, this might be it. This is a House of Drécoll dress, circa 1912, from The Metropolitan Museum of Art (accession no. 1998.253.3). Here is the high-waisted Empire look so very popular at this date, but rife with lots of other historic references.
Here are the references I see:
  • 1770s: the open robe, polonaised, and the tucks in the front of the petticoat. The full sleeve ruffles. the box-pleated ruching.
  • 1790s: the trained open robe, pulled back to the sides. The fluffy wrapfront dress underneath the robe. So is the wide lace trim edging the robe. The sash effect.
  • Late 1860s: the sash tied in a low bow at the back with the robe boufed up inside the bow. In 1868, for example, the Harper's Bazar Baschlik Mantilla wrap ties up the skirt in back in a very similar way. See Cornell's HEARTH site, Sept 5, 1868.

What historic references or ideas do you see?

Wouldn't it be a treat to wear?

How I Would Construct This Dress

Like many ornate Edwardian gowns of this date, the dress construction is layered and rather devilish. On this dress, it's not that the basic pieces are that oddly shaped, it's that there is just so much to think through and so much to sew and connect.


-----A Short Interjection To Rant-----

This era mastered draping and fit, but at the cost of flexibility. Here is a dress with clear references to earlier eras, but as with most backwards-looking designs, only superficial ones. Its construction is clearly of its time. Looking at it, I can nod in pleasure with the ingenious way it's made, but another part of me sighs that so much of the work is plain unncessary and that if the wearer were to grow or shrink, if something needed remodeling, or if the wearer loved part of the dress but hated the rest, she was pretty much stuck with the designer's entire ensemble or an expensive and potentially unsuccessful redo.


Step back a century or more and the landscape is very different. Not only do the customers rule (for the most part) on design, but the actual garments are cut and closed with methods that allow for changes in weight and even wearer, while the essential fit remains good, and the garments are made to layer and often can function as separates to be mixed and matched in fashionably appropriate ways.

Mmmppphhh.


-----End Rant-----


Here is how I might construct the dress. I am not saying that this is how the designer did it, but it's how I would use typical Edwardian shapes and methods to do it.

Let's start from the inside out. Refer to additional pictures at the bottom of the post for visual information.

A bodice ("waist") lining;
The Dressmaker, p. 90
This dress may look unfitted, but given how smoothly the lace wrap-front portion of the bodice lies, the layers you see likely are mounted onto a tightly fitted lining. That lining helps to ensure that the dress retains the draping wanted, and doesn't just hang heavily from the shoulders, even with an interior belt to help hold the ensemble up.
  • Using one of the resource books from the last post, especially Butterick's The Dressmaker (Chapter XVI, Lined Waists), I'd find a fitted front-closing low bodice lining pattern and draft and cut a toile from strong cotton. Given that I do not have a corset for this period, and not everyone wore them at this date anyhow, I'd tack multiple bones to it at front, sides, and back to create the shape. Then I'd adjust the seams and once it fit tightly, I'd stitch in the bones for real and attach hooks and eyes to the front center. If I had a proper corset, I might forgo all but a back bone or two, and depend on the interior belt (see below)to create the shape.
  • Next I'd create an interior petersham belt, 2.5" wide preferably, to which both bodice and skirts are stitched to. I'd close it at front side with large, heavy hooks and eyes. The belt was a super common construction aid. It helped high-waisted skirts have no visible waistband, allowed connection of bodice and skirt to a firm foundation, especially helpful with soft, tearable fabrics like net or heavy passementerie and beading. Follow the directions in the Butterick The Dressmaker book (see last post), and if it's unclear, you can refer to analagous directions in the other manuals. Make sure to set the belt above the natural waistline, perhaps two inches. It's really hard to find modern petersham in this width. You can butt narrower widths together and whip stitch them to approximate the width needed.
  • I'd stitch the tight lining to the belt.
An example of an interior belt on a dress in my collection.

  • I'd find a wrap-front kimono bodice pattern from the same list of books for the lace portion of the bodice. The kimono design was hotter than Louisville in July and featured no shoulder seam, and sleeves in one with the bodice. The lace portion of the bodice does not need sleeves, so those do not need to be included from the pattern.
  • To get the gentle wrapping motion of the lace on the front of the bodice, I'd toile it in lightweight, drapey cotton, then cut the lace for real. Make sure the waist short, for this dress is high-waisted. Give the back a gentle neckline point, pretty deep, to match the original.
  • Once the toile fit, I'd cut the real lace, preferably a net with a loose needlelace pattern on it, seam it with very narrow French seams, hem the armscyes, and gently mount it to the underbodice and to the belt. Closure? Multiple hooks and eyes at both sides, eyes attached to the lining. The Butterick book The Dressmaker details how to drape a bodice atop a fitted lining. This layer is tacked to the belt, too.
  • Then I would use the same kimono bodice pattern and toile the open robe bodice, this time in a crisp or starched cotton imitating the crisp silk taffeta. The sleeves are included this time. You will notice that when the sleeves are cut, the stripe will automatically run horizontally when worn! Make sure to allow for the deep cuff on the sleeve.
  • The front of the open robe has a dart, perhaps a two-ended dart, to the right and under the bust. This helps to pull the robe back in a curve from the bust. Make sure the back neckline curve is very deep to match the original, and that it has a few scant gathers.
  • Then I'd cut the silk, seam it with French seams or open seams finished with binding.
  • Cut the blue ribbon trim, mount to the underbodice up just near the bust, as in the original.
  • Mount the robe bodice to the underbodice, and right over those ribbons.
Section of The Dressmaker about draping the
outside bodice fabric to the lining. p. 93

  • Attach robe bodice to the belt, too. Again, refer to those manuals. They illustrate this, as do some originals. Sometimes the tacking is plain messy and can even be seen on the exterior of the dress! It was covered with a sash, hence the slapdash work.
  • Cut and tack the sleeve flounces. I'd want to toile the shapes.
  • Then I'd pattern the underskirt in interfacing. It's hard to tell on the original, but this looks like a one-piece skirt, so called. There are plenty of patterns for them in the books I have referenced in the previous post. If I could get net with an integral loose pattern, that would be great, as the pattern at the bottom was not only almost standard on nice dresses at this time, but is a reference to the 18th century habit of embroidering petticoat hems with deep bands of embroidery. Otherwise, plain Jane. Sigh.
  • I'd add the tucks.
  • Next, the skirt would be cut and sewn with narrow French seams, and tacked to the interior belt. Handy thing, that interior belt.
  • Now for the open robe skirt. This I would drape right on the dressform, from a single piece of fabric, gathering some at the sides and heavily in the back. I'd hem it and, yes, tack it to the belt!
  • Next, cut, scantly gather, and tack the lace flounce to the edges of the open robe.
  • Make box pleat trim and tack onto the open robe.
  • Now it's time to connect the underskirt to the robe. I'd use doubled thread and connect the two layers with long tacks that leave an inch or so loose inside, so that the robe can move. I'd tie the ribbon bow at this point to, and tack where necessary. This is a matter of playing. The complex Edwardian garments I own use a lot of these sorts of connections to preserve draping just so, even when the wearer was in motion. These are works of sculpture as much as they are dresses and even their overall movement is controlled.
  • Next, the sash. A single layer of the silk, pinked with a tiny pinker, and backed with cotton to help it cling to the silk. Hooks and eyes to attach it at the front.
  • Next, fun with high-quality vintage paper and silk flowers. The posy can be tacked to the front of the belt.

Whoo. That was a process, wasn't it?


What do you think? Is this something that you'd try?

Wednesday, January 11, 2012

Titanic Fever: 1912 Garment Construction Resources

From my collection: a damaged teens-era
lingerie dress with bretelles and interior
belt.
If you've been living under a rock, you may not be aware that a goodly proportion of the costuming world is bewitched, befevered and bebothered about the upcoming 100th anniversary of the sinking of the Titanic. There are so many circa 1912 ball, tea, and travel ensembles underway that I am sure the fabric stores have noticed an uptick in sales of chiffon, satin, handkerchief linen and seed beads.

I have not caught the disease and do not plan to; time's too precious this year. However, having spent a number of years in the Edwardian costume era, I've accumulated some construction resources that ought to help you when you start your designing and draping.

First, an extant garment, analyzed. I have an early teens era lingerie dress, in terrible condition, that I analyzed some years ago, specifically for the interior waist belt or waist band that is the linchpin of its construction, as are so many garments from this era. My post, Edwardian "Lingerie" Dress Diary, Part 6, contains an analysis, full of photos. It even shows how the bodice draping was attached to that waist belt!

Cutting Guides

Thornton's International System of Ladies' Garment Cutting. 1912. Here you go! A go-to place for the pattern basics for 1912. Excellent for suits. I've drafted from here and the drafts work fine. Thank you, Costumer's Manifesto, for making this treasure available.

The American garment cutter for women's garments. Gustav Engelmann. 1913. Pattern basics for 1913, but with some nice extras in the way of kimono cuts. From archive.org.

The elements of dress pattern-making: Magyar dress-cutting for technical classes, home workers & professionals. Reeve, Amy J. 1912.  A rather different way to approach cutting. From Cornell's HEARTH site.

The Ladies Tailor, Vol. XXVII. No. 3. March 1911, London . Titanic-era suits! From the Costumer's Manifesto.

Sashes, from the American System of Dressmaking, 1912
Dressmaking Manuals

This was the heyday of Home Economics, and there was a massive proliferation of dressmaking manuals, especially for schools. Some of them are very well written and include the minutest of details on draping and seams and dealing with the all-important waist belt. You will notice that school manuals did not keep up with high fashion; it would not make sense. Therefore, the dates of some of those I include are later than the Titanic, but their advice will still be useful.

The American System of Dressmaking. Merwin, Pearl. 1912. If you read nothing else, read some of these 1000+ pages. This correspondence course includes draped bodices over fitted linings, kimono sleeve cuts, sashes, many of the details that you need. Lots of photographs and illustrations. The course was published in multiple editions, and some content dates to 1906 or so, but there is much that applies to 1912. From Archive.org.

Dressmaking in the school. Cooke, J. C., Kidd, H. M. 1913. Great for details on fitting and on applying trims.

What a newspaper can show you. Evening Standard, Ogden, Utah, 04/20/1912
The dressmaker: a complete book on all matters connected with sewing and dressmaking from the simplest stitches to the cutting, making altering, mending and caring for the clothes. Butterick. 1916. The classic kept being updated, year after year. There are still some early Edwardian images left in this 1916 edition, but it includes information on belting and hanging skirts, including circular skirts, that apply to the teens era.

Newspapers

The Sun. April 14, 1912. If you read
the article very carefully, there is construction
information included.
News reporting during the late Edwardian and teens era frequently included heavily illustrated, photo-rich "women's pages" with lengthy articles on fashions, millinery, hair dressing, ettiquette, and sometimes even tutorials. Chronicling America, from the Library of Congress, is STUFFED with such articles. I can't stress enough just how good a resource this is. You'd be nuts to miss it.

Take for example the article from the New York Sun, April 14, 1912, titled "Tucked Up Drapery Marks New Gowns". If you read it carefully, look at extant garments for comparison, and then use the pattern drafts for the basic dress or waist and skirt underneath the drapery, you can work out the fabrics, cuts, and additional drapings and trims on top.

Use the keywords "fashion", "drapery", or other specific words to find appropriate articles.

Other

Dressmaker's Dictionary. Curtis, Homer S. 1916. Fabric names, explained :} From Archive.org.

Edwardian-era content on my blog. Hairstyle information and more, almost always including the research sources I included.

I wish you all the luck in the world!

The Epiphany Pageant

In the Episcopalian world, the Christmas season lasts 12 days and ends with Epiphany, also called Twelfth Night, which celebrates the visit of the Magi to baby Jesus. Each year our church holds a pageant, in which the story is played out by the children. This year the boys took part for the first time. They took their roles as an angel and a shepherd very seriously, so much so that any smiles at all were only in evidence when they processed up the aisle to the "shed" of made of wood and magnolia branches, a moment when cameras are not appropriate, or this fond parent would have taken some!

A note on their costumes, constructed from stash materials. I used the age-old "pattern" for a T-garment for both the angel robe and the shepherd's robe. All that meant was folding the fabric longways, laying the boy down on it with his arms held out, and measuring for his height and arm length. Then I folded twice the needed length in half crossways so I had four layers, cut a hole for the head, and in Christopher's case, cut open the front. I used selvages where possible and hemmed the rest. I made 6-inch hems so that the boys can wear their robes for a few more years. Some belts, two ties to close Christopher's robe and a headdress for him and we were done...Noah's wings and halo were courtesy the church.

Noah tests his halo.

All shepherds, and one little angel who wants to be
next to his brother, line up for the
festivities.

Wednesday, December 28, 2011

Christmas Day Moment


After the Christmas Eve Service, after settling down for the night, after Christmas morning's excitement at the foot of the tree, a little peace while cousin Tommy, Christopher, and Noah consider their new books and toys, and parents and grandmother take it easy for a moment. Before brunch, naps or no naps, Christmas dinner, and family visiting... 

Wednesday, December 21, 2011

1790s Goldwork-Embroidered Petticoat, Back at It To Ease Stress

For those of you for whom messing with teeniney, wee bits of beadlike wiggly wire, minute spangles, and small motifs stresses you out, read no further, for your blood pressure may rise.

For those who find doing very precise, small-scale work actually relaxing, you may find the below a bit fun.

Do you remember the goldwork-embroidered petticoat I made last summer? The one with little sprigs all over it in a variety of motifs? Here it is as worn in August.


As a first effort, it is nice, but...it needs more work, for a couple of reasons.

First, a look at it laying flat in decent but night bright light reveals a lack of brilliance. The work is executed only in spangles and purl. Spangles are flat sequins; purl is tightly wrapped gilt (or 2% gold, for those with more cash) wire, formed into long hollow tubes.

Now, some fashion plates and originals, for example the pretty French 1790s muslin in the Napoleon and the Empire of Fashion exhibit (which spaces its motifs on the upper part of the dress), or the dress from the Met, below, do widely space their motifs. That was the effect I was going for initially. However, because the motifs are composed more of faceted purl than of spangles, the shine factor isn't as high as I'd like it to be.


Metropolitan Museum of Art, accession number

1995.5.5.

Second, I am not happy with the motifs that outline leaf shapes, but leave the interiors blank. I've looked at a lot of extants since designing the petticoat, and so far as I can tell, only very tiny sprigs are made with their leaves barely outlined. In spriggy designs, purl leaves of any size are usually filled in with the purl running obliquely. Here's my silly drawing:
If you have a copy of 18th Century Embroidery Techniques, and look at the goldwork section, you will get a better drawing:}

Third, the bottom of the petticoat lacks a transition between the spriggy motifs and the fringe. Sure, some dresses were just sprigged, but I like the versions with a wide repeating band of embroidery about the bottom, especially when the motif is composed of swagged floral motifs. By 1800, swags weren't as hot as they'd been earlier, but they were still about, and I like swags, and don't get to have swaggy fun very much, so I want swags here. Want to see 1790 swagged petticoat emvroidery designs? Check Gallery of Fashion (enter the periodical name into the search box). Also search for "embroidery designs" on the Victoria and Albert museum site. There aren't overmany actual embroidered petticoats extant, at least that I can find.

Fourth, Christmastime, and the state of having young children, is stressy, so that some some sort of quiet release, some quiet place to retreat to that has nothing to do with Christmas Preparations or Productivity, becomes a Restorer of Balance. Some activity in which the brain can focus on something pretty, and for which the creation process is somewhat repetitive but does command the conscious mind almost 100%. Something that can be taken up and put down in a moment. Embroidery is perfect for that, and sparkly embroidery in the depths of short days is perfect.

Enter a rework.

After all, I've put too much work into this petticoat to chalk the effort up as Learning Example #1 and move on. With each motif consuming upwards of 20 minutes, you do the math in terms of hours, and I am betting you would rework the piece if it were in your hands, too.

So, What Changes to the Petticoat Lie Ahead?

Fill in the leaves, of course. That means snipping off some of the old motifs and redoing them. Second, add a band of embroidery to the bottom.

You can see the tentative first results of both below.

Here is a shot of the position on the petticoat that I am working on: the center bottom. I have set the embroidery hoop over a sprig in the bottommost row of the sprigs, and under that I have started a swag that will be some 5 inches high. There is actually a decent amount of room between the sprig motif row and the fringe. That's what will be filled in.

The design is a row of swags made of a rope of tiny leaf sprigs all done in purl, and tied at the top with bows in spangles. At the middle of each swag, a second spangle-and-purl bow with tassel tails dangles. Underneath, a second set of swags, this time in silk chenille and silk embroidery thread.


The design is a take off of a pattern in a pocket of a man's waistcoat, found in 18th Century Embroidery Techniques in the goldwork section, and is roughly the same dimensions, perhaps a little larger. I'd show you the original design but since Gawthorpe Hall hasn't posted an image of it, and the only images I have are in a copyrighted book, sorry, guys.


You are looking at a motif in the bottommost row of the sprigs, and the first bow in a series of swags.

Now for the detail shot.  Mmmm. Needs work. Let's examine what is going on.


What's the deal with the sprig motif riding so close on top of the bow? A bit of explanation. I did that work before deciding to add the swag motifs, so yes, off it will come, to be repositioned higher. Thankfully, the silk-cotton voile weave is widely spaced enough to allow redos without leaving holes, and all of the sprigs were freehand-embroidered...there is no drawn pattern on the fabric.


What about how rough the floral sprig leaf looks when executed in purl?
  • First, I haven't laid the purl obliquely enough. Have to redo it.
  • Second, close up, purl often looks rather imperfect, as if it just won't sit where you put it. In fact, it is hard to manage purl. First, you have to cut each piece before you lay it, so close measurement is important and tough to achieve. Second, no, it won't lay down easily: it is wire, and likes to bing-bong around, and only couching stitches hold it in place. All but the best of the best trained professionals had those issues, and so purl easily looks wonky and heavy up close. Don't believe me? Have a look at All That Glisters Goldwork, in Stitch with the Embroiders Guild. Look at the purl laid on top of the spangles on this German 18th Century professional example. See how it wanders a little? Okay then. Makes me feel better. Plus, practice will help.

What about the band of swags at the base of the skirt? What's the design, and what's going on with the elements?
  • The design must be drawn because the design success depends on consistency in the pattern repeats.  Here you see the bow tying up two swags.
  • The bow:
    • The spangles are backstitched in place, and overlap heavily. However, guess what. I backstitched them backwards. Each thread should lay of the part of the spangle that is not covered by the spangle before. That helps the spangles lay flat and in place. Oops. I had no directions on how to do it, other than that I knew such lines of spangles were backstitched. Another lesson learned. The only pity is that riding free as they do now, the spangles reflect a lot of light. Pooh.
    • The spangle at the center of the bow is overlaid by a piece of purl. 
    • The original laid a line of purl atop the spangles, but I found that this addition diminished the brilliance of the spangles so much that I left that element out of the design. Spangles were often left plain.
  • To the left of the bow, the beginning of a purl-and-sequin leaf swag: the central stem and each set of leaves are of purl only, each piece of purl strung and attached like a bead, and then couched down. Each leaf set is divided by a cupped spangle filled with a tiny piece of purl. 
  • To the right of the bow, you can see the penciled design.


Since goldwork was usually accompanied by silk embroidery, another phase of this project may be to add some small floral motifs in yellow and cream among the swags, again per the original. The original had more naturalistic color, but some designs were very restrained in color use by this date, and did not aim at naturalism. I won't touch that for at least a year. Meantime, I can still wear the petticoat!

So that is what I am doing this season, and into January. It should be a pleasant process and even is now, right in the learning phase.

This Evening, I Leave You With...

A cozy wintertime scene. The boys playing with their Legos under the gardener's bench in the family room. Little ones like corners and hidey-holes. Do you remember?

Sunday, December 04, 2011

Making the Wrapfront Dress Do Double and Triple Duty

Given how little time and funds I have to sew, I am learning to make what I have stretch in a lot of ways...a method popular "back then". Not to mention with my modern wardrobe.

First, we know that the wrap-front dress can be worn with a "body", to make an afternoon ensemble, or an evening ensemble, depending on how it is accessorized. 18th Century Sewing Techniques has an example used for evening dress.

Second, I can simply wear it like an open robe, with a petticoat peeping out underneath. Here is a 1799 fashion plate from The Fashions of London and Paris, from the Bunka Gakuen library collection in Japan. This particular example is full dress, meaning that it would be suitable for dinner or an evening out. Memo: the fabric the model is wearing around her arm is not a shawl, it's the train from her dress.


The description:
London Full Dress
Hat of lilac crape, looped up in front; with silver loop and button; ostrich feathers; robe of muslin; petticoat of lilac crape; both trimmed with lace. Lilac belt, trimmed with silver; gold chain.

A handsome hat, small plumes, sash and matching petticoat, and necklace--oh, and shoes--, and voila, we have yet another ensemble. In my case, I already have everything to hand. Just need to mix it around a bit. Or I can take fabric from my stash and run up a petticoat in another color. No expense whatever.

That hat...Polly and Jenni, what do you think? The original is felt.

Wednesday, November 30, 2011

Just A Reminder to Put Your Best Foot Forward: You Don't Know Who Might be Watching

Portrait of Georgiana, Duchess of
Devonshire, by Sir Joshua Reynolds.
Image courtesy Wikimedia Commons
"...Hetty and I took a walk in the Park on Sunday morning, where, among others, we saw the young and handsome Duchess of Devonshire, walking in such an undressed and slatternly manner, as, in former times, Mrs. Rishton* might have done in Chesington garden**. Two of her curls came quite unpinned, and fell lank on one of her shoulders; one shoe was down at heel, the trimming of her jacket and coat*** was in some places unsown [sic]; her cap was awry; and her cloak which was rusty and powdered****, was flung half on and half off. Had she not a servant in superb livery behind her, she would certainly have been affronted*****. Every creature turned back to stare at her. Indeed I think her very handsome, and she has a look of innocence and artlessness that made me quite sorry she should be so foolishly negligent of her person. She had hold of the Duke's arm, who is the very reverse of herself, for he is ugly, tidy, and grave. He looks a very mean****** shopkeeper's journeyman."

Fanny Burney's comments in a letter to her friend and second "Daddy" Mr. Crisp, April 1776.*******

Ow.

*Mrs. Maria Rishton, Fanny's close, flighty, spirited friend.
**Chesington, the private, rural home where Mr. Crisp boarded, and where Fanny and Maria often stayed.
***"jacket and coat": jacket and petticoat. "Coat", the 1880s-era editor of Fanny's early journals tells us, was an old term for "petticoat", and when Fanny edited her journals later, she often corrected the word to read "petticoat".
****"rusty and powdered": "rusty" was often used to describe black garments of which the dye, never fast, had faded in spots. "Powdered", I am guessing refers to some of her hair powder having fallen on it. Ugh.
*****"affronted". In this case, may mean something on the order of being snubbed, or worse.
******"mean". In that day, mean usually meant poor, penurious, of low means.
*******The Early Diary of Frances Burney, 1768-1778. Vol. II. Edited by Annie Raine Ellis. London: G. Bell and Sons, Ltd., 1913, pp. 138-139. 

Friday, November 25, 2011

1790s Convertible Spencer: A Collar Construction Issue

Our poor little Metropolitan Museum "body" may have been the salvagey product of, let's be honest, not the finest of seamstress work. That's Mrs. C's take and the longer I look at the item, the more I am inclined to agree. The collar is attached so oddly! Remember this interior detail? Where at least one side of the collar is simply rolled over the neckline and hemmed down?


It makes me wonder if the original garment was some sort of collarless bodice that received a quick update. Rather like this one:

Well, if I were to design wrap-front body, perhaps along the lines of the 1796 Luxus und der Moden model, below, how to construct that collar? The wrap-front would "go" better with my wrap-front dress. Much as I'd like to replicate the Met item (shout out to Sabine!), it would just look plopped on top of the wrap-front dress, and I haven't energy or time to make a gauze chemise.


Over the last few evenings I roamed through Nancy Bradfield, Janet Arnold, etc., etc., finding nothing useful, then remembered the exceedingly detailed dress diaries of Brocadegoddess, produced for her thesis, Rockin' the Rococo. She had made a riding habit, and was focusing on garments she believed, after in-person examination, had been made by seamstresses, not tailors.

So I visited, and, happy sigh, there is the collar construction, illustrated. Mrs. C., you may be glad to know that the construction is much as it is today:
  • Sew the underside of the collar, right sides together, to the neckline edge.
  • Hem down, with slanted slip stitches, the upper side of the collar to the lining.
She even has photos, which I take the liberty of reproducing here:
Underside of collar stitched right side to right side
(lining side stitiching shown here). Courtesy Rockin-the Rococo.

Upper side of collar hemmed down to lining.
Courtesy Rockin-the Rococo.

Collars on Extant Spencers

I know that sewing techniques began to alter as the nineteenth century progressed. However, later eighteenth century collared items not made by tailors aren't too plentiful, and not many other garments featured collars, so, perforce, I look at spencers...all of them at the Met, which appears to have the best selection online, at least with zoomable photos.

To start, an c 1800 example, and my favorite of the lot, a snappy muslin item picked out in black...appears to be cotton yarn? I must make this one. Gee, if I cut this one out at the same time as the silk body, it shouldn't be too hard to finish two of them, eh?

Metropolitan Museum of Art
1991.239.2


Second, an 1805-1815 unlined muslin spencer, whose primary decoration consists of tucks and piping. It's a tour de force. Sabine, this one's certainly for you. Look at the little manchets at the shoulders, the neat treatment with the piping, and the eyelet embroidery.

Metropolitan Museum of Art

1986.114.2

Third,  a spencer dated 1815, fawn colored. In the detailed view you can see that the lining and collar are slip-stitched on the interior, although it isn't clear to me whether the lining is slip-stitched to the collar, or the collar to the lining.

Metropolitan Museum of Art
1975.34.9


Yet another Met example, a sleeveless jacket-spencer from 1818-1819. It reminds me almost of a waistcoat. The Met seems to have the widest selection of spencers with large photos online, by the way, that I have found.

Courtesy the Metropolitan Museum of Art
1982.132.3

Here's the same shot, blown up to show the collar detail.


Thus endeth our tour of spencer collars.

Next step, making sure that shawl-style collars could be handled that way right down the front, even in very lightweight fabrics.