Sunday, November 14, 2010

Renovation Tidbits, Part 3


Noah spots the moon, while the house
windows glow brightly
behind him.
Praise the Lord and pass the paintbrush...for we're almost done with the windows! The last two windows received their protective paint coating yesterday afternoon in such a breeze that I thought the paint would dry on the brush before going on its intended surfaces. All that's left is scraping and some touch-ups, and putting the storm windows back on.

In the kitchen, the cabinets are up, the counters on, the doorways cased and the baseboards on. We await the plumber for water and gas, and the floor men for one last coat, and ourselves to install the wall tiling, but the main parts are done. I may be able to put away the electric frying pan before long and take the discloths and towels out of the bathroom. Oh, bliss, bliss, bliss.

The kitchen hutch wall, safe behind plastic
sheeting while the ceiling is worked on again.
The kitchen: stove hood, counters, and sink.

Friday, November 12, 2010

Dress Diary: Laura's 1795-1797 Robe and Petticoat, Part 2

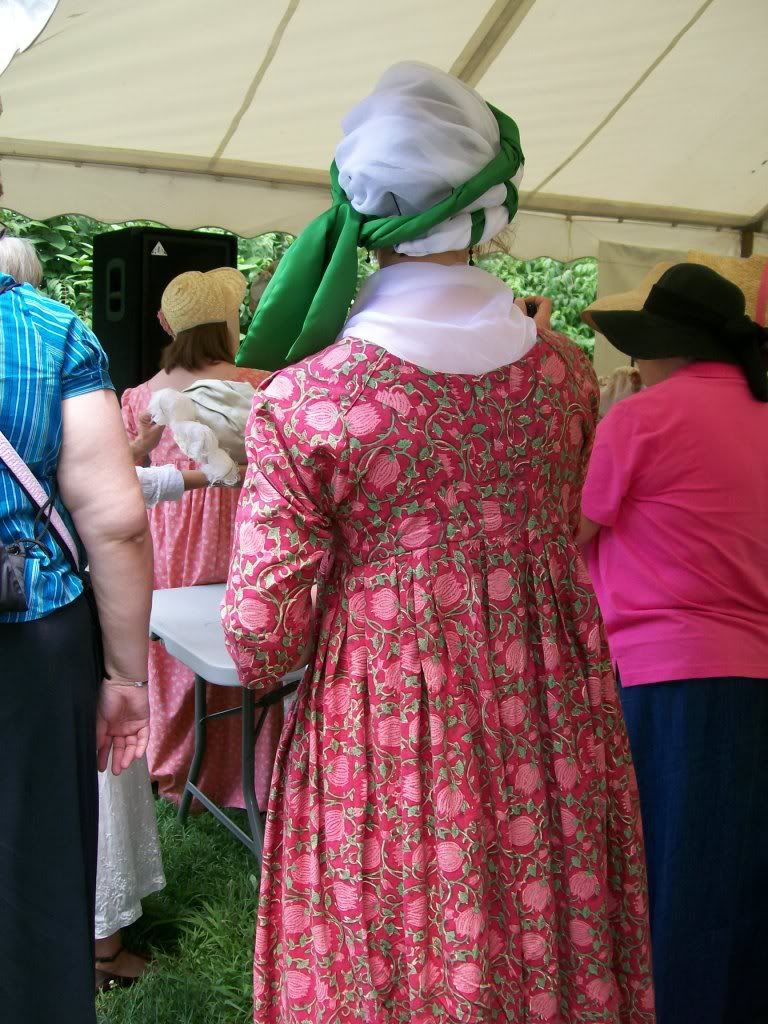
Laura wears her open robe at the Jane Austen
Festival Ball. She is on the far right.
When last I wrote about Laura's open robe for the now long-past Jane Austen festival -- back in early summer, oh my! -- it was not completed.

Now it's time to do so. Over the last few days the original post (Part 1) has been seriously expanded, with a great number of details about construction.

This post will finish the robe's construction.

A reminder note: this was a dress that Jenni and I designed and figured out the construction methods for together, but that Jenni constructed. Our deal was that she'd do the initial reporting on the dress on her blog, Living with Jane, but that I would complete a detailed post on it here later.

It's mostly machine sewn, but with hand-sewn details. The construction methods were taken from Costume Close-Up, Costume in Detail, and Fitting and Proper. The conceit on this robe is that it is quite the transition gown, showing the high waist and flowing silhouette of the mid to late 1790s, but constructed using methods already in use for many years.

As always, please click the image to see a larger version.

The Sleeves
The elbow-length sleeve pattern came from the Sense and Sensibility ELC pattern. It's in one piece, with a small dart right over the elbow to curve the sleeve into the typical lightly bent shape of the eighteenth century. By the way, this cut leaves fewer wrinkles when the arm is bent.

Jenni fitted the sleeve toile rather tightly to Laura's arm so that there was little ease, for sleeves during the period we designed for usually were worn tight.

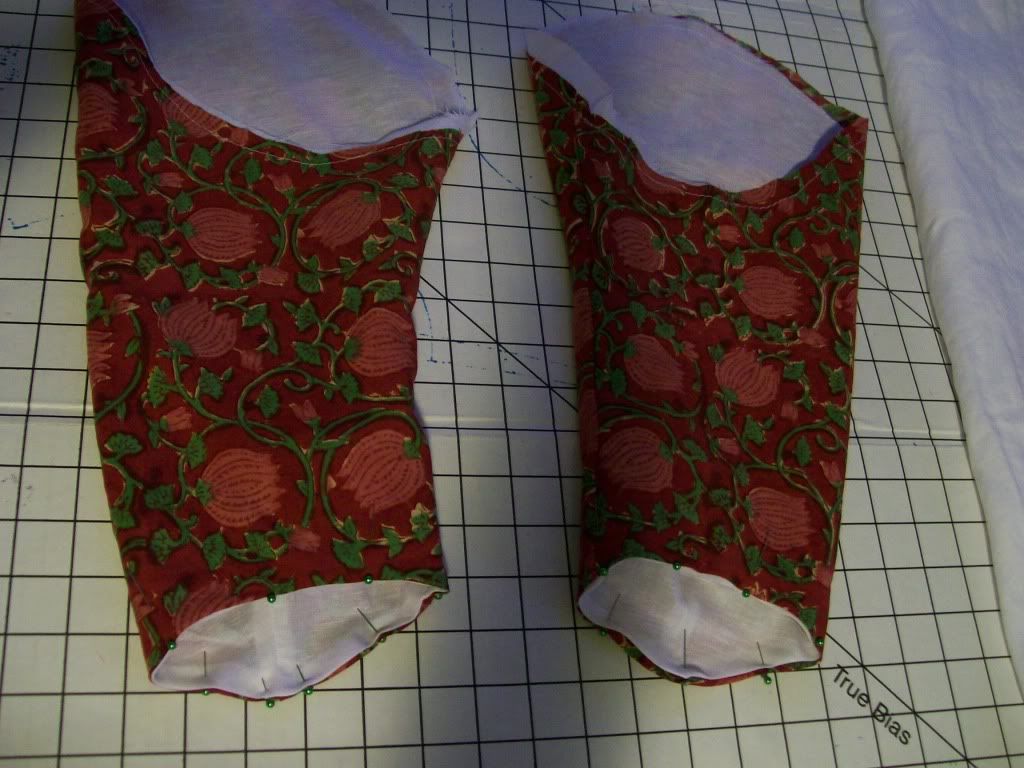
The sleeves are lined with linen, just like the bodice. To construct them, the darts are sewn. Then the lining and fashion fabric are treated separated. First, the lining piece is seamed up, such that the seam allowances are on the outside, away from the skin. Second, the fashion fabric piece is seamed up, right sides together, and then turned right sides out. The lining sleve is slipped inside the fashion sleeve, the seams matched up, and the seam allowances turned inwards, as below.


She could have folded the lining in a little bit more so that from the inside, a narrow band of fashion fabric would show and from the outside no lining could ever show, but we did not know this at the time.

I cannot recall how she finished the wrist edges -- perhaps with a small running stitch. I have since learned a special stitch, called in French le point a rabattre sous le main, which is a nifty top-stitch-cum-hemming stitch all in one. Clever needlewomen...one stitch performs two functions and saves a step! More on this stitch in another post, for I have prepared photos for a tutorial.

The sleeves were fitted into the armscye such that the sleeve seam is on the inside of the arm, perhaps a little above midway through the arm's thickness. Jenni then sewed them in place as you would a sleeve today, but leaving the inner seam allowance edges raw. This was common.

Finishing the Bodice
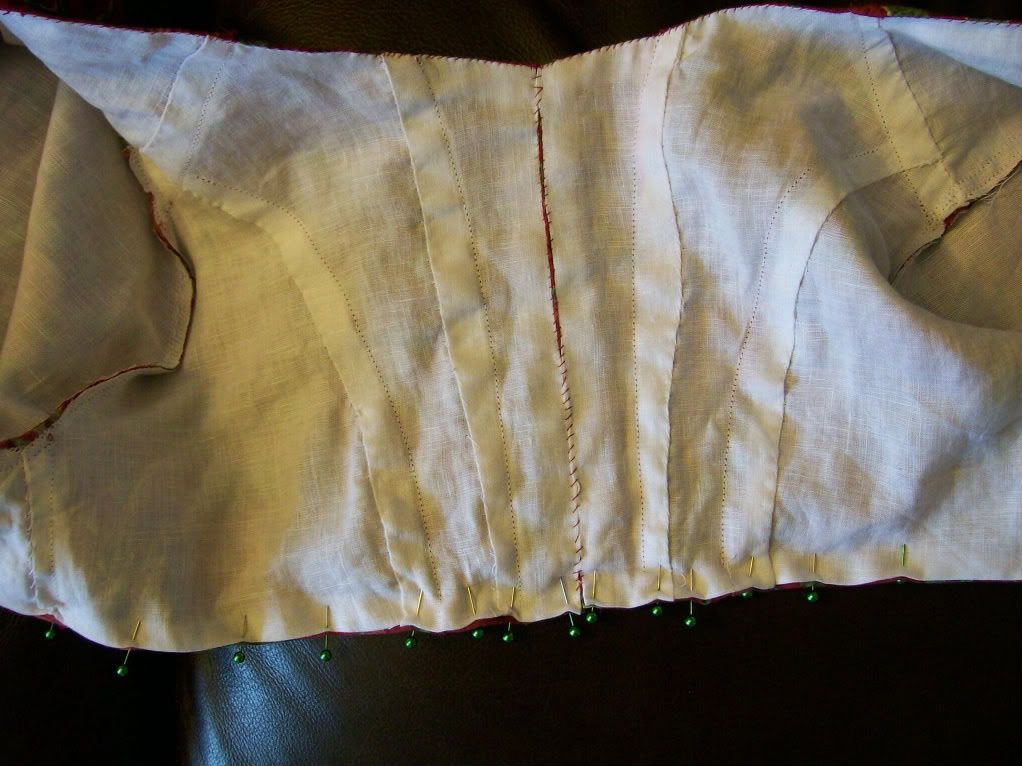
Finishing the bottom edge of the bodice was straightforward: turn the raw edges in, and whip stitch.


Again, a common treatment, and clever. The skirt could be taken off and renovated or redone without mussing up the bodice.

The Robe Skirts
The robe skirts are straight two panels of unlined fabric, seamed up the center back, and hand-hemmed at the edges: the edges turned under about half an inch, then turned again and hemmed down. Unlined, the robe flutters when she walks. Here is Jenni hemming the skirts while Laura looks on, at a sewing meeting morning at our friend Caroline's house, this spring. It was one of the first warm days. Funny that I should look at the photo on the evening of what is probably the last balmy, Indian-summer day this year.

Jenni cut the skirt such that there is no real train, for Laura wished ease in walking.

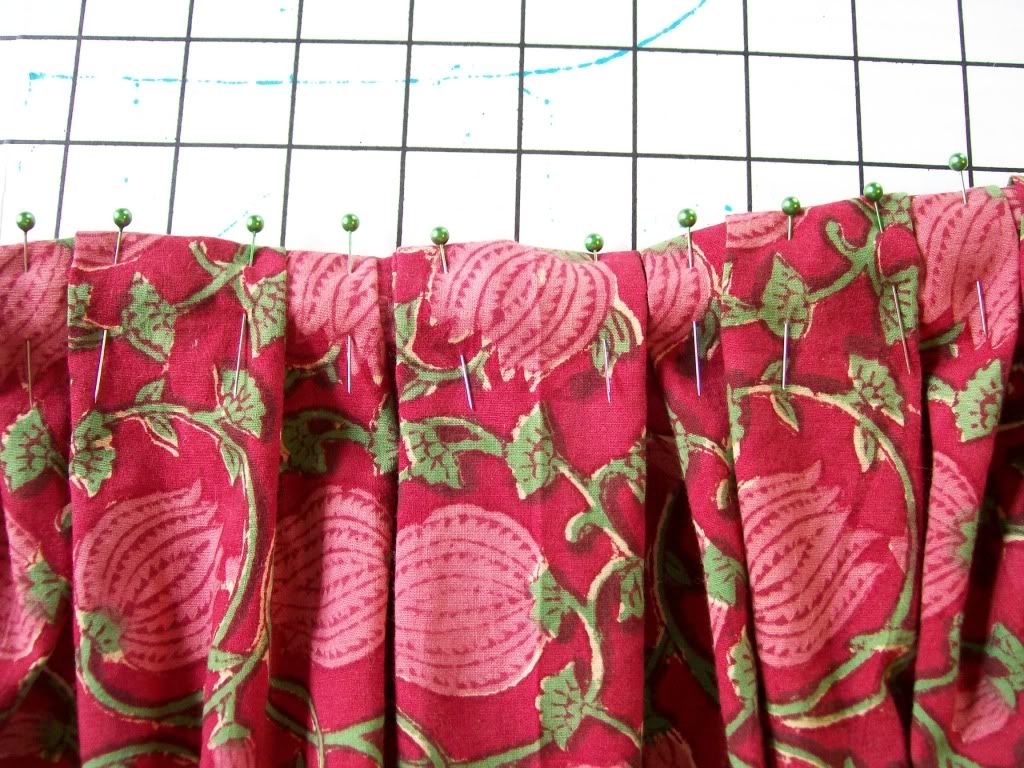
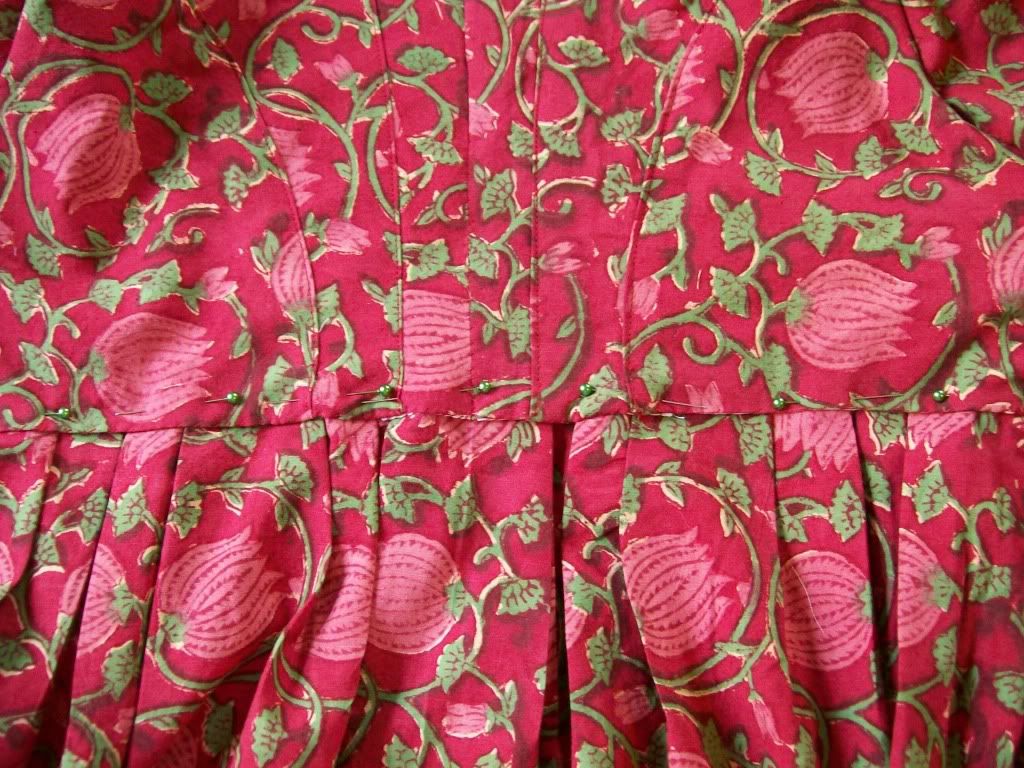
To attach them to the skirt, Jenni box-pleated them. She did so by eye, as many people do, using lots of pins. Here is a close-up photo:


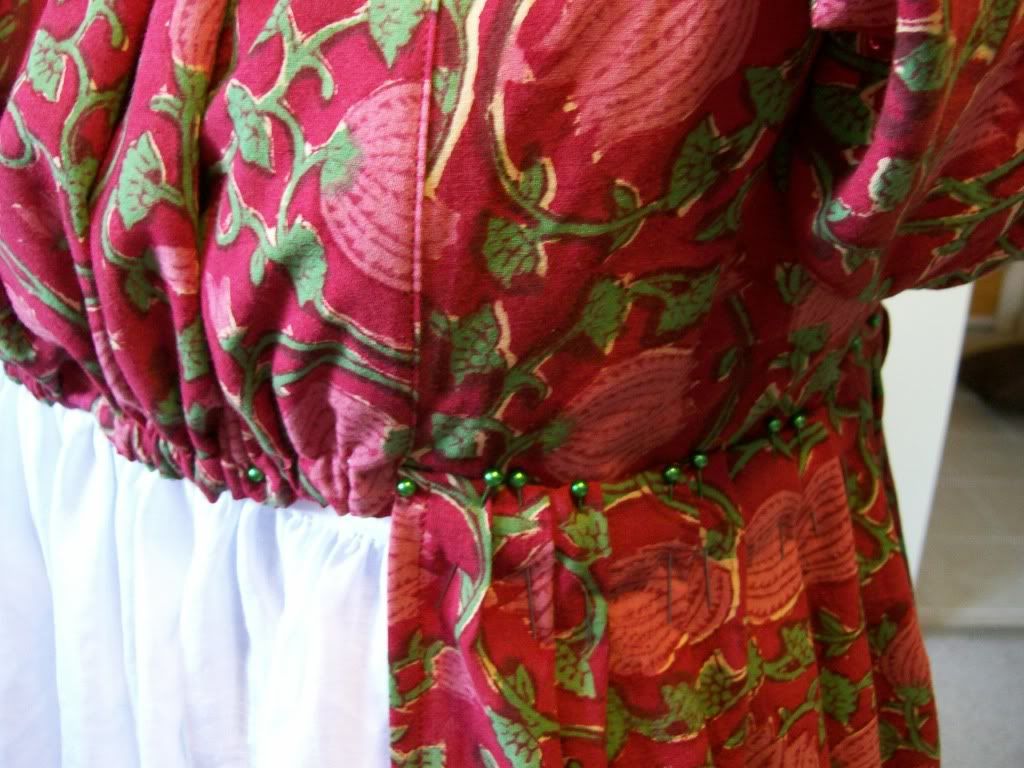
Then she placed the pleated skirt on the outside of the bodice, and test-pinned it.


She then re-pinned it to the inside of the skirt. The pins set horizontally give you some idea of the depth to which the skirt is set. Then she top-stitched the skirt on to the bodice.


The Petticoat: A Separate Dress Diary
Because an open robe is just that -- open -- an outer petticoat must be worn with it. Jenni designed a white linen one for Laura.

The petticoat dress diary lives on her blog. A note: we are unsure at this point if petticoats worn beneath mid-1790s robes would have had the straps we used -- the underpetticoats certainly could be done this way. However, given the raised waistline, the straps would make sense, for without them, unless one boned the waistline or tied it unreasonably tightly, or pinned it tightly all the way around to the stays, the petticoat would have kept falling down. As for the placement of the placket at the back, this is simply the solution for now.

The Final Ensemble

Here is Laura in her robe and petticoat, with proper supporting garments, and a pretty turban. I very much like the portrait of her with her husband.


Here ends the dress diary. Next up, completing the documentation of the feather-light open robe I made for Polly, for which you have seen the first part, in 1795-1797 Printed Indian Muslin Open Robe for Polly, Part 1. I started documentation during its construction, and just as with Laura's robe, am only now finishing it. After that? As complete documentation as I can manage for my own white robe, both pre- and post- alterations...you may find lessons galore in the treatment of bulges and gaposis.

Wednesday, November 03, 2010

The Cowboys Are Worried

Celebrating Hallowe'en and All Saints at The Old Episcopal Burying Ground. Our boys were early wakened from their naps and didn't think much of the proceedings, even getting to carry candles to the little outdoor service. It wasn't until the cupcakes were handed out that Noah even smirked.

At trick or treat time, a different scene. Visiting three neighbors, as promised? Not enough. We traveled to five and the boys chatterboxed the whole way, proud of their rodeo cowboy identities and prouder of being able to say, "I have as much candy as I can hold". They stuffed the front pockets of their overalls until they looked like their tummies had traveled to their chests.

None of those pictures came out, though, for nobody wanted to remain still.

We're all nibbling the proceeds, a candy or two a day.

Had fun making the outfits. The pattern is from Butterick...I think. Fake cowhide for the fabric, and the vests are lined with chambray and so are reversible. We hope they'll want to wear those again, because they're cute!

Thursday, October 14, 2010

Renovation Tidbits, Part Two

One of the windows in worst shape.
 The windows across the front of the house haven't been cared for since, as one of the carpenters put it, Daniel Boone last puttied them.

So with the help of my mother and sometimes Curte, I have scraped all the ages of paint, glazing, putty, and strange old fabric weatherstripping -- tacked on and painted over -- off the windows as well as possible, reglazed and painted the windows, painted the storm windows, doors, and sundry other surfaces, and caulked.

It takes approximately two hours to scrape a window, another hour to glaze it, and after two weeks' cure, another two hours to paint two coats on it and scrape the excess off the panes. If there are six windows and door and door frame and said storm windows and swing also needing paint, and twin boys adding their activity to the mix... you do the math.

It has been a month-long job, and I am not done yet.

Then there is the...

Other Project

One month ago today, we were in the middle of renovating our kitchen. As of this evening, we are still at it. The walls that needed moving are moved and completed even down to the paint, the ceiling is done, the plumbing is in, the wiring mostly done, the lighting in, and tonight Curte was plugging old piping holes with rounds of dowling, preparatory to the arrival of the flooring people tomorrow morning. The old, stained resin pine floor that we loved too well to replace will be painted like it was back in the 1920s, but in Adirondack green this time, rather than olive green.

Perhaps by this time next week the floor will be done and the cabinets and counters can start to go in? Certainly hope so. For my tiny cooking corner in the dining room, enjoyed though it is for its simplicity, is rather hard on the menu...it's stews in the crock pot or sautes in the electric frying pan or something in the microwave, and only one thing at a time can cook, for our 1920s-era wiring out there won't stand for more than one small appliance at a time. The water source is a big bowl of water drawn from the downstairs bath, and dishes are washed in the upstairs bath. That part is not pleasant: I am always reminded of running with scissors when heading up or down the stairs with cooking knives.

Still, it is very good to see this coming together. Perhap afterwards I will give myself the gift of another sewing project to be undertaken in quiet evenings over the winter: shall it be a proper 1795 long fichu (try six feet in length) or a black 1870 dress?

Then too, there are pillow covers and cushions and curtains to be made.

Meantime, it's back to brute labor :}

Sunday, September 26, 2010

Mid-1790s Hair Tutorial and Hat Precis

Channeling 1794-1795.
Late eighteenth cenrtury hair was big, wasn't it? First we had Marie Antoinette and her giant poufs topped with sailing ships and whole birds. Then we had giant boufs with tails in back, as if ladies had slept in the poufs for months and then just teased them out in frustration.

By the mid 1790s, fashionable women transferred their passion from big frizz to big, long locks. A spiral-curl lock or two might hang fetchingly over a shoulder and inspire plays like The Rape of the Lock earlier in the century, but now those curly long locks multiplied until the head was covered with them.

The locks could be pulled up into messy masses, or sometimes woven more carefully with ribbons,or headbands, or left au natural. For this era was the prelude to Romanticism, and what is more romantic than tendrils around the face and shoulders?

Here are two mid-1790s fashion plates from The Gallery of Fashion that show two variations on the look.

As alway, please click the images for larger versions.

Please also pardon any typos...for an experiment, I typed the whole thing on my Blackberry...excepting image code, which I set up earlier. Um, sore fingers ahead.


By 1796, high fashion began to take the hair high up onto the head again and while curls were still the rage, they became sparser, set closer to the head, and kept more controlled, more in emulation of the Classical than of Nature's Child.

The Hair


My problem for the 1790s picnic we held Saturday was translating this look onto a 21st century head of hair, bobbed and straightened. Not good "lockige" material.

Lauren of The Lady of Portland House and her friends at the Oregon Regency Society, who favor the same decade our group does, seem to have gone for full wigs as a solution. There are variations on the Hair Metal theme out there in wig world, with names like "Lionness". Teased and shaped a little, these do admirably.

I had neither the money nor the chutzpah to go for a wig, though; I like my own hair, and wondered if I could do a variation on Vivcore's Georgian pouf wiglet (Google it for a great tutorial). Then I could use my own front and back hair.

But midway through making it, it began to look too poufy, and I had a Eureka moment. Are you familiar with the Paris Hilton headband wiglet that some stores sell? Have you seen the Costumer's Manifesto tutorial for hair for the play Les Liaisons Dangereuses? I have, and, a day before the picnic, the lightbulb blinking on after months of intermittent mindless musing, I pulled out a Scunci 1.5-inch-wide elastic headband bought years ago, some brown thread and a needle, and 10-12 curled wefts of imitation hair some 22 inches long, from Sally Beauty Supply that I bought for 5 dollars, again years ago.

The wefts I had cut into slices some 2 or 3 inches wide early this summer. I had found a wooden dowel a half inch in diameter, and had, one by one, wound wefts around one end of it like one winds hair around a curler, pinned the hair ends in place with a bobby pin, and plunged the dowel and its hair into a pot of boiling water for about 30 seconds, enough to make the strands on the weft take a permanent curl. Once gently worked off the dowel and dried, each weft was now a long sausage curl. Left alone, the ingredients for any formal look that requires sausage curls -- mid-eighteenth century, 1830s, 1850s, 1870s. Pulled out with the fingers, loose long locks.

You can see the wefts above, bobby pins run through them.

Certainly you can just pin the wefts onto your head with bobby pins, mixing wefts with your own hair, I tried that and it works -- just think hair extensions.

An easier route, the one I ended up taking, is to sew the tops of the wefts to the headband. I set a weft to the outer edge of the band, and sewed it to the band with a few stitches. Then I set a weft next to it and did the same...repeating until I had gone almost halfway round the band.

Then I sewed another row of wefts on a half an inch in from the band edge. That proved to be enough hair for me, but you might add as much as you like.

You can sew how rough the sewing is, below.

If you wish, cover the sewing with shorter locks or a period head wrap: since I was wearing a hat, I did not.

Put the headband on, bobby pin it to your hair to hold it in place, and style it as you like: push some towards the front of your head, other parts to the sides, pile some of the locks up on your head and pin in place as I did... If thick enough and of a similar color to your own hair, it blends with your hair nicely.

Remember to pull your own natural front hair forwards towards your face and to spiral-curl it with curlers or curling iron or foam curling rods. Using setting lotion on dry hair, and blow-dry your hair to speed things up. When you take the curlers out, your front hair will be curly, too. Now you can blend it with your new locks. If you have long hair, looping some of it up for slightly shorter by-the-face face curls looks nice. 

Use fashion plates and paintings of the era to help decide how to arrange it into a coiffure with hat, hair wrap, turban, ribbons, feathers. (See my Research Resources page...link in menu at blog top, to find fashion plates.) 


Here above is the sewing; rough, eh?


Here above is the completed wiglet.

The Hat


This is just a precis, for the hat was very simple.

You see the fashion plate above in which the young woman is wearing a hat with a band around it, tied in a 3-way bow in front and with the fringed end pointing obliquely up, and a plume set behind the bow? That was my model.

I used a hat bought my freshman year of college and modified it. The base hat is a boater of sorts, the brim width the same all the way around, with and three-plus inch straight crown.

I sewed two lengths of millinery wire to the inside from crown out to the edge of the brim and bent the wire to bring the hat equally down on either side, which style was also popular in 1795.

Then I tacked a scrap of shot pink and cream silk-cotton around the brim, tucking raw edges under the scrap for a more finished look.

Next, another scrap was formed into a bow, and one end, longer than the other, brought up obliquely in back.Because the fabric frayed naturally, I took advantage of it and frayed the bow's sides for a two-tone effect. Again, an idea from fashion plates, and you see fringing in trim of the day.

The bow was pinned with a silver hatpin to the front of the hat.

Finally, I took two medium ostrich feathers, tacked them together with thread to make a single fluffier plume, and inserted it behind the hatband, tacking it into place. Should have tacked it more: it twisted. The plume should be set so the top cuves forward -- that means the back of the feather faces front.


The Results


Here you go. A pretty 1790s look, with minimal outlay of construction time or funds. The research and thought time? Months and months. I have a slow brain.


Saturday, September 25, 2010

A September 1790s Picnic


Come with us as we  wander the estate.
September cries out for picnics. This morning the air was washed clean for the first time in almost six weeks, the sky was the deep blue of early fall, and around us the foliage, so tired and dead just yesterday, had shaken itself off and perked up a bit. Not but that we could see real fall coming: most of the black walnut trees are bare except for their decorative green orbs, and underfoot we had to watch for their staining husks and the detritus of other trees who had given up some of their leafiness a little early, in the face of drought.

(As always, click the images to see larger versions.)

In honor of September and 1795, the year Jane Austen's first novel, Pride and Prejudice, was published, our little Jane Austen Sewing Society met at Henry Clay's Ashland Estate to picnic, and stroll under the trees and in the formal garden afterwards.

A formal portrait, with baskets.

There were just four of us today, and we missed everyone else, but what a time, what a time! Imagine sitting down to a table, properly clothed and decked, to Polly's cheese pie, and salad from Caroline's garden, with little glasses of rosewater flummery just waiting for the conclusion of that first course. A second, almond flummery, made in small pats like jewels, says Jenni, and dressed with gold leaf, to go along in case rosewater was not to taste. To finish up, a true antique cheese cake. These three dishes Jenni had worked up from eighteenth and early nineteenth century cookbooks, and she has told you you all about them in her blog, Living with Jane, for they were excellent, soft and smooth with cream, the flavoring just present enough to make you want more. I had forgotten the muscat in the flurry of packing all the baskets, but we had two excellent teas, and fresh-squeezed lemonade, both by Caroline.

Here are some shots of the event. You can see more -- and far better ones -- at Living with Jane. Jenni studied photography in college, and you can tell.

As usual, the morning was somewhat hurried. The tots were good ducks, as they mostly are, but Christopher had an accident as I was ironing my dress, and cleanup took awhile. Potty training takes time for a little boy when he has things to do and people to see.
1790s dress, from Collection Maciet.

So I was behindhand when Caroline and Polly arrived to dress, and still fussing with hair. We dressed with more dispatch than for the JASNA festival in July, being a little more confident and experienced, but despite the new modesty panels that line my 1795 cream silk dress and take the strain off, the pins to close the dress would keep coming undone, silly things. So, as last time I have gaposis. I will beat those pins yet.

Then too, the new fichu, made of the embroidered skirt from a vintage child's dress that was so scorched and stained that it qualified as a cutter to me -- and as trash to unkind others, had a dear friend not rescued it some years back -- wouldn't sit well without a brooch. I had set it in one of the ways it could be worn during the 1790s, as shown in the Gallery of Fashion fashion plate example on this page.

And I let the front wrap loosely outside the dress, which was allowable then, but it did look like a collar, and I won't be doing that again. Why did I not mirror-check before we left? We were late, of course, in leaving for the estate and I didn't care for the idea of Jenni wandering around looking for friends who weren't there.
Happy with the thought of a pleasant
lunch. Those are Jenni's antique
cheese tarts behind her, and a flummery.

To finish the rush, while I had packed the baskets the evening before, the fruit was still a-fridge, along with the wine, and it remained there...while we left without it.

Lunch itself as was described, was very, very good, and all of us agreed that the bar is very high for tea rooms these days, to match what we have learned to do. Cheeky little statement, but you get women together who enjoy cooking and who have access to local fresh ingredients, and nice things tend to happen. Why then no pictures? Not for modesty, sure...we shared camera duty, and my camera was asleep at the moment, because I was too busy with a fork.

The cups of tea brought Caroline to the subject of poetry and over the last of it, well caffeinated, we listened to some Wordsworth, a piece about going nutting in the fall. As you might expect of an early Romantic poet, the piece was a peaen to Nature, a celebration of the wild harvest, and a reaction against the practical gathering of nuts and what it wreaks. A conflicted poem, to say the least, but good.

At lunch. Image courtesy Jenni of Living with Jane blog.
Off to stroll afterwards, like any smart picnicker who doesn't want to leave for home over-full and sleepy.

Down a garden path slowly.
Through the formal garden, where the bare walnut outside
warns of cool weather to come,
and Christmas. Do you see the mistletoe?

The mandatory rose photo because
the blooms match the dress
Wouldn't you know, by this time the fichu had a life of its own. At least it was covering the gaposis.

Leaving the garden for a wilder walk...

...in the woods, watching for walnut hulls and other dangers.

The last of the stroll, back among the shadows.
Image courtesy Jenni of Living with Jane blog.

And so to home and naptime for the tots, although I was too full of tea and happiness to sleep, so here I am.

Tuesday, September 14, 2010

Renovation Tidbits

We are renovating our kitchen. Any thoughts of doing much else during this period have evaporated, pretty much. Sewing, blog posts...pouf. It's taken forever just to write this post; I 've done it in bits and drabs. Sans kitchen, and with a part-time job and 3-year-old twin boys, life must perforce simplify or Mama will collapse.

I rather like living without a real kitchen, because it forces creativity and also a visceral understanding of what it took great-great grandmothers to get meals to the table. I have few pots, limited heat sources, and as of today, no running water outside of the bathroom. Counter space is part of a table. I walk to to the basement to or to the fridge in a back room to get all but the most frequently used items. If I forget something, it's another trip. One learns to carry a tray everywhere.

Photo: A kitchen in transition: to the left, a door moved, to the right new windows, the old cabinets largely gone, the ceiling down and the new wiring and lighting in progress. Since this picture, the sink has gone bye-bye, too.

Most of the china, glass, and silver went to basement storage, and that has been a delight: it is very clear just how much mental effort went in, over the years, on selecting proper dishes and so on. Now the essentials are to hand on open shelves, and in the pretty, light-filled dining room that I've always enjoyed, so that table setting is a pleasure and dinners more elegant than in the family dining area in back, now taken over by drills, nails, and dust.

The blessed crockpot does its thing all day, and provided I have planned ahead and start in the morning, we have a relatively good dinner. A dinner not too far from the sorts that cottage folk would have provided nightly for their families. Read the early part of Lark Rise to Candleford and you will know what I am talking about. I have merely substituted stews and braises with pastas added an hour before serving for boiled meats and vegatables and puddings cooked in nets.

Photo: Household archaeology: the white tubes are ceramic spacers that neatly guided old fabric-covered wires carrying power to the original outlets, one or two per room. Houses were more dimly lit and more people used central overhead lamps hung from a chain. Curte had just removed the wires, in this picture; I rather wish he had left them for history's sake, for they weren't attached to anything. Curte's dad , a former contractor, says no one has done nice neat electrical work like that for fifty or sixy years.

The dark beams are the original 1923 beams; the gray lines showing on them are where the lath was nailed up, and the lines themselves are remnants of the innermost -- roughcoat - plaster, that was strengthened with horsehair.

The outdoor gas grill doesn't work for frying, as the gas is too far from the pan to heat it efficiently, but Curte's mother thoughtfully sent his Dad over with her mother-in-law's old electric frying pan recently and so now sautes and johnnycakes are back in the picture. My mother lent me a microwave, and I have had to play about-face with an old prejudice against them. We've not had one for seven years, and I distrusted them before that, and was always bold to tell Mom that I didn't like what came out of them. Well, guess who is eating her words, now it comes down to scratch? No, I am still not fond of them, but if we want separately cooked vegetables or potatoes or hot oatmeal, the machine does a nice job steaming the former and a gluey but edible job of the latter, and I am very thankful.

Now that the water source has gone today, it's out with the pail* and dipper. I've used one before: at the family cottages I grew up visiting on a pretty little lake, if you stayed at the red cottage you walked with your pail a minute or so to the square well, lifted the metal lid, which had a nice, scratchy-bell screech althat everyone knew, and dipped in your pail. An artesian well, the water bubbled inside in a three-cubic foot space, gravel and sand bottomed, visited by newts, and cooooold. The well would breathe a dank air in your face when you leaned down. I loved the smell. An outlet at the bottom sent the spillover running between the path's stepping stones and down a minute cress-lined stream to the lake. All of this shadowed in dappled woods. So beginning tomorrow, I have those memories every time I dip water to cook. I am looking forward to them, so long as the twins don't try to play water boy. Oh dear. Just thought of all the possibilities. How to keep them from thinking of them too?

Photo: More household archaeology. The bit of wall jutting out to the left of the door is the original brick flue. We discovered that the original wall color was a soft green then very popular for kitchens and other utility areas. That round mark? That's a portion of an old cover to a stovepipe. Now that was a discovery. We knew that the house was heated with coal, because the old coal chute it just outside the kitchen window. The coal man shoveled coal down the chute into a cellar bin. We did not, however, know that the earliest kitchen stove was coal-fired. I expected gas, for some reason. Between the kitchen stove and the coal chute nearby, no wonder there was so much old coal dust above the plaster ceiling!

(*Note: I live in Kentucky now and married into a Kentucky family here since this was Virginia. It's "bucket", in Kentucky. I've been saying bucket now for years, but when it's time to fetch and carry liquid, it's "pail" that I remember, just as "Did you check down cellar" or "The ash can's full" will come out once in awhile rather than "basement" or "garbage can". Curte has a good time with that, but he says "I reckon", so there. Once in awhile, staring at that thing we sit on together, I cannot recall any word at all except "davenport", when it's "sofa" everyone knows, or "couch", and when putting away laundry, it's to the "bureau" it goes, as much as to the "chest". And when I am dog-tired, darned if "broughten" and other strange past tense usages worm their way up from child-speak or the idiom of my birthplace, I don't know which.)

Light talk and funny talk aside, let's quit the cooking and get to the real cause of why I haven't finished documenting the dresses made for the Jane Austen Festival. Here's the dirt: it's dirt. Literal piles of it. First it was lath and plaster and coal dust when Curte took the old cracked ceiling down. Maybe if I am feeling chipper sometime I'll regale you with the coal dust caper. Then it was lumber dust and drywall dust, and soon it will be plumbing mess and who knows what. This is an older house, built in 1923, and the kitchen is in the middle of a three-rooms-deep layout (not original), and whether Curte or workmen enter from front or back, they are tramping through other rooms, and they've been working in the cellar too, where the clean laundry is, and my pantry.

Photo: the rest of the kitchen. The wall moves back, and it's sayonara to the sink for a new one goes in another corner, to save space. Later owners colored the walls lime green. It was actualy a really sunny, pretty color. The original floor? Resin pine, painted bluey-green around the edges, with a rectangle of linoleum laid in the center. Years of water trailing off the linoleum and later stains from floors tacked on top left the original strong, but too stained to refinish. So we are painting it once again, a bluey-green, but in a checkerboard pattern. The original ceiling? Apparently either a mustard (unless that was a primer), or a soft robin's-egg-blue, a gorgeous color. I saved a little piece. Our porch ceiling we painted that color, so it's good to know that the first owners liked that color, too.

So we get to clean all of it, over and over and over and over and over. Curte and Mom and I split this work; I am expecially grateful for Mom's help, since it's not even her house. It takes an unholy amount of time and effort.

At this juncture I think I have a pretty good grasp on what living in a town where coal fires heated homes, or on a farm during a drought, would have been like to those who had to maintain the house, whether mama or maid. It's good to understand this. I am going to understand it very well indeed when the two-three months this job will take is over.

Friday, August 06, 2010

Addendum: A Tutorial: Sense and Sensbility Bodiced Petticoat

While I am still waiting to get pictures of the completed bodiced petticoat, here is an extant example of one of these garments from Boston's Museum of Fine Arts (MFA).

It's of a later date than the 1790s, but is a lovely object nonetheless.

The MFA refers to it as an underdress. There may be truly a difference between an underdress and a bodiced petticoat, or terminology used then and now differs, or synonyms are floating around. I cannot judge.

Anyhow, the museum explains that the garment dates to the early 19th century (the labeling that came with it said 1820-1825), and was worn by one Mehetable Stoddart Sumner (Welles). It comes from the Boston area.

It's made of plain-weave cotton, with cotton embroidery, and features the use of twill tape in addition to the cotton.

It has drawstrings at neck and waist, and back tie closure...whether that is separate from the drawstrings the text does not make clear.

Want to see it in detail? Visit the object, accession number 49.876.. If the link doesn't work, the garment's accession number is 49.876.

Lest you believe that all bodiced petticoats were complex, here's a dramatically simpler one, with twill tape for shoulder straps. Not something to show under a sheer dress, I would think?

And here is the link to the details for this object, accession number 99.664.5.


Monday, August 02, 2010

A Tutorial: Sense and Sensbility Bodiced Petticoat - Part 5

This is the fifth part of a multi-part tutorial about making a bodiced petticoat using the bodice portion of the basic Sense and Sensibility Regency dress pattern. The tips are designed to supplement Jennie Chancey's online directions. If you missed the first four sections, you can read parts 1-4 here.

As always, please click on each image for a larger version.

Our job at this point in the process is to have Polly try on the bodice yet again, to sew up the back and create the closures, and to make up the skirt and waistband.

I found this last part rather fun, really.

When Polly tried on the petticoat, this was some months after her last fitting, and she had been exercising, and lo, she had lost weight! It was too big now.  I thought a few moments about what to do, attempting to put my 18th century hat on, and said to myself, back then, people gained and lost weight too, but with cloth so dear, it's likely they'd have had a system to accommodate weight fluctuations. Aha: lacing! Adjust the lacing tightness to adjust the fit.

Second, I thought the bodiced petticoat would be more supportive if it contained a few bones in back. Asking her about it, she said that her favorite undergarments have support in the back anyway, so voila, that decision was made, too.

First, I pulled the bodice tightly on her, and marked the spot where the fabric overlapped, from top to bottom, with chalk. The line was not vertical, because her back is wider at the top than at the bottom, near her waist, no surprise there.

Then I measured in about inch and a half on each side and cut off the excess fabric. I wanted to leave an inch or more open across the back for the lacing to cross, but needed about half an inch of fabric for a seam allowance.  In retrospect, I should have cut off more, for Polly continued to lose weight :}


Adding Bones

Next, I turned in a narrow seam allowance and pinned it.


Here it is pinned. If you look to the completed side to the left, you can see that the next step was to run a seam very close to the edge. It not only closed the back edge, but provided a line against which to place the first of two bones.


Here I have taken inexpensive plastic boning out of its black bias tape wrapping, have slide it up along the edge of the seam, and am marking a sewing line to the left of it. This line of stitching will hold the bone in place.
Therefore, after marking the sewing line, I removed the bone from the bodice, sewed up the channel seam, slid the bone up into place, with the top edge nestled against the top seam, and trimmed the bottom pretty flush with the bottom of the bodice.

Now I measured about an inch inwards from the first bone, and marked a parallel line for a second bone, stitched a seam from top to bottom, slid a second bone along its edge, marked the channel same as for the first bone, and completed this second bone in the same manner.

Sewing the Back Closure Eyelets

Now we are ready to sew the eyelets. Like the stays used during the high-waisted era, these lace with a single lace in a sprial pattern, not two laces.

How far apart should the eyelets be spaced such that they would hold well but not overdo the lacing thing? To answer this question, I looked at my Past Patterns transition stays, numbering the eyelets and measuring the distance between them. The Past Patterns bodice is taken from an actual example, so I felt comfortable with its lacing pattern.

For this bodice, I came up with six eyelets. I spaced the top and bottom eyelets as directed in the Past Patterns #30 stays directions. The eyelet positioning is such that the top and bottom eyelets on each side line up horizontally, but the rest of them are offset, to take account of the single lacing. Given the vertical distance to be covered, and the number of eyelet holes I had made, I ended up with a rather funny look…the top two holes on each side are rather close together, but I see that in period spiral-laced stays. Probably I should not have been so rigid in following an existing lacing pattern and should have just reset all of them except the top and bottom ones a little, but the end result works well, so, as they say, all’s well that ends well. Just think carefully when you do your eyelets, and you most likely will do better than I did.

I marked the eyelets with a pencil, placing them in the center of space between the two bones.

Then I created the eyelets.

Important: when you make an eyelet hole, you do not want to punch through the fabric, cutting the threads that make it up, as if you were setting a grommet. That only makes the equivalent of little tears in the fabric, and as everyone knows, little tears soon become big ones.

Instead, you want to spread the threads and nudge them aside into a hole shape without breaking them. Mantua makers used to have a special tool for this. I used a candy thermometer, which has a blunt-ended sharp point and the diameter of an eyelet hole.

First I used a great big crewel needle to find a space between the threads at the center of my eyelet hole mark. I put the needle through and slowly spread the threads apart. When I had a hole big enough for the end of the candy thermometer to go through, I put that through slowly, working the threads apart into a nice eyelet hole.


Then I overcast the edges to finish them. There are lots of tutorials out there for making eyelet holes, and some of them differ from each other. I used linen thread (that came with the Past Patterns kit and with which much of the work on the stays was done) to do the job. It’s strong and thicker than sewing thread. Basically, all I did was to overcast stitch all the way around the hole. I did NOT do button hole stitch. It’s decorative, but the horizontal edge created will wear off over time. Plain overcast was what was used during the period, so I understand.


My first eyelets are always a little wonky, until I get into a groove, and so it was here, but eventually they turned out evenly.


How many stitches to do all the way around? Looking at close-ups of stays and other laced items of the day shows a bit of variety: some are beautifully, neatly overcast, leaving not a hint of a raw edge all the way around, and all the stitches the same length. The vast majority, however, use just slightly more than enough stitches to make the eyelet strong, and the stitches are not always perfectly even, and in some cases, are downright sloppy. Depends partly on the quality of the original garment.

Finishing the Bodice Bottom

I decided to finish the bottom of the bodice with bias tape, for a neat, clean edge. That way if needed the bodice can be worn alone, but more importantly, the skirt can be changed out relatively fast. Very early Regency dresses (1790s) were quite full, but as the years passed, they became slimmer and narrower.

All I did was to take a length of white double-fold bias tape somewhat longer than the length of the bodice bottom, and pin the right side edge of it to the raw edge of the right side of the bodice.


Then I stitched perhaps a quarter inch from the edge...or conveniently on the first fold of the bias tape...cannot remember the exact measurement.

Then I folded the bias tape over the raw edge of the bodice, and hemmed it down. Or stitched. Cannot recall. Hemming would be neater, but we were in a hurry to finish.

Voila, a completed bodice, ready for any skirt to be put upon it.

Adding the Skirt and Finishing the Petticoat

I apologize for not having pictures of this section. Somehow the camera just wasn't in play...we were just counting down days to the event and I was flying :}

Since the dress that Polly was to wear was designed for a circa 1796 look, we went for a full look.

You do not want the petticoat to drag the floor and it should end above the hemline of the dress so it doesn't peek out. So Polly donned the bodice, and I measured from the bottom of the bodice to about her ankle bone.

I took two pieces of muslin, 45 inches wide, and the length needed, plus 1/2" for a bottom hem and 1/2" for a top seam allowance. Then I seamed them up the sides at their selvages. with a 1/4" seam allowance.

I slit the center of what would be the back piece down 9" for a placket, to open at the back at the bodice opening. I turned down one raw edge of the slit about 1/8", then turned it down again to make a tiny hem, and hand running-stitched it up to the top. I did the same thing to the other raw edge and voila, a placket done much as it would have been in the day.

Then I hemmed the bottom, using the same procedure as for the placket, but turning down 1/4" each time. Period hems would be even narrower, often, but this seemed right for her.

Then, 1/2" down from the top of the skirt, ran, by hand, gathering stitches of about 1/4" or less each, all the way around the skirt, in four separate sections. For speed, you can run just two sections of gathers, one for each skirt panel, but it's better practice to measure the skirt into quarters (center front to side, side to center back, center back to side, side to front) and run four sections, because you can distribute the gathers more evenly. Even better, run two rows of gathering stitches, and stroke them, like I did for the midcentury petticoat. In a hurry? Gather by machine. It's up to you.

I then divided the bottom of the bodice into sections and marked these sections with a pencil, thus:
  • After I marked the center front of the bodice with a pin, I placed a pencil mark about 3" to each side.
  • On the back of the bodice, I measured in about 3" from the edges and marked there, on each side.
These markings show where to gather heavily and where to gather minimally.

Then I pulled in the gathering stitches of each skirt section until the result fit the length of the bodice. I pinned the raw edge of the skirt to the finished edge of the bodice. In practice, this means laying the skirt on a table, raw edge nearest you, and with the center front lying right side up. Then you lay the bodice on top, with its bottom edge (finished with bias tape) aligned with the skirt's raw edge, and its center front touching the center front of the skirt.

Then you pin the skirt to the bodice pretty roughly, from the center front out to each side for an inch or two. Then lift up the skirt, and pin the edge of one placket to the edge of one end of the bodice, and do the same with the other edge. Add a few extra pins to hold the rest to the skirt.

Now you distribute the gathers. It's easiest to start at the back.

Early Regency skirts had the most gathers at the back. So at one placket edge, distribute the gathers most heavily from there to the first marking out from the placket edge of the bodice. Pin the skirt to the bodice as you go. Try to pin in the valleys of the gathers rather than on the peaks. Do the same for the other placket edge.

Flip the skirt over to the front. Distribute a good bit of the gathers front the center front to the marks that are three inches to either side of the center front. You don't want it as full as in the back, but not scanty.

At the sides between the marks front and back, use the most minimal of gathers.

Why do it this way? Why not go flat in front? Because in the 1790s, skirts were still fullish there! Why go skimpy at the sides? Because you still wanted to show a waist, and this looked less poofy.

Now, from here you have several choices.

If you are going by machine, you can sew down the gathers as they are. Go carefully, trying not to smoosh or bunch up the gathers. Sew just outside (towards the skirt's raw edge) of the gathering stitches, and sew them just up from the bottom of the bodice. You will have raw edges on the inside of the skirt.

I frankly prefer to whip the skirt to the bodice by hand, instead. To do this, I lay the the two edges to be attached together, and then whip stitch them to each other, using very small stitches just inside the edges of both pieces. Not sure how to whip stitch? It's an ancient stitch, and the tutorial at the Medieval Tailor is quite nice. Or you could try the "Attack Laurel" method of whip stitching, illustrated in her excellent article, "The Elizabethan Seam".

Why qhip stitches? The whip stitches act like little hinges and the skirt hangs beautifully, with no seam line, no bulk. In the mid-century petticoat I whipped every gather, but if you are in a hurry, you can whip every 1/8 inch or so and be just fine.

Feeling a little iffy about raw edges? Encase the gathers in bias tape, and stitch the tape down down by hand or by machine, again just outside of the gathering stitches.

Then either sew the tape to the bodice or whip it to the bodice.

Either way, you now have a completed bodiced petticoat. Polly said it was very comfortable. It provided good support and was cooler than something made of synthetics.

Our only remaining fitting issue: she continued to lose weight, so the petticoat meets at the back when laced and the cups are too big, so that we had to take in the straps a week. My advice? Make the thing at least a size too small!

Soon as I can get the petticoat back from Polly for a photo shoot, I will add pictures of it here.

Wearing the Petticoat

Wondering how to lace the petticoat? Again, I need to show pictures, but frankly, La Couturiere Parisienne shows how to do it best in a diagram in How to Make 18th Century Stays: Wear and Care. You can get more of the history at The Zen of Spiral Lacing.

At last, we are done.

On to finishing the documentation on Polly's block print robe and petticoat and my white silk robe and petticoat!