Last I wrote about this project, I had attached the sleeves to the lingerie dress bodice and had added cuffs of antique whitework lace.
The next step was to attach the bodice and the skirt together. By 1909 or so, from what I understand, dresses were beginning to be constructed with interior belting to which bodice and skirt were sewn. This belting could be in many widths, and often the bodice and skirt were merely tacked to it; the wearer added a sash to conceal the join.
While the use of belting seems strange at first, it makes a lot of sense to me now because so many dresses and gowns were made of diaphanous or fragile fabrics that would have pulled or even torn had bodice and skirt been sewn to each other directly. The belting, made of stronger material, took the strain.
I've learned a lot about belting - how it was used, where to get it - while constructing a
wool Beatrix skirt in 2008; you can get the details there. (By the way, thanks again to everyone on
Sense and Sensibility: you all helped me understand belting so much better!)
Today we can use petersham ribbon for the belting. However, as you will see in a bit, you might consider using a muslin band for some garments. To all appearances, this is what an original dress in my collection used.
I used petersham. It doesn't come in as many widths as did the original belting, but because it is woven with picots at each edge, it can be shaped and curved to the body, unlike regular ribbon.
Judith M Hats and Millinery Supplies carries it.
Preparing Bodice and Skirt for Joining...an Unexpected Problem
Before I started the joining work, I tried on the bodice and skirt for fit, with the help of my friend Jane. Yarggghh! The bodice was so large, and the skirt waist, too! It took a moment to realize what had happened. When I started the dress in March 2008 -- yes, more than a year ago -- I was still carrying baby weight. During the fitting I learned I'd lost some two inches at the waist and above!
Happy me, sad me. Nice to be smaller, sad to see yet another obstacle to finishing this dress.
Jane took two pleats at the back panels of the skirt and basted them in with red thread; you may see them in pictures below if you look carefully. Then we marked the bodice too, and I unpicked the French seams, redrew the fitting lines, and redid the seams. Resewing the seams meant that I had to remove the trim so carefully applied to the waistline. Growl. I should have waited until the bodice and skirt were joined anyway, before adding it to begin with.
Fitting the Skirt to the Interior Belting
What follows is a visual essay in the art of fitting a full-length, heavy linen skirt to petersham belting. Essay it is, too. An essay is by definition a try, and this is a try at getting it right.
As always, please click on the images to get a larger version.
Examining Construction Using a Period Lingerie Dress
For how-to help, I turned to a period lingerie dress made, I think, of lightest batiste, which I bought last fall for a song...it's so damaged it cannot be worn but it's a pretty piece nonetheless and perfect for study. Please note that I did not take the original apart, so at one or two points I am guessing at construction, yet I think I have it pretty close. So, here we go.
The above is an original white lingerie dress made of what looks like batiste or lawn, trimmed with wide lace panels. It's about 49 inches long and very small in the waist, and may have belonged to a teenager. It is damaged: a portion of the right sleeve is missing, part of the front has come unsewn, and it has several period darns. I am giving it a wide date range of 1910-1920, because I am having trouble dating it. It features the lower neckline of 1910 and after, and the shoulder bretelles so fashionable in the early 1910s, and the wide lace horizontal skirt trim of that date, too, but if it were made for an adult by chance, it would have to date later since it is not full length. Any help in dating it would be greatly appreciated!


The shoulder bretelles are hard to make out here: the lace panels (two widths of lace carefully stitched together) were originally gathered and tacked, none too neatly, at the waistline. Here above is the dress with the bretelles gathered into what would have been their original position. The shot above shows the back closure of the dress, with the bretelles casually tacked into place. Again, a sash would have been worn to cover up all this mess.
A few years ago I would have said that someone with few skills had altered the dress, but having seen a number of garments online made the same way, I know now that this was just how it could be done.
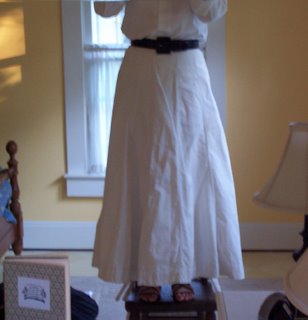
Here above is the interior of the dress, showing the belt in the position it would have been worn. The skirt fabric is folded over the top of the belt, with about 3/4" on the front of the belt, and the rest hanging down behind, and sewed down. The dress bodice is gathered, laid over the belt, and tacked down. The bodice fabric covers the portion of the skirt fabric that is sewn to the belt...you would hardly know it is there.
Note: Just below the belting and just to right center of the photo, you can see a period darn made to the skirt fabric. This is one of several darns. The dress must have been well-loved: the worn or ripped spot would have been right on the front of the dress.
Here above is the interior of the dress, with the belt flipped upwards. As usual, if you click on the image you will get a larger version. There is what appears to be a doubled band of batiste covering the belting, sewn down with giant basting stitches. I am not sure of its purpose.
I have folded down a portion of this fabric covering the belting so you can see the belting itself. The belting appears to be a doubled piece of muslin, not a commercial belting or tape. It is very lightweight, very thin, of a loose weave.
This is important. Texts I have read refer to using purchased belting, but here is a dress with what seems to be plain muslin belting. Certainly with a dress as lightweight as this one (it is nearly sheer and weightless), you wouldn't need something heavy to attach the dress to, just something stronger than the extra-thin dress fabric. Therefore, if you are designing a lightweight lingerie dress, making your own muslin belt may be an option.
How I translated this apparent construction method in my dress is covered next.
Attaching the Lingerie Skirt to the Belting
First, I determined the relative height of the belting on the completed dress. I needed to try on the bodice and the skirt to do this. Sadly, I do not have an image.
Then, as shown in the photo above, I set the skirt on my dress form up higher than it is supposed to sit...higher by the width of the belting. (When worn, I hope that the dress will sit about 1 inch above the natural waistline.)
Leaving the skirt on the dress form, I traced a chalk line along the top of the skirt right on the dress form, and then removed the skirt from the form. In the photo above, I've finished making the chalk line, and have pulled the skirt down a bit. The lower of the two chalk lines marks where the skirt was set.

I've looked at a number of original bodices and dresses, either in person or online, and have noted that the skirt back is usually a little higher than the front. That straight-fronted corset, which was beginning to go out in 1909, still had an effect on the set of the skirt. Therefore, I redrew the chalk line so that the back angled up a bit. In the photo above, that's the upper of the chalk lines. The higher set of the skirt in back, will, I hope keep the dress line from looking draggy when the dress is worn.
Here above is a little side-trip...our kitty Ladybug, interested in the goings-on!
Then, as shown in the image above, I pinned the belting to the dress form, setting the top of the belt along the chalk line. After the skirt is attached to the belt, the belt will be folded down. That means that the waistline will still be above the natural waist by about one inch.
After this I pulled the skirt, right side out, onto the dress form and over the belting, lining up the top of the skirt with the top of the belting. I pinned the skirt to the belting, and then basted the skirt to the belting, with good strong basting stitches. It helped to hold one hand under the skirt and belting to get the needle through both skirt and belting without sewing through the dress form cover, too! You can see the work in the photo above.
I made sure that I pinned and sewed the ends of the belting carefully to the placket opening.
I could have put the belting at the height I wanted it to sit, then have drawn the skirt up from behind the belt, folded it over the top to the front of the belt, and then pinned and basted it. Yet can you imagine trying to unpin a bit of belting from the dress form, tug up a length of heavy skirt fabric under the belt, fold it on top of the belt, pin it there, and then pin the belting back to the dress form, without letting either belt or skirt slip? I am not that talented.
So I did it my way...
After the skirt was securely basted to the belting, I removed all pins, and stitched the belting to the skirt about 1/4" from the top of the belting.
Then I trimmed off the skirt fabric below the stitching. The lingerie dress I have appears to be done this way, and certainly it means one less layer of fabric at a key portion of your midsection.
The last picture, above, shows the back closure of the skirt. The skirt is right side out. Part of the belting has been folded down to the inside of the skirt, in the position it will sit when worn!
Voila, skirt attached!
The next step will be to turn the skirt inside out and to tack the bodice to the belting. I will leave that for the next post...since I have to actually do it.

 Here is an informal picnic of 1910 or after, as judged by the women's straight-silhouetted dresses and lower necklines. As described by Lovedaylemon on Flickr, this was "a relaxed picnic with cups of tea, sandwiches, fairy cakes and a substantal fruit cake. " You can see a bridge in the background. Larger version
 Here is a garden party of around the same period. It's a more formal occasion and may be cooler out...hence the women are wearing suits and hats. From Lovedaylemon on Flickr. Larger version
 These folks are having tea out in a fenced field. Lovedaylemon doesn't know if the tent is for sleeping or just shelter, but I would vote for the latter. The ladies hats are quite nice, and it seems a bit nippy out, as some women are in jacketed suits. Larger version
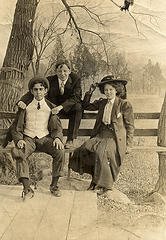
 Lovedaylemon titled this photo "Having tea by the sea". Our sitters must have been at a nice spot indeed, for they are very fashionably dressed, their hats ostrich-plumed, the lady on the right in a suit with lovely necklace, the lady on the left in an Empire-styled, high-waisted and very form-fitting dress. This photo would have been 1909-1912 or so judging by the styling. Larger version
 By contrast, these young people, who had their photo taken and turned into a postcard on August 3, 1906, were of a less fashionable bent. Do read the postcard on Flickr; it's really neat. In 1906, women's dress was still pigeon-breasted and pouchy in the bodice, and separate lingerie blouse and skirt combinations were very popular. Only one lady here wears a matched bodice and skirt. Hats are smaller, and here, at this seaside resort and worn by less fashionable people, are less bedecked. However, the ladies wear their white gloves (note the three lines of stitching atop the gloves of the lady on the left). Larger version
 Young people picnic in a rocky field, their table a big boulder. What a nice spread they have: a layered spongecake, something in a bowl, tea in pretty cups. This is probably before 1910, as some of the girls wear jumpers over their blouses, and the blouses are quite blousy and high-necked; some wear menswear-inspired shirtwaist blouses. Larger version
 This photo was in an album marked 1905 and was taken in South Africa. How dry the woods seem, but how comfortable the company. The pancake-like, tipped-up-high hats are neat, and all the women wear white blouses. By ookami-dou, on Flickr. Larger version
 This is a favorite photo. I would guess the family is washing their picnic dishes at a large lake or very rapid stream, judging from the little waves lapping the shingled shoreline. Whoever took the picture must have been on a dock or in a boat, or perhaps wading! It is such a happy scene, and the relaxed attitudes of those in the picture radiate peace. I'd date the photo after 1897 and before 1908, based on the pompadour hairstyles, the narrow-hipped, many-paneled and wide sweeping skirts, and the high necklines. Fullish sleeves were popular on and off through the first decade. Original posted by Otisourcat on Flickr.