 Hooray, almost finished with the corset cover! Just have to add buttonholes and the internal waist tape, and it's done. Meantime, I have added the lace to the neckline and armcyes (armholes), which was a bit of an adventure in itself.
At left, the corset cover as it stands now. The internal waist tape is not pulling in the waist as much as it will, and the front is pinned together.
Adding Lace, the Long, Hard Way
Perhaps I was a bit silly, but I was bound and determined to have as finely finished an effect inside as outside the corset cover. No raw edges, nothing to fray, and everything as neat as neat.
Even after reading the directions out of the 1917 guide American Dressmaking Step by Step (on vintagesewing.info) that say that you can hide raw edges on beading, I didn't "get" it.
So here's how to do it the long way.
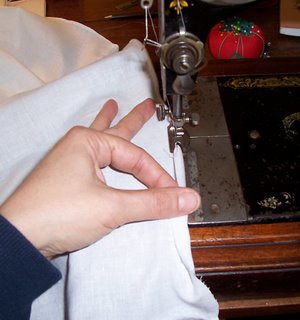
 Hem the edge to be decorated with as tiny a hem as you can manage. My Singer handcrank has an attachment that can do a 1/8 inch full hem.
 Hem the edge to be decorated with as tiny a hem as you can manage. My Singer handcrank has an attachment that can do a 1/8 inch full hem.
 It's impossible to do around the seams, though, so you have to stop near these edges and hand hem them afterwards. Not terribly efficient.
Once you have a well-fitting pattern, might as well hem each piece BEFORE you seam the pieces.
Above or left, the Singer VS 27 handcrank with the small hemmer in operation.
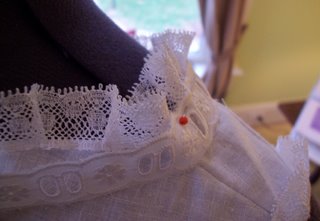
Measure the lace so that it reaches 1 and 1/2 times around the edge to be decorated. Gather it by sewing in the little margin (it's about 1/8 inch wide and looks like a mini selvedge edge). I ended up arranging the gathers so they looked a little bit like open inverted box pleats or ruching and very much like the effect!
 Then baste the lace to the the edge of the area to be decorated, with raw edge of lace on top of right side of fabric, and its selvage next to the outer edge of the fabric.
 After that, cover this tiny basted seam with beading (sewn with a seam to each side of it) so there are no edges showing. You have to fold out the lace so it sticks out over the edge of the fabric. This is fiddly work! Too fiddly, I say.
Above or left, the lace being pinned to the neckline.
Adding Lace, the Easier Way
The easier way also results in no hem inside and probably a flatter, slightly less bulky result. If only I had read those instructions more closely!
Here's what you do.
On the fabric to be decorated, say a neckline, fold the raw edge from the inside to the outside and baste it flat against the right side. Now inside you have a perfectly smooth surface, no hem, no edges.
On the outside, now gather the lace and once again baste it to the edge...but this time, face the lace so that its pretty edge already falls out over the edge of the garment, and the selvedge edge is sitting on top of that raw turned-in edge. Baste down.


Then baste and sew the beading (one row of stitching to each side) over the combo of the basted lace selvedge edge and the raw edge of turned over neckline hem and voila...all nice and neat and tidy.
Man, did I feel silly! I was just fixated on internal hems and didn't realize I could do them externally as neatly. Oh well.
Next up, the buttonholes and buttons. Until then, bye now!
At left or above, my kitty ZipZip asleep on a chaise in the March sunshine. She's in my lap right now, too.

No comments:
Post a Comment