Resources and Blogs

Friday, March 31, 2006

Narrow-Hemming the Bottoms of Seamed Garments: Advice from TreadleOnions

In the Corset Cover Dress Diary posts I wrote about having trouble creating fine machine hems around the bottom of the corset cover. The seams connecting the fronts and backs of the garment kept clogging the hemmer because the amount of fabric was too much. I wrote,

"It's impossible to do around the seams, though, so you have to stop near these eges and hand hem them afterwards. Not terribly efficient. Once you have a well-fitting pattern, might as well hem each piece BEFORE you seam the pieces."

So I asked the folks on TreadleOn, a super-duper online community for those who use treadle machines. Always warm and helpful, several Onions gave me tips on how they deal with the issue. I've reproduced several of them here, with a few edits for context.
  • The way my grandmother taught me to do this is to clip a triangle off the seams with the widest point being at the seam itself, and the point being about 1/4" up into the seam. That leaves less fabric for the hemmer to have to turn and stitch, and works about 99% of the time. On lightweight fabrics, batise or light cotton, it works 100% of the time because there isn't that much bulk there in the first place. By just snipping 1/4", almost the entire snipped area is inside the hem, and if you press the seam open before running it through the hemmer, it's even less bulk.

    If you're doing heavier than light fabric, you should hand-crease the narrow hem at the seam so it will feed through the attachment properly.
    Marilyn S.SE TX
  • I'm not sure how they did it in the bad old days, but when I cross seams with my narrow hemmer, I first make sure those seams are trimmed to reduce bulk. I usually cut a triangle from each one, such that it tapers from regular width to nothing at the raw edge. Then when I am sewing along and get close, I stop and remove the hem from the "curl" of the foot. Using my fingers, I fold the hem as narrow and as flat as I can over the seam, then stitch across it as neatly as I possible, with the foot riding totally on top of the hem. Once past the seam, I stop and re-insert the fold into the "curl" and proceed to the next obstruction.
    Jennifer, Calgary, AB
  • I usually [do] the tuck[ing] or hem[ming] before sewing the seams. Recently I tried it the other way on a petticoat and it just didn't work. I usually finish my seams by pressing the seam open and then turning each seam allowance under and stitching down the folded edge. Not period authentic, but it looks nice and wears well.
    Annie, Pennsylvania
Thank you, Onions!

From the Rag Bag: a Scrap Quilt for a Baby

My sister Julie and her husband are expecting a baby boy, so I thought they might need a quilt for June Bug, as they're calling him.

Not a fancy quilt for display, but a hard-working utility quilt that he can play on and drag around, and that can be tossed in the wash. So, taking a page out of the past, I resorted to the rag bag and have assembled the simplest of quilt tops.

At left, the completed quilt top

Rag Bags

Rag bags used to be common: when clothes and other textiles outlived their original uses or began to look tatty, they'd be recycled. Small pieces would end up in a rag bag to be pulled out later to live again as cleaning rags or quilt block pieces.

Over time I've filled quite a fat rag bag. Any piece of clothing too ratty to be given to charity was cut up and the buttons and zippers saved for reuse. For this quilt I pulled from the bag remnants from some of my husband's old striped oxford shirts, a couple of pairs of jeans and other slacks, and bits of fabric left over from a skirted table project.

Piecing the Quilt

Each quilt block is just one piece of fabric, cut 5 inches square. Once all the pieces were cut, I laid them on the floor and played around until I got a pattern I liked.

At left, two samples of blocks sewn together into strips.

Then I sewed strips of blocks together, making the seam allowance the width between needle and edge of the presser foot, which is about a quarter of an inch. After that I sewed the strips together.

I only had to pay careful attention to a few things. I had to line up the blocks on each row when sewing the strips of blocks together. No matter how careful I was, not all blocks were exactly 5 inches square. After all, I used scissors when cutting them, not a rotary cutting wheel, and they were cut out of bits of fabric, not nice neat "fat quarters" meant for quilting. To make up for this I pinned the each strip to the next very carefully, easing each block to fit to the next, easing just like I might a curved seam on a collar. It worked pretty well! Only one row is rather too far off.

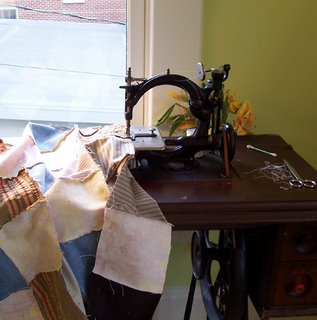
At left, the strips of blocks are sewn together on the Willcox and Gibbs chainstitch treadle machine.
  • I also had to make sure all the seams butted up to one another in the same direction throughout. Careful pressing of the seams all to the same side before sewing helped.

Now it's time to embroider "June Bug" on a block and then add a thin cotton batting and a backing of plain blue check fabric. I will bind the outside edges with a heavy-duty quilt binding.

Wednesday, March 29, 2006

An Edwardian 1911 Corset Cover Dress Diary, Part 3: finished!

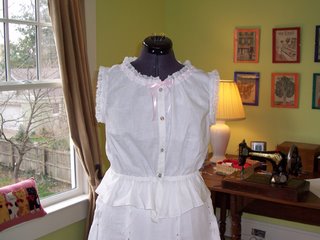
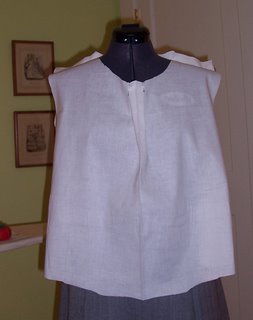
The corset cover is complete. Here it is at left. Compare this image to the photograph of the original in the 1911 textbook I drafted it from, which appears below. I think they are quite close, with one exception. I have a 30-inch waist, and the original was for a 24-inch waist. The cover is comfortable to wear, and fits as it should, which is a relief! I believe this is a typical schoolgirl-type corset cover, utilitarian and effective under opaque shirtwaists or bodices, but not meant for dress-up wear by any means. 

Lessons Learned...for Next Time
  • Unlike many popular corset covers of the period, on this one the shoulders are quite wide. Next round I would cut them in so that the lace and fabric didn't come out over the shoulder curve. When wearing a tight sleeve the extra fabric would tend to get in the way.
  • I would retain the front fullness in this pattern. Worn under an original sheer batiste shirtwaist of bloused cut, the cover helps to hold out the front fullness nicely. By this point some shirtwaists still had a bit of blousing, while others were smooth-fronted. Speaking of which, those shirtwaists are awfully fashionable in 2006. The lace, the sheerness -- worn with a cami (just a modern version of a corset cover) it could have been made today! CAbi in fact has a blouse in their line this spring that could have been made between 1912-1920.
  • The peplum is also useful as it helps to hold the cover in place under a skirt waistband. Practical!
  • For this trial piece I used plain, 99-cent 100% cotton muslin. Next time I would use a fine 199% cotton batiste. The muslin is too heavy, and the threads and weave too coarse to be attractive under a lawn, handkerchief linen, or batiste shirtwaist, especially a vintage one. All of these fabrics are really, really sheer. So the inferior grade of the muslin beneath is apparent. Further, it's too stiff by comparison and again, you can actually see that the two "don't go" when worn together. Above, the original corset cover, from Text-Book on Domestic Art, 1911, p. 87. Available on Cornell University HEARTH site.
  • The lace I used, while cotton, is also too stiff. Washing it a great deal might help, but in future I will use a finer, thinner lace that won't frill so aggressively under a fine lawn shirtwaist.
  • I'd wear this sort of pattern only under bloused shirtwaists. A much smoother, lower-fronted, and closer-cut version would be appropriate with a dress.

Tuesday, March 21, 2006

Digitized Collections of 19th and 20th Century Catalogs, Manuscripts and Ephemera

If you are interested in period advertisements, catalogs, magazines, scrapbooks, diaries, and ephemera, do see the digitized collections that Harvard and Duke University have online.

Women Working: 1800-1930, Harvard University Open Collections

As Harvard describes it:

Women Working, 1800 - 1930 focuses on women's role in the United States economy and provides access to digitized historical, manuscript, and image resources selected from Harvard University's library and museum collections. The collection features approximately 500,000 digitized pages and images including:
7,500 pages of manuscripts
3,500 books and pamphlets
1,200 photographs


Includes such representative items as


  • Dorcas Magazine (crocheting and knitting, 19th c), (some issues)
  • Ladies Home Journal, (some issues)
  • Woman's Home Companion, (some issues)
  • Abercrombie and Fitch 1913 Styles catalog,
  • and the diary of Delia Kinglsey, school teacher (1906-1910).

Visit the site! See http://ocp.hul.harvard.edu/ww/

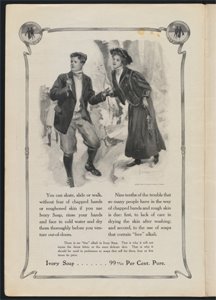
Above: Ivory Soap advertisement from Woman's Home Companion, January 1909, Harvard Digital Collections

Digitized Collections, Duke University

Part of the Rare Book, Manuscript, and Special Collections Library. Includes items such as

  • "9,000 advertising items and publications dating from 1850 to 1920"
  • 19th century sheet music!
  • writings and diaries of African-American and Civil War women

Visit the site! See http://library.duke.edu/specialcollections/collections/digitized/index.html

Super resources for researching and understanding fashion!

Thursday, March 16, 2006

An Edwardian 1911 Corset Cover Dress Diary, Part 2

Hooray, almost finished with the corset cover! Just have to add buttonholes and the internal waist tape, and it's done. Meantime, I have added the lace to the neckline and armcyes (armholes), which was a bit of an adventure in itself. At left, the corset cover as it stands now. The internal waist tape is not pulling in the waist as much as it will, and the front is pinned together. 

Adding Lace, the Long, Hard Way 

Perhaps I was a bit silly, but I was bound and determined to have as finely finished an effect inside as outside the corset cover. No raw edges, nothing to fray, and everything as neat as neat. 

Even after reading the directions out of the 1917 guide American Dressmaking Step by Step (on vintagesewing.info) that say that you can hide raw edges on beading, I didn't "get" it. 

So here's how to do it the long way. Hem the edge to be decorated with as tiny a hem as you can manage. My Singer handcrank has an attachment that can do a 1/8 inch full hem. 

It's impossible to do around the seams, though, so you have to stop near these edges and hand hem them afterwards. Not terribly efficient. 

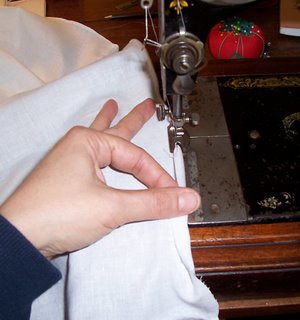
Once you have a well-fitting pattern, might as well hem each piece BEFORE you seam the pieces. Above or left, the Singer VS 27 handcrank with the small hemmer in operation. 

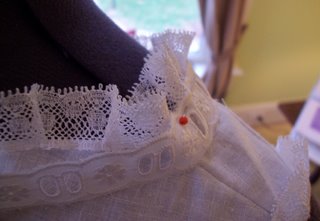
Measure the lace so that it reaches 1 and 1/2 times around the edge to be decorated. Gather it by sewing in the little margin (it's about 1/8 inch wide and looks like a mini selvedge edge). I ended up arranging the gathers so they looked a little bit like open inverted box pleats or ruching and very much like the effect! 


Then baste the lace to the the edge of the area to be decorated, with raw edge of lace on top of right side of fabric, and its selvage next to the outer edge of the fabric. 

After that, cover this tiny basted seam with beading (sewn with a seam to each side of it) so there are no edges showing. You have to fold out the lace so it sticks out over the edge of the fabric. This is fiddly work! Too fiddly, I say. Above or left, the lace being pinned to the neckline. 

Adding Lace, the Easier Way

The easier way also results in no hem inside and probably a flatter, slightly less bulky result. If only I had read those instructions more closely! Here's what you do. 

On the fabric to be decorated, say a neckline, fold the raw edge from the inside to the outside and baste it flat against the right side. Now inside you have a perfectly smooth surface, no hem, no edges. 

On the outside, now gather the lace and once again baste it to the edge...but this time, face the lace so that its pretty edge already falls out over the edge of the garment, and the selvedge edge is sitting on top of that raw turned-in edge. Baste down.

Then baste and sew the beading (one row of stitching to each side) over the combo of the basted lace selvedge edge and the raw edge of turned over neckline hem and voila...all nice and neat and tidy. 

Man, did I feel silly! I was just fixated on internal hems and didn't realize I could do them externally as neatly. Oh well. Next up, the buttonholes and buttons. Until then, bye now! At left or above, my kitty ZipZip asleep on a chaise in the March sunshine. She's in my lap right now, too.

Tuesday, March 07, 2006

An Edwardian 1911 Corset Cover Dress Diary, Part 1

The latest project: drafting and constructing a circa 1911 simple corset cover of muslin. 

Just a reminder of how someone might have worn one. The 1905 Butterick sewing book I have a reprint of states on p. 33, "for ordinary waists [shirtwaists]...a well-fitted corset cover answers about the same purpose as a lining [on a fancy bodice]." So one would put on a chemise and knickers, or a "combinations" instead, then the corset, then one of these corset covers and a petticoat, then the shirtwaist and skirt on top. (Above, the corset cover partially assembled. Set on the stand inside out, I have basted the channel for the drawstring tape over the waistline gathers.) 

Once again, I am using the 1911 manual, Textbook on Domestic Art, as the source for making up this garment. See the Cornell University HEARTH site, and browse for it. You can view and download each page. The directions appear on pp. 86-96, and comprise
  • measuring for a basic shirtwaist pattern,
  • drafting it up into a pattern and adjusting it to a corset cover,
  • cutting the fabric,
  • and step by step construction and finishing;
  • a photo of the finished product is included.

This particular pattern produces a corset cover with an interior waist drawstring or "tape", and then a short peplum that helps keep the corset cover in place. Many corset covers don't have such a peplum; you can easily find them on Ebay. 

The textbook photo shows a simply trimmed garment with modest lace at neck and armholes, and the directions say that armholes could be simply bound with bias tape, although you could make a corset cover with all kinds of decoration from tucks to beading, or make it of eyelet fabric.

(Above, the corset cover with waistline tape channel pinned to it, from the back)

Drafting the Pattern

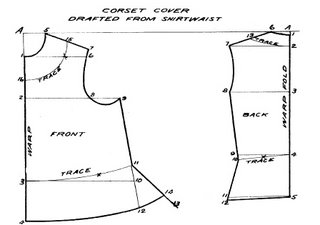
The pattern only requires two pattern pieces, front and back...but the front is split into two pieces for a total of three pieces. I drafted it in about two hours, including checking it and cutting it. Remember though that I am a slow worker; someone with a bit more experience could knock it out rapidly. There is also an oblong piece of fabric that you cut out to make the channel for the interior tape or drawstring to go through.

The "model" measurements for this pattern are about 15" across the shoulders and and a 24" waist. My 30" waist circumference resulted in a more boxy-shaped pattern, but the result on the mannequin still looks good.

(Above: the pattern draft sample as it appears in the textbook. The numbers are drafting points you use to build your own draft, not measurements.)

Notes on Cutting and Construction

  • If you're unsure of your drafting skills, leave about an inch or so all around as seam allowance so that you can alter as necessary.
  • When you have cut out both fronts and backs, mark the right side of the fabric carefully (with something that will wash out) too. Then pin the shoulders and sides, with the right sides on the outside, wrong sides together. Now, most directions would say, do this on the wrong side of the fabric. Not this time! You'll be sewing French seams, for which the first seam is on the right side of the fabric!
  • Once it's pinned and you're happy with the fit, then baste it, again, wrong sides together. Um, I didn't pay attention, and on autopilot, pinned and basted wrong sides together. So when it came time to make French seams, I had no markings to work with. I had to take everything out and start over. Whoops. Don't make the same mistake! (Above, the corset cover pieces pinned up for initial fit. I have yet to cut the front into two halves; a tester box pleat is set up to mimic the button hole pleat.)
  • I found that pinning and basting on the dress form felt good after a first few minutes of feeling strange.
  • The corset cover closes in front with four small pearl buttons. The right front, that holds the button holes, is constructed with a "box plait", which turns out to look an awful lot like the narrow sewn-down pleat (sewn down on both vertical sides) that seems to make up the fronts of many men's and women's shirts. The result is that you have several layers to support those button holes so they won't rip.
  • After you make up the box pleat, do up the French seams on sides and shoulders. To make these seams: run the first seam 1/4 inch out towards the edge of the fabric. from the seam line. Then, trim the seam allowance pretty close to that seam stitching. Then, turn fabric so that right sides are together, and run a second seam on the real seam line to enclose the raw edges inside it. Press the resulting seam so that it faces towards the inside back of the garment. Whoo! Yes, after awhile it seems more natural to do this, and it sure has a nice, tidy, luxe effect.
  • Put the corset cover back on the dress form, this time inside out. On your pattern draft, you'll have made a series of X's that mark where you should gather the waist together. Silly me, I didn't follow directions. I gathered the full back, instead of just in the center of the back. Silly me again, on the front I gathered from the sides halfway to the front, instead of just across the center of the front. Once again, had to pull it out and do it over. (Above, closeup of front, with waistline gathered and tape channel basted. Note that gatherine is not heavy because you don't want the garment to be too poufy.)
  • The text asks you to do two rows of gathers, 1/2 inch apart. Couple of good reasons for this. First, that's the width of the narrow strip of fabric that is sewn from one side of the waist to the other that forms the channel to put the waist tape through. Voila: automatic markings for placing it. Second, you get a more even gather. Just try to make sure that the positioning of your gathering stitches match decently one to the other. I'd tie off the gather at the end you'll be pulling from. On the other end, leave a long string so you can pull your gathers together.
  • Gather as the text suggests, and use the photo as your guide. Then make up that channel strip from the directions, and pin it to the waistline, placing on top of those two rows of gathers. Arrange the gathers one last time, and baste in place.

(Above, the Singer 27 handcrank sewing machine used for this project. It does wonderful tiny stitches and uses really neat attachments, sans electricity.)

That's where I am to date. Back with the final product soon as it's done!